Guide to Iceland national parks

Nearly ALL of Iceland looks like a national park, so families can’t go wrong finding beautiful outdoor experiences on an Iceland vacation with kids. But Iceland national parks do pack in a lot of interesting natural features you won’t want to miss. Here’s what to see in each.

guide to Iceland national parks

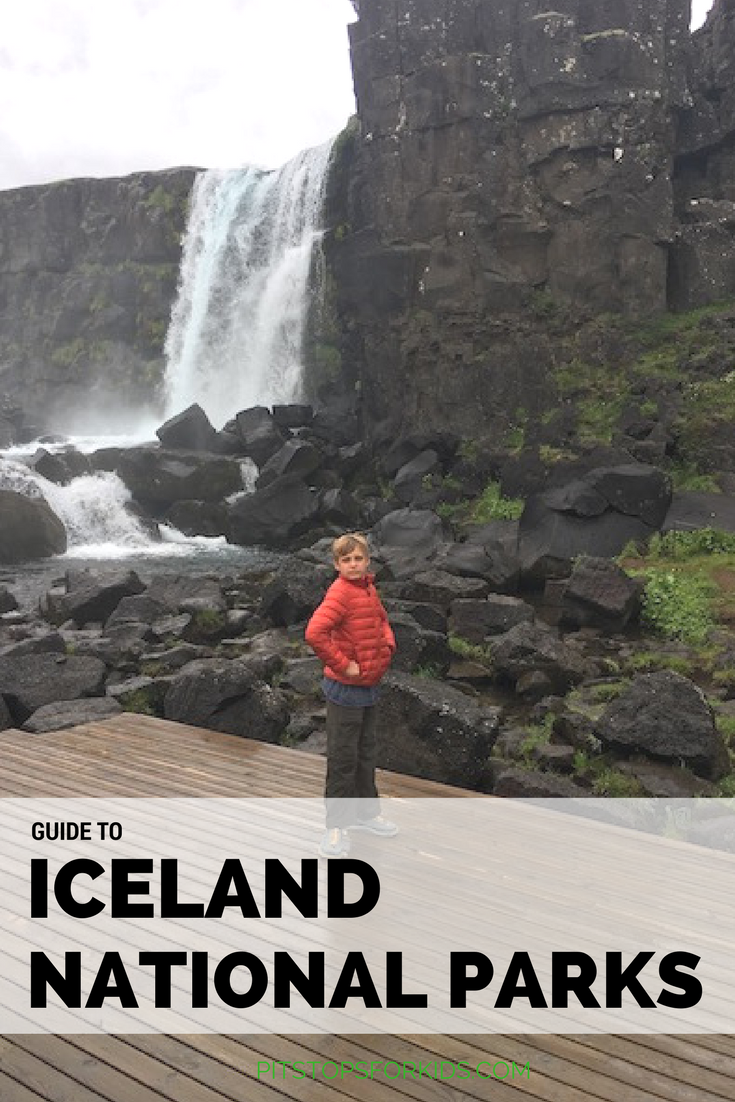
Þingvellir National Park:

Þingvellir is easily accessed from Reykjavik, and is located on the Golden Circle, so expect to share space with plenty of tour buses. However, it’s absolutely worth the trip. Start with the main attractions: the rich Viking history in various sites and the location where you can see the shifting of the tectonic plates (over the course of millions of years). There are several walking paths here (we wouldn’t quite call them hikes), the largest of which will take you up to a viewpoint (which is where they put the visitor center and parking lot, disappointingly) where you can see the deep ravines cut into the landscape. Taking the other paths, you can see Drekkingarhylur pool, the site where women were once drowned for offenses such as adultery, and the waterfall Oxararfoss.

Iceland national park

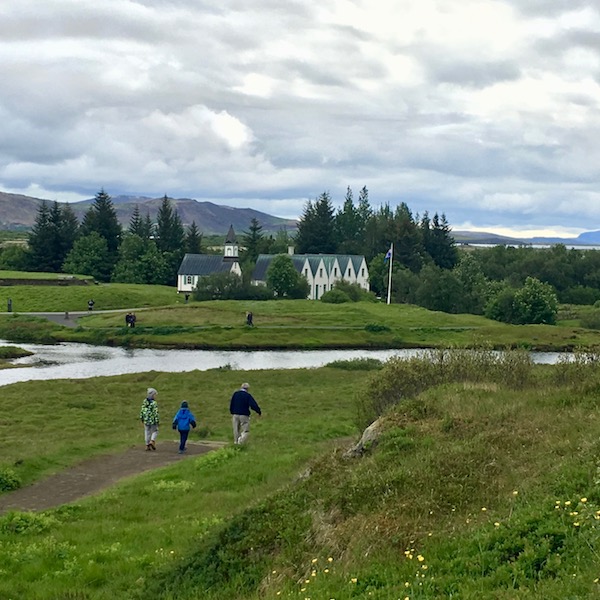
Next, explore the valley and lake, where you’ll see the historic sites, including one of Iceland’s first churches. Along the Oxara River, you can find the ruins of Viking camps, called budir.

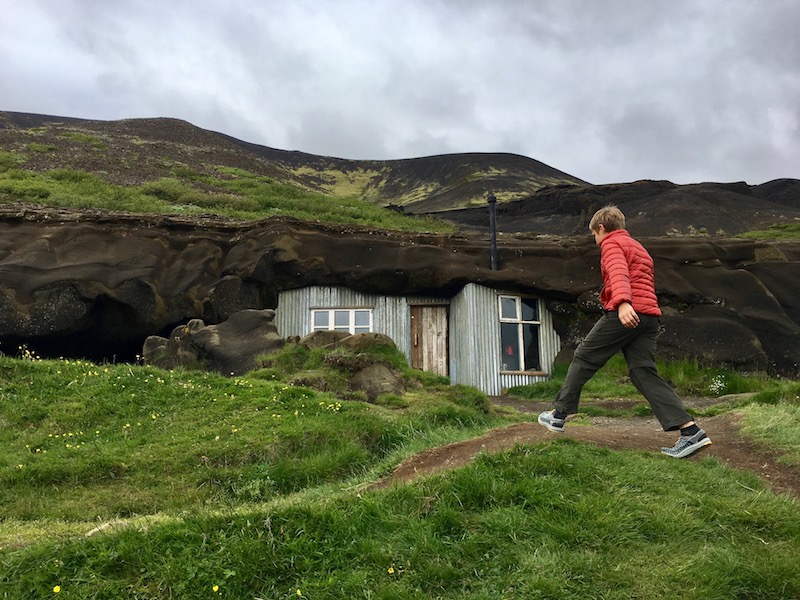
Top extra activity outside the park: Laugarvanshellir Cave People Tour

This lovely tour is still unknown to most tourists (as its new in 2017). Located outside the park on 365 toward Laugarvatn, you’ll see the little house (think hobbit house) cut into the hillside before you arrive at the small parking lot. Go into the tent that houses a small tea room to purchase a tour, which is led by an enthusiastic guide. In fact, days later, our kids commented he was their ‘favorite Icelander they’d met’. The tour takes about 40 minutes, and takes you up the hillside to see the cave an Icelander couple made into a rudimentary home at the turn of the 20th century. Later, another couple inhabited it for a short time. The single room house is historically restored, and includes a sheep barn and cow barn built into the rock. While it’s interesting the see the house, the story behind it is even more fascinating; this really is a story of Icelandic pioneering. Learn more at http://www.thecavepeople.is

iceland cave people

Vatnajokulsthjodgardur National Park:

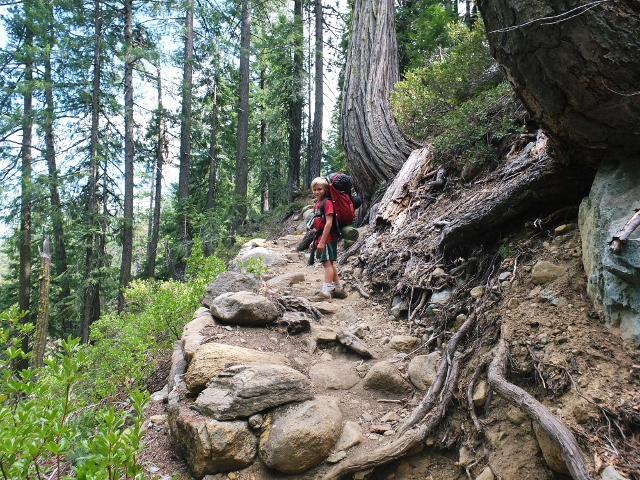
This was our favorite Icelandic national park, thanks to its dramatic volcanic history and glacier. The visitor center at Skaftafell has a lot of good information: start here and pick a day hike to try. We opted for a loop of about 6 km that took us high up the mountain to spectacular views of Iceland’s largest glacier, Skaftafellsjokull, then cut along a high ridgeline to dip back down to stunning Skaftafoss (certainly a highlight of the park). You can opt for shorter hikes, or longer ones, but for any length, be sure to pack many layers for all types of weather, as you’ll be completely exposed to the elements (as you are in most of Iceland).

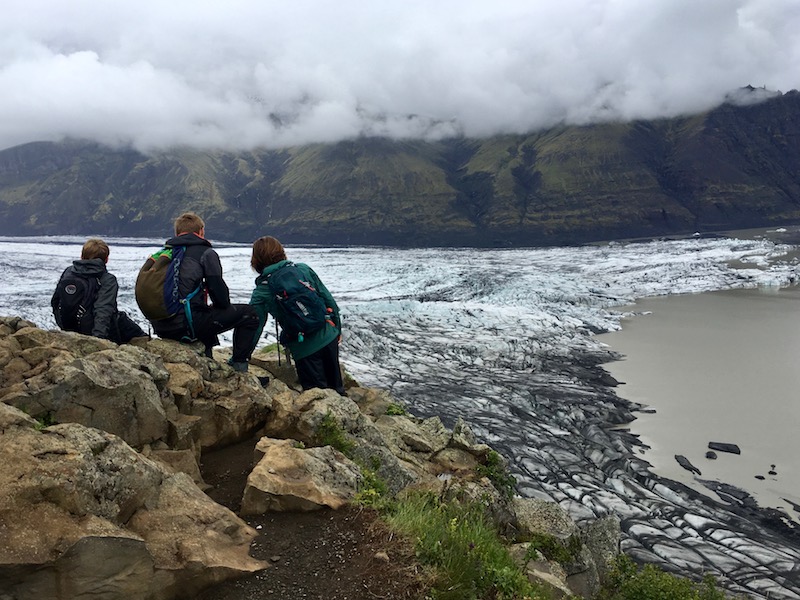
Glacier tour operations are located in the parking lot of the visitor center, which can take you onto the surface of the glacier for about $40-60 per person. You are not permitted to walk on the glacier without a guide, as fissures and cracks can be unpredictable. We opted to skip the glacier tour and were satisfied with our excellent views via the hike.

This national park is pretty massive, and offers plenty of F-road goodness for those venturing north, but families can certainly get a feel for the area from the southernmost Skaftafell entrance without venturing beyond Jokulsarlon glacial lagoon.

Top extra activity outside the park: LAVA Centre

Before you enter the national park, stop at the brand new LAVA Centre located at Hvolsvollur. This highly interactive, tech-heavy museum answered a lot of our questions about the geothermal and volcanic nature of the region, which really helped us understand the lava fields, glaciers, and volcanos we saw the following days. The fairly steep entry price (still on par with entry to other museums we visited) is well worth it: get the family pass if it applies to you, to save some money.

LAVA Centre

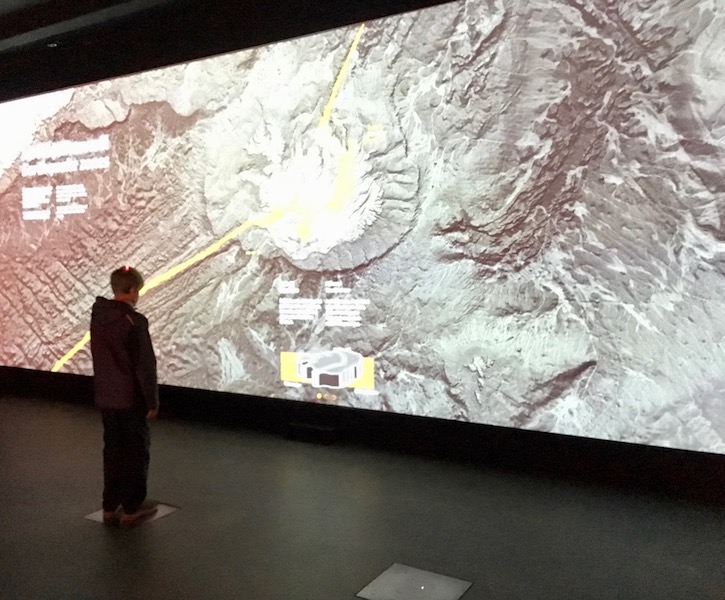
The museum is divided into several rooms you walk through in order, each with hands-on activities and digital displays. It’s truly hard to describe how great these exhibits are, but I’ll try: one room mimics the properties of ash, giving you a taste of how it feels to be blinded by it in an eruption, and another room allows you to spin a giant globe, showing the shifting of tectonic plates over millions of years. Start with the 15 minute film and follow the map through the rooms from there. All displays are in English.

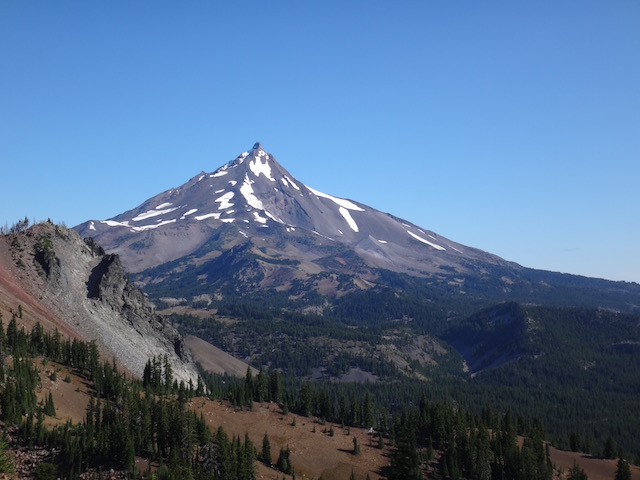
Snæfellsjökull National Park:

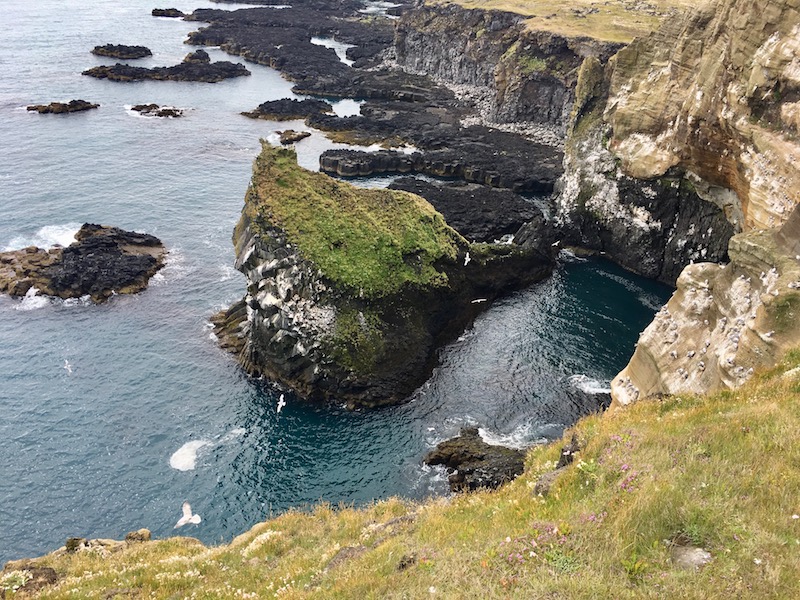
Located on the west side of Iceland on the Snæfellsnes Peninsula, Snæfellsjökull features a big daddy volcano (unfortunately covered in cloud during our visit), as well as black sand beaches with interesting rock formations, caves and lava tubes, and cinder cones. The park is located past the fishing village of Olafsvik, with a visitor center located at the space ship-looking lighthouse about three-fourths of the way through the park. See great views of the ocean and sea stacks here, then book a cave tour a few meters down the road. If you don’t want to spend the money (it’s not cheap), do as we did and take the short self-guided tour of the main cave entrance. All around the cave are smaller lava tubes you can (but probably shouldn’t) climb into.

Iceland

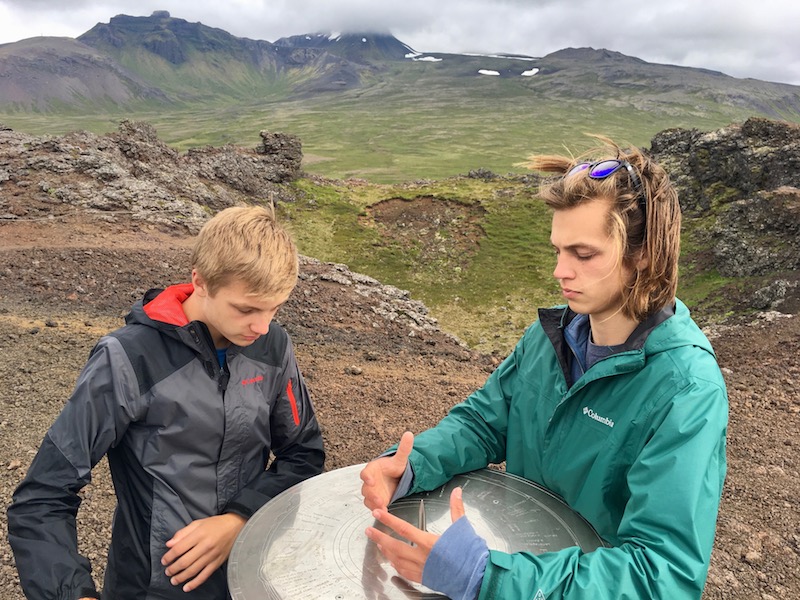
There’s also a well-marked cinder cone in the park, which is an easy climb with metal steps, and affords great views. We loved that at the top, a circular plaque names all the nearby mountains and volcanoes so you can identify each one.

Top extra activity outside the park: Settlement Center 

At the bottom of the peninsula, you’ll first enter Borgarnes on 60. Go to the Settlement Center, one of the best museums in the region. It’s located by the harbor in a warehouse, but inside, you’ll see the history of the Icelandic settlement era and learn more about its famed Sagas.

Beyond the Blue Lagoon: Iceland hot springs off the beaten path

Yep, we went to Iceland for eight days and never went to the Blue Lagoon. Why pay a crazy entry fee to go to an overcrowded geothermal pool, when so many remote, beautiful, and FREE pools exist all over Iceland?

During our camper van road trip in Iceland, we dipped our toes in steaming water every single day, and never paid an entry fee of more than $25 (and usually paid nothing at all).

Where to find Iceland hot springs off the beaten path: 

iceland hot springs

Reykjadalur hot springs river:

In the south, just about 40 minutes outside of Reykjavik, the small town of Hvergerdi offers a 3.5 kilometer hike into the geothermal hills to a hot springs river. Yes, it’s well worth the hike. You’ll climb upward pretty steeply for the first km or so, then work your way up and down over hills with lovely views of the valley below. Eventually, you’ll see steam billowing up, and you’ll quicken your pace, because you’ll know you’re close! At the river, there’s a boardwalk with entry points along the small stream, and a few wooden walls that serve as changing areas. If you follow the boardwalk up, you’ll find the hottest water (so hot it’s almost painful), and as you walk down, you’ll find cooler water (closer to 35-37 C). It’s a lot of fun to move from section to section feeling the different temperatures.

iceland hot springs

If you don’t want to change behind a wall, you can change in the small bathrooms at the little cafe at the start of the hike, or just wear your swimsuit under your hiking wear. Be sure to bring lots of layers, including rain wear, as there’s no protection from the elements (similar to all over Iceland). The hot springs river is free, and does get crowded on the trail (though even in peak season, we found plenty of space in the river to soak).

To get here: Take Route 1 (Ring Road) from Reykjavik to Hvergerdi. Drive through town following the Reykjadalur signage until you get to a gravel road ending in a parking lot.

Seljavallalaug Hidden Hot Spring:

This one may not be so hidden anymore, but it’s still uncrowded. This geothermal pool is located in the middle of nowhere in a tiny valley with green mountains rising dramatically up all around it. The pool was made near the turn of the 20th century, for the purpose of teaching Icelandic children to swim (before the 1920s, unbelievably, most Icelanders could not swim). It has a single pool and rudimentary changing rooms (unisex…it gets interesting). This pool gets some criticism on TripAdvisor and the like, with people calling it dirty. It’s not dirty: it’s rich in algae, natural to Icelandic hot springs. The hike to the pool is only about one km, and our only complaint is that the water is a bit on the cool side (around 35 degrees). Toward the southern end of the pool where the geothermal water flows in, it’s closer to 40 degrees. On a warm day, this is fine, but on the cold, sleeting day we visited, it was painful to get out! This pool is FREE.

iceland hidden hot springs

How to get here: From Route 1, turn down road 242 in the south. Follow the dirt road straight (don’t turn right) and you’ll get to a parking lot with an unused pool about 1/4 mile in. The hike is short into the valley (you can’t see the pool from the parking area though).

Laudar campsite hot pot:

This adorable hot pot (hot tub) is located in the Laudar campsite in west Iceland. The parking lot is at the Hotel Edda, and the walk is just a few meters. There’s a quaint changing hut (unisex, but fewer people are here) and the water is a perfect 38 degrees. You can camp onsite, too, if desired. This hot pot is FREE.

Iceland hot pot

How to get here: From Route 1, take 60 all the way up through the isolated farmlands until you’re above the town of Budardalur. Follow the sign to Laudar.

Secret Lagoon:

So the Secret Lagoon is no secret, but it can be found just outside of the town of Fludir near the Golden Circle. You’ll find a large pool half-formed by natural rock, fed hot water from bubbling geysers nearby. It’s the most expensive pool we visited ($25 per adult), probably because of its proximity to the Golden Circle and its tourism traffic. No matter: it’s worth spending a few hours here.

iceland secret lagoon

How to get here: Take road 30 to Fludir. The sign is just before you enter town. Go down a dirt road for just about a mile.

Hot pot of Flokalaundar:

If you’re willing to drive about two hours (mostly on dirt) from Reykholar in the Westfjords, you’ll arrive at a hot pot nestled right against the sea. Do as the locals do and jump between the warm water (around 38 degrees) and the freezing ocean and back. This hot pot is larger than Laudar but a bit busier. No changing rooms…change in your car or camper. There’s a small parking lot right nearby.

Iceland hot pot

How to get here: From Route 1, take 60 and follow it all the way up into the fjords. Be sure to have a full tank of gas, as there are few services before you reach Flokalaundar. Plan on narrow, steep dirt road for part of the drive. Is it worth it? Yes.

Tip: Can’t get to a natural hot springs one day? Look for a public Icelandic pool! Every town we drove through had their own (look for the water and swimmer signage), and each cost less than $10-$12. Inside each complex, you’ll find a geothermal fed warm outdoor pool (often with waterslides and other features), hot pots, and a steam bath, plus nice changing rooms and hot showers. Talk with locals here, and get to know the real Iceland. Remember to follow custom and shower nude before swimming. Never bring cameras or phones into the pool or changing areas.

Three favorite public Icelandic pools:

Note: Photos are not allowed of Icelandic public pools.

Laugardalslaug: Iceland’s largest public pool complex is only $8 for entry, and in our opinion, beats the heck out of the Blue Lagoon. There are two huge outdoor pools (one is a lap pool, the other has all sorts of features…basketball hoop, big twisty waterslides, climbing ropes, floating platforms, and water toys), four hot pots of various temperatures, a cold plunge, a huge steam bath, a massage area, and a large kiddie pool area. There are spacious and clean locker facilities and hot showers. On the grounds are also sand volleyball courts, exercise equipment, and a ropes course. Laugardalslaug is located in the suburbs of Reykjavik.

Drangsnes: The public pool on the Steingrimsfjordur fjord in the north has all the usual amenities, with a location right on the sea. Best of all, the town has arranged for free hot pots to be placed and maintained right on the beach, should you not need the added amenities of showers.

Kirkjubaejarklaustur: This public pool has views of the town’s pretty waterfall from the hot pots, plus a nice sized swimming pool with small water slide and a kid’s hot pot/wading area. What we loved about this pool was its local vibe: we had the opportunity to talk with many Icelanders here, and all were welcoming.

SaveSave

On a budget? Cruise tips for saving money!

Cruise vacations remain some of the most budget-friendly family vacation options available. While I admit to being quite picky about cruises, experience has taught me that cruises make for excellent multi-generational trips, allowing diverse family groups to have a great time together without extensive effort, stress, time, and, if you do it right, money.

cruise

On a budget: cruise tips! How to save money  (and when it’s worth paying full price):

In travel, just like in anything else, you get what you pay for. However, whether you’re springing for a exotic small-ship adventure cruise or a mega-ship family cruise, within your budget category, it’s absolutely possible to save money. Here’s how:

Cruise in the off-season:

Is there still an off-season in cruising? Yes. Families willing to avoid the busy holiday and summer break periods will snag deals on cruise lines across the board, especially if they’re willing to cruise to the Caribbean or Bahamas during September through mid-November. While this time period sees primarily adult travelers without kids in tow, families able to break free from the traditional school schedule will be rewarded with deals and less crowded ships. While I realize this is not always possible, it’s a great strategy to have in parents’ back pocket.

Take a weekend getaway cruise:

Obviously, the longer your vacation, the more it is apt to cost. Consider a land-cruise combination holiday, or a shorter, weekend-long cruise of 2-3 nights. Cruise lines such as Royal Seas Cruises regularly offer 2-3 night cruises to the Bahamas, which can either whet the appetite for longer journeys or simply serve as a short trip that doesn’t have to break the bank. Naturally, weekend-length cruises are easiest to manage if you live near a cruise port in Florida, where most of these shorter trips depart.

Cruise from a port within driving distance:

You don’t have to live in Florida to take advantage of longer cruise itineraries that depart from cities as diverse as Galveston, New York City, Seattle, Vancouver, and Los Angeles. Additional ports on the eastern seaboard host shorter cruises into the waters of eastern Canada and Europe as well. Picking a cruise based on the port can save hundreds or even thousands of dollars in airfare, and had the added benefit of causing less stress pre-cruise: there’s no worry about missing your cruise due to airline delays or cancellations.

Find the most inclusive cruise in your budget category:

Unless you have incredible will power, it can be hard to resist the many, many upgrades sold on cruise ships. Start fighting this battle by picking the most inclusive cruise you can afford. For instance, many cruise lines charge extra per person for all types of drinks, including soda and tea, while only a handful include these beverages in their base rate (and even fewer include alcoholic drinks). If you must cruise on a less-than-inclusive cruise line, and you can resist these types of packages, bring your own travel water filter along and filter your own drinking water to use in a reusable water bottle (the water in buffets and restaurants onboard cruise ships is potable, but sometimes not very tasty).

Set a daily budget for extras onboard cruise ships, to be put to use at cruise ship arcades, casinos, dining upgrades, and bars. Decide before your trip what extras you won’t be paying for, and then stay away from those areas of the ship. If you enjoy spa treatments, consider booking on less desirable days, such as port days, when discounts are offered on most cruise lines, or the same day you embark on the ship.

Opt out of cruise line excursions:

Booking your excursions via your cruise line is convenient, but more costly than booking them on your own, and almost always a less satisfying travel experience, too. Unless you are very tight on time at your port (in which case only the cruise line’s excursions guarantee you’ll be back in time), book your own getaways off the ship. Read through the cruise line’s offerings, then do some research on your own, finding reputable companies offering similar excursions for less. TripAdvisor and your favorite travel blogs are a good place to start. Often, booking solo will result in a more personalized tour or experience for less money. If you don’t want to plan ahead, exit the port and simply find a local taxi, and ask for a rate for half a day. You may end up with a local tour guide for a personalized experience. If in doubt about reputable taxis or guides, as the tourism police who are almost always stationed at cruise ports.

Should you take a ‘budget’ cruise? 

I personally believe that we all get what we pay for, which is why I’d rather take a shorter cruise or watch my budget more closely on a quality cruise line than take a chance on a budget or bare bones cruise line. That said, I know travelers who have had good experiences on cheap cruises by managing their expectations, being flexible, and enjoying the ride.

Need more tips? Check out our mega guide to cruise vacations!

This story was sponsored by Royal Sea Cruises but the opinions are the author’s own.

SaveSave

Deschutes river rafting with Sun Country Tours

During our recent visit to Pronghorn Club, we were fortunate enough to enjoy the Big Eddy rafting trip with Bend, Oregon’s Sun Country Tours. ‘Short but sweet’, the Big Eddy trip is only 1.5 hours long (2.5 door-to-door from Sun Country) but promises more whitewater than most families see on the average float or raft trip (at least it was more than we had seen!).

Deschutes river rafting:

Our trip began with a short bus ride from Sun Country to the Big Eddy drop-in site on the Deschutes River (near majestic Mt. Bachelor), conducted by a friendly bus driver. Once on the water, we met with our guides (one per raft of 4-6 guests), donned lift jackets and were assigned oars (kids must be taller than the handle to be issued one), then started down the 3 mile stretch of river on the tour. Both the beginning and ending feature calm, still water ideal for swimming, and our guide encouraged the kids (and adults) to jump from the raft and float downstream. The kids especially loved being spun around while standing on the bow of the raft, one at a time.

The river offers a few ‘warm up’ class 1 and 2 rapids before the class 3 Big Eddy, before which the guide pulled us over to the river bank to dock and overlook the rapids before tackling them. The kids loved seeing what we were going to raft, and our guide used the opportunity to instruct the adults in the group on where to paddle and when (though I promptly forgot). Once back on-board our raft, the kids were secured in safe spots (Toby was given a special rope to hold) and we were on our way.

The whitewater of the Big Eddy was truly like a wall after wall of water; we were bounced from crest to crest, and the kids shrieked with more delight on each one! I loved the experience, despite continually looking back in the boat to ensure my kids were still in it! Afterward, everyone was laughing with relief at surviving the thrill (including the six-year-olds in our group who hadn’t been too sure about the whole thing). We celebrated with a few more small rapids, during which the kids were allowed to ‘ride the bull’ (I.E. sit on the front of the bow with no hands). We docked after the last of the rapids, and were transferred back to Sun Country.

Distance from the interstate: Five minutes from Hwy 97.

Cost per person: The Big Eddy tour is $46 per person. Other Sun Country tours start at $73.

Dining options: None. The Big Eddy tour is easily fit in between lunch and dinner or breakfast and lunch. Full day tours include lunch.

Directions: Sun Country is located at 531 SW 13th St., Bend, OR. From Hwy 97, take exit 138 toward Downtown/Mt Bachelor, then turn right onto NW Hill St. Continue onto NW Colorado Ave. At the traffic circle, continue straight onto SW Colorado Ave. Turn right onto SW Emkay Dr., then take the 1st left onto SW Donovan Ave. Take the first right onto SW 13th St.

As I disclose whenever applicable, we experienced the Big Eddy tour as guests of Sun Country Tours and Pronghorn Club. While we appreciate their hospitality, this compensation came with no expectation of a positive review.

Three northwest backpacking routes for families

Parents with young children: you absolutely can backpack with kids! Our family has found success by choosing backpacking routes that are short on distance but big on rewards, whether that be in the form of a fun lake or river to swim in, dramatic scenery, or both. The following three northwest backpacking routes for families deliver.

Before you read on, check out our tips for backpacking with kids!

northwest backpacking routes

Northern California’s Trinity Alps:

Just south of dramatic Mt. Shasta at the top of Northern California, the Shasta-Trinity National Forest offers some of the best backpacking for families. While word is now getting out, the Trinity Alps used to be very uncrowded, while still offering up vistas on par with the Sierra Nevada.

For families, we recommend the 5.2 mile route from Swift Creek Trailhead to Granite Lake. From the Swift Creek Trailhead of the Trinity Alps, families hike for one mile before crossing Swift Creek at a large bridge and taking the Granite Lake Trail. After that, it’s 4.2 miles of a pretty strenuous uphill hike. Take your time, knowing that you don’t have to hike too far but will be rewarded with one of the most stunning alpine lakes you could ask for.

Make a home base at Granite Lake, and spend an extra day day-hiking up above it (the terrain turns to sub-alpine granite with great views). If you want to make a full loop of it, you can continue to Horseshoe Lake, reconnecting with the original Swift Creek Trail to follow the creek back to the parking lot. We have always been content to simply play at Granite Lake, however.

How to get to the trailhead: Swift Creek Trailhead is at the end of Swift Creek Road, accessed from Highway 3. (From I-5, grab Highway 3 at Yreka.) You’ll pass a national forest ranger station near Fort Jones, where you can grab your backcountry permit.

backpacking-trail

On the Granite Lake Trail

Southern Oregon’s Sky Lakes Wilderness:

The Sky Lakes are beloved to our family. They’re right in our backyard, so we’ve logged a lot of hours on trails here. The great thing about Sky Lakes is the flexibility; there are multiple options for making larger or shorter loops between its many small alpine lakes. The elevation is lower than many backpacking routes, so the nights will remain warmer (but you’ll also experience more mosquitoes, so aim to visit in August or September).

The Sky Lakes are generally split between Lower Sky Lakes Basin and Upper Sky Lakes Basin. You can see it all in a 12 to 14 miles loop, but we recommend staying on the Upper Sky Lakes Basin end to see Trapper Lake and Lake Margurette. You can camp at either, and experience the other in a day hike, should you wish. Start at Cold Springs Trailhead, and when the trail splits, follow the upper toward Natasha and Margurette lakes. The entire hike is only about 3.2 miles, and isn’t too steep. If you’re ambitious, you can also access the Pacific Crest Trail above Trapper, and walk along it for a while.

How to get to the trailhead: Cold Springs Trailhead is located off Highway 140. From Medford (and I-5), take Highway 62 to Highway 140. At mile marker 41, you’ll take gravel road FR 3651 at the Cold Spring Trailhead sign, and follow it 10 miles to the parking lot.

stuffing backpacking bags

Setting up camp

Central Oregon’s Jefferson Park:

Very few wilderness areas are as breathtakingly beautiful as Jefferson Park. And yes, it is indeed a veritable ‘park’ of alpine creeks, lakes, trickling waterfalls, and towering peaks. You have to earn it though: the route in from either side takes some time for families. We recommend the slightly shorter route from Whitewater Trailhead (the other option is Breitenbush Trailhead further north).

You’ll go about four miles before reaching Whitewater Creek, with stunning views of Mt. Jefferson all the while. After the creek, you’ll join the PCT temporarily as you enter the park. Once in, you’ll see many trail options leading a short distance to multiple small lakes. We suggest Russell Lake or Scout Lake. Take fishing poles, and the fish seem to really bite here. You can rejoin the PCT for a long day hike should you wish, or can simply set up camp and enjoy the lake. No matter which lake you pick in the park, the round-trip mileage will be about the same: 11 miles or so.

How to get to the trailhead: Take exit 253 off I-5 in Salem. Drive 60 miles east on North Santiam Highway 22. Between mileposts 60 and 61 (10 miles beyond Detroit), turn left on Whitewater Road 2243. This gravel road forks in about 100 yards, keep right. Follow this road 7.5 miles where it dead-ends at a large parking area.

Jefferson-peak

Jefferson peak

I think it’s time for us to discover some shorter backpacking routes in Washington state next! While we have experience in this region, it’s for longer hikes for more experienced backpackers. If you know of great routes for families in Washington, please leave them in the comments. And always remember to call the local ranger station before your trip for weather and trail closure information, as well as any detailed driving directions you may need.

Family friendly urban bike routes in the U.S.

If you’re heading to one of the popular cities in the U.S. for vacation, you might want to consider doing some exploring on two wheels. There are plenty of cities around the country that offer family-friendly urban bike routes where you can learn more about the area and see some great scenery. Make a plan to check out the following urban bike paths with your family.

urban bike routes

Cherry Creek Trail, Denver

Extending from downtown Denver to the high prairie grasslands, the 42-mile Cherry Creek Trail is one of the best ways to see the area. The paved trail starts at the confluence of Cherry Creek in downtown Denver. It then follows the creek past busy downtown streets and top attractions, such as the Colorado State Capitol building, Larimer Square, Union Station, and the Colorado Convention Center. As the trail heads out of the downtown core it goes through some historic neighborhoods, Cherry Creek State Park, and suburban residential areas.

Lakefront Trail, Chicago

See Chicago’s famous and stunning shoreline on full display when you ride on the Lakefront Trail. With the shores of Lake Michigan on one side and the Chicago skyline on the other, the 18.5-mile paved trail takes you by some the city’s most famous landmarks. A few of the attractions you’ll ride past include Navy Pier, Lincoln Park Zoo, Soldier Field, Monroe Harbor, and the Museum of Science and Industry.

Minuteman Bikeway, Boston

If you want to include some history with your bike ride, there’s no better place to do it than the Minuteman Bikeway in Boston. This 10-mile paved rail trail follows roughly the same route Paul Revere took during his famous ride. The trail connects the neighborhoods of Bedford, Cambridge, Lexington, and Arlington. It stops at the Alewife Station, where you can park your bikes and hop on mass transit to go right into downtown Boston.

BeltLine, Atlanta

The BeltLine is a former railway corridor that circles Atlanta. When completed, the trail will offer a nearly continuous loop around the city for transportation and recreation. So far, Atlanta has converted around 22 miles of abandoned railroad track to a multiuse trail. You can tour the city on the Eastside Trail and ride through the beautiful Historic Fourth Ward Park. Best of all, even if you’re traveling to Atlanta without your bikes, you can rent some using a bike sharing program and still tour the lovely BeltLine.

Burke-Gilman Trail, Seattle

Another lovely rail trail is the 27-mile multiuse Burke-Gilman Trail in Seattle. The trail runs from Puget Sound in North Seattle all the way to the town of Bothell. Along the way, you’ll ride the shorelines of Lake Union, Lake Washington Ship Canal, and Lake Washington. You’ll also enjoy relatively flat terrain, gorgeous views of the water, and a great tour of the surrounding neighborhoods.

No matter which city you decide to travel to in the U.S., you’re sure to find some scenic urban bike routes that will help you explore the area and learn more about where you’re visiting.

SaveSave

SaveSave

Travel Gear We Use: best hiking boots for the family

We’re continuing our Travel Gear We Use series with a category I’m asked about a lot: hiking boots. Need guidance on buying the best hiking boots for the family? The following picks for kids hiking boots (as well as adults) come from brands we use and trust to be sturdy, highly-functional, and affordable. All have been worn by us on our own backpacking and hiking trips.

Best hiking boots for kids:

This infographic is created by GoFindMe GPS Tracker.

Merrell Chameleon 4 Mid Ventilator Hiking Boot :

The Merrell Chameleon comes in a range of styles, from low-top hikers to high top boots with full ankle support. You can also opt for mesh ventilation or more water resistant models. Find the style that your child likes best. What we love about the Chameleon is how comfortable this shoe is on, and how easy it is to get on and off. I know it sounds simple, but these features can make or break a hiking shoe for our kids. The Merrells are well-constructed but still lightweight and flexible, and the low-top version can certainly pull double-duty as a school shoe. The mid-height Ventilator linked here is only $55, which means that if you kid wears them out in a season, you won’t cry.

KEEN Gypsum Hiking Shoe:

Like the Merrells, the Keen Gypsum retails for under $60, but it offers a lace capture system for even easier on-and-off (and a better fit while on the trail). They’re not too heavy (we really don’t recommend stiff, heavy boots for kids), and will flex with the soles of kids’ feet. They’re breathable, and they have the toe-protection that Keen does so well: no stubbed toes here! pick up a pair for $60

Vasque Breeze WP 2.0 Hiking Boot:

If you need something a little more technical for multi-night backpacking trips, we like the Breeze from Vasque. Kids get full ankle protection and a very rugged sole with strong grip, but also a nice ventilation system so they don’t feel like their feet are in an oven. They weigh in at 2 pounds, and feature a very ‘grown up’ lacing system and toe guards. They’ll set you back more than the other shoes, but might even survive to be handed down! Buy the Breeze for $79.

Hi-Tec Altitude Lite Jr:

We love Hi-Tec hiking boots for adults, so it stands to reason that the kids’ versions would be a great ‘fit’ too. Always affordable without sacrificing quality, Hi-Tec boots are our first pick for down-to-earth outdoorsy families who don’t care about having the absolute trendiest brands on their feet. Give Hi-Tec a try! The Altitude Lite Jr. is rugged, with full ankle support. Opt for the waterproof version to save your kid from wet feet after creek crossings and muddy trails. Pick them up for under $70 on the Hi-Tec site or Amazon.

amzn_assoc_placement = “adunit0”;
amzn_assoc_search_bar = “true”;
amzn_assoc_tracking_id = “pitstoforkid-20”;
amzn_assoc_ad_mode = “manual”;
amzn_assoc_ad_type = “smart”;
amzn_assoc_marketplace = “amazon”;
amzn_assoc_region = “US”;
amzn_assoc_title = “My Amazon Picks”;
amzn_assoc_linkid = “2b3ff3efebcf632ee007032e7c7a5424”;
amzn_assoc_asins = “B00Q66T13Y,B004LX007A,B008O5AQJI,B00LB7A150”;

Oboz Sundog:

For teens who say they don’t like hiking boots (and think they can hike in flip-flops) the Sundog is the next best thing, that will still make mom and dad happy. Extremely lightweight and in a fun citrusy color, the Sundog wears like a tennis shoe. It has a rugged outsole and laces tightly, so there’s some control amid the feeling of ‘I just have my sneakers on’. Win-win.

Best hiking boots for parents:

I’m going to say something radical here: 90% of the time, you don’t need a full-fledged hiking boot, even for multi-day backpacking trips. I LOVE to wear my LOWA Innox Evo shoes, both when I’m traveling and when I’m hiking, camping, and backpacking. For me, and I know it varies by person, this is the most comfortable trekking shoe out there. Check out a full review here. Buy the LOWAs, be happy, don’t worry about hiking shoes ever again.

BUT, if you need fuller protection for a seriously epic trip, read on:

GoLite Women’s XT89:

I love GoLite shoes, and their XT89 for women are lightweight while still offering full support and great traction. Plus, they’re comfortable enough to want to wear around camp, too. I found I needed to order a half-size up (as they run small), so definitely try these on before ordering online. For men, GoLite’s GoLite Men’s Quest Lite Hiking Boot is a great pick.

KEEN Terradora:

For women, it’s hard to beat the KEEN Terradora if you need the protection of a full-fledged hiking boot. (It does, however, come in a lightweight hiking shoe, to). The Terradora is made of knitted fabric that’s completely waterproof but still soft and flexible, and has a padded ankle support section to help with the discomfort of the usual stiff ankle coverage. Pick it up for $130 on Amazon.

Oboz Mystic Low BDry:

I love a lightweight, low-cut hiking shoe. (If you don’t, try the Oboz Bridger instead.) The Mystic is fully waterproof, yet light enough to be considered a sneaker, should you slide them on for a mid-week soccer practice, as I have. They’re substantial without being stiff, and responsive yet firm on the outsole. They’re my go-to backpacking shoe when I won’t need full-scale ankle support, and they’re competitively priced, too.

Need more shoe ideas? Check out more gear at gearweare.

amzn_assoc_placement = “adunit0”;
amzn_assoc_search_bar = “true”;
amzn_assoc_tracking_id = “pitstoforkid-20”;
amzn_assoc_ad_mode = “manual”;
amzn_assoc_ad_type = “smart”;
amzn_assoc_marketplace = “amazon”;
amzn_assoc_region = “US”;
amzn_assoc_title = “My Amazon Picks”;
amzn_assoc_linkid = “5cff3a8b5f0e508e11c71a553e7363cc”;
amzn_assoc_asins = “B009OZEN0A,B006S65U6E,B018WEJIRG,B0133B58BS”;

More Travel Gear We Use:
Best carry-on luggage for kids
Best overnight backpacks for kids and youth
Best packing cubes and TSA bags for the family

Best point and shoot camera for vacation photos
Best iPhone cases for travel

Renting an RV: Tips for RV summer travel

As a parent, I understand it can be appealing to rent an RV for a family road trip. Your schedule is your own (and so is your bathroom!), and you’re not confined to airports, flight delays, or even hotel reservations. On a whim, you can detour to visit something new, or delay a day to remain somewhere special. Before you take the plunge and rent an RV for a family road trip, however, read the following tips gleaned from hard-earned experience.

rv-road-trip-tips

Weigh the costs to have an affordable RV experience:

Consider what is typical for you while on vacation: do you seek a relaxed experience? Are you content exploring a single destination for longer stretches of time, and do you want the flexibility of making your own meals? Would you rather have your own space (which is mobile!) than nightly hotel rooms that are less flexible? The amount of vacation money you’ll save by renting an RV depends on your road trip style.

Ways to save money with an RV:

  • Stay in one place longer to save on fuel.
  • Plan to cook in your RV or over a campfire.
  • RV reasonably close to home.
  • Skip hotel rooms (more on this below).

If, for example, you normally spend a decent chunk of your vacation budget on hotel rooms, the $30-$45 per night on an RV camping space will be a deal. Of course, if you’re accustomed to renting tent sites, you’ll need to budget for the upgrade necessary for an RV space. As a beginning guide, use this Vacation Value Generator from Go RVing to directly compare vacation prices.

Embrace the RV vacation lifestyle during your road trip:

Repeat after me: you’re not in a hurry. You’re not in a hurry. You’re not in a hurry… The beauty of RV vacations is the slower pace. Plan a route that takes you along scenic byways and off the interstate. Create an itinerary that ensures less mileage and more pit stops. In most cases, it’s more affordable to rent and return your RV at the same city. In other words, travel in a loop instead of in Point A to Point B style.

Consider driving or flying to your destination, then renting an RV:

This combination seemed perfect for us. We knew we wanted to fly from our hometown to our primary destination (in this case, Chicago). From there, we wanted to take it slow, so we planned an RV road trip around the Great Lakes. We didn’t need to rent a car, and skipped all hotel and dining costs while in the region. After our Great Lakes tour, it made since for us to fly to our next destination. The moral of the story? Don’t be afraid to think outside the box and create the transportation combination that works for your family.

Eat on the road so you don’t feel deprived of restaurant dining:

If the thought of preparing all meals while RVing doesn’t appeal, try these ‘tricks’ to feel less deprived of restaurant food:

  • stop at farmer’s markets and roadside stands en route
  • eat a big breakfast out (the cheapest meal of the day) and skip lunch entirely
  • let the kids cook: in an RV, it’s somehow fun to plan and create meals
  • cook over a campfire (we love this Guide to Campfire Cooking)

guide to summer RV camping

Get more tips on RV rental affordability at GoRVing.com. As I disclose whenever applicable, this post was written in partnership with Go RVing. I found the information on GoRVing.com to be useful for planning an RV trip, and hope you will, too.

Photo credit: Trekaroo/mcfam

SaveSave

A Boston 4th of July: Tips for Celebrating on the Esplanade

All people want to spend the Fourth of July in special fashion. If you’ve never been to Boston, heading there in the beginning of July is as good a time as any. Below, you’ll find tips regarding how to spend it right during the Esplanade celebration.

washington-dc-fireworks

Weather:

New England weather is fickle, and natives know weather patterns change on a dime. In July, temperatures can range from the 60s and get up into the 90s, not to mention thunderstorms may inspire a downpour in the blink of an eye. To be certain you’re spending the celebration in hospitable conditions, check the weathercast at WBZ Accuweather, or, use your smartphone to check the CBS Boston Weather App.

Clothing:

There’s no dress code to enjoy the festivities, but if you’re concerned about your level of comfort, you’ll want to bring a light jacket or sweater; it can get mighty chilly during the evening hours. During the day, you’ll want to bring along sunscreen if you burn easily or a hat to keep the sun off of your face. As mentioned, weather conditions change quickly; it is a good idea to bring along an umbrella or rain coat just in case.

Shoes:

Regardless of how you get to the center of festivities, walking will be on the itinerary. Therefore, ensure you wear a good pair of comfortable shoes. This is especially a concern if you’re driving to the event; you’re more likely to win the Boston Marathon than find a great parking spot during the celebration. Event organizers encourage goers to take public transportation to be more green and to alleviate traffic coming into the city. Alternatively, if you’re coming out of town, peruse the web to find hotels in Boston residing by the festivities.

Public Transportation:

The closest trains (on the Boston side) are Charles-MGH (on the red line) and Arlington Street (green line). The trains are open late on the Fourth and expected to offer free rides home after 10 pm.

duck-tour-quacker

Handicap Parking:

All are encouraged to attend the festivities, and handicapped parking is offered at the Charles Circle LAZ Parking Lot (adjacent to the Massachusetts Eye & Ear Hospital). Of course, the police will be vigilant to ensure that no one without handicap plates take advantage of limited parking spots. The lot will close once full or after 6 pm (whichever comes first).

Leave at Home:

Though convenient, backpacks are not allowed in addition to shopping bags. Additionally, coolers (on wheels), fireworks, grills, propane tanks (BBQ equipment), and firearms are to be left behind since none of those items are permitted inside the festivity grounds. Sorry, Boston loves animals but they are not allowed inside! Of course, you can attempt to ‘sneak’ something in, but it’s not a good idea; security checkpoints are in effect, and items not allowed inside will be confiscated.

Vantage Points:

There are multiple areas to enjoy the events taking place. The Oval is considered the ‘best seat in the house,’ with the right side optimal for watching the fireworks exhibition. However, lines to get in this area start early and the space fills quickly. Don’t assume you can send one friend to reserve space for more people; such tactics are not allowed! The Island Lagoon is also a good area, but will be considered a secure area too; you’ll need a bracelet to get back inside once you get in. Speakers are aligned along the Charles River; you won’t be able to see what’s going on, yet you’ll be able to hear the music and festivities from there. It’s not ideal to see the fireworks due to a number of trees from there, though you may be able to maneuver yourself around the crowd and get a good position.

Some attempt to see the sights from the Mass. Ave Bridge but it’s off limits to the public, and depending on police and civil officials, the Longfellow Bridge may also be closed to the public. Memorial Drive will have speaker towers and food vendors. Alternatively, if you know someone with a boat, you can park in the Charles River for a truly exceptional view of the celebrations.

Jane Sandoval is a travel consultant. She loves to write about her experiences online. Her articles can be found on many travel and vacation sites.

Summer in the Berkshires: Bousquet Mountain Adventure Park review

Bousquet Ski Area’s Adventure Park is a vertical playground of high rope courses, zip lines, nets, and ladders, all set against the backdrop of the beautiful Berkshires. With three levels of course ‘elements’ to master, everyone will be challenged here, and everyone can get a taste of what ropes courses are all about.

Bousquet mountain


Bousquet Mountain Adventure Park review:

We met first with our instructor, who fitted us in harnesses and gloves and explained to us how our clips and ropes worked. It seemed complicated at first (and we’d done this before!), but once we’d had time to go through the steps with her and review what we’d learned on the practice cables and zip line (very low to the ground), we felt very confident about maneuvering through the course. I loved that due to Bousquet’s cable and clip safety system, it’s virtually impossible to be completely unclipped from the cable at any given time. I felt completely at ease allowing Nate (12) and Calvin (9) loose on the course, always with instructors nearby.

Of course, I wasn’t about to miss out on the opportunity to play on a high ropes course, so I joined in, too. The first level is relatively low to the ground, and a great place to get the hang of things. Participants go in one direction through the elements, which eliminates traffic jams (a non-issue since there were only a few other people on the course at the time) and ensures you experience everything. Once you’ve completed Level 1, you’ll want to try Level 2 (straight above you), though of course, if you opt out, you can experience Level 1 again. Level 2 was certainly more challenging to me, and by Level 3, I was ready to leave it to the kids (i.e. monkeys).

One of the best parts of Adventure Park are the zip lines that connect elements. We’d experienced zip lines and high ropes courses before, but not together! Attached to each of our harnesses were zip line apparatuses (apparati?) which we used to zip ourselves from area to area on short zip lines. (Note: on the higher elements, some ‘commando’ work is required for lighter, shorter people; you’ll zip part way, then need to pull yourself the rest of the way, which takes some upper body strength!)

We couldn’t help but compare Bousquet’s Adventure Park to Big Sky, Montana’s high ropes course, and though the scenery was certainly more stunning at Big Sky, the kids preferred Bousquet’s multi-level course. I found Big Sky’s course to be more dramatic (it’s higher, for one, and accessible only by rope ladder), and had a hard time directly comparing them.

The Adventure Park is awesome, but what makes Bousquet great for traveling families are the multitude of other activities to do on-site in summer! Toby (age 6) and our nephew Homer (age 2) were too young to explore the Adventure Park (where participants must be 70 pounds and at least 48 inches tall), but with mountain day passes, had free rein of the water slides, activity pool, and miniature golf course. Day passes also include three activity tickets to be used for the bungee trampoline, bounce house, climbing wall, go-kart track, or Frisbee golf course. Everything is located in one place (including the Adventure Park), which makes it easy for families to pick and choose how they spend their day based on interest and age, while still staying together.
Bousquets-adventure-course

Note: We were told that kids under five feet tall could only experience Level 1 of the Adventure Park, but after completing this level, our instructors allowed Calvin (just shy of five feet) to continue on up. It was explained to me that the height requirement is in place not due to safety, but due to cable placement; some cables on the higher elements are spaced in such a way that the reach from the child’s harness to the cable might be uncomfortable. Also, kids’ lower weight ensures they will need to complete some upper zip lines ‘commando’ style. We didn’t find the former to be a problem, and Calvin enjoyed the latter! I always recommend following an operation’s guidelines and deferring to their instructors’ judgment.

Ticket costs: Adventure Park passes are $35 per adult (over 5 feet tall) and $29 for juniors (under 5 feet tall). Day Mountain Pass tickets (which include the above listed, minus the Adventure Park) are $28. Activities can be purchased ‘a la carte’ as well, but the day pass is by far the best deal! In fact, we’ve reviewed many zip line and ropes course locations, and I can say without doubt that Bousquet’s offers the best value on a high ropes course I’ve ever seen!

A spectator pass can be purchased for those not experiencing the activities for $7.50. (I always appreciate when an operation offers this!) And be sure to check Bousquet’s ‘deals’ page before planning your trip: they offer $10 Mondays on their Mountain Passes and $20 Tuesdays for the Adventure Park!

Hours: Bousquet’s summer hours are 10 am to 5 pm, daily.

Reservations: 413-442-8316. We didn’t need reservations arriving when the park opened at 10 am on a week day, but to be safe, call ahead!

Website: http://www.bousquets.com/

Directions: Bousquet is located at 101 Dan Fox Drive, Pittsfield, MA. From Boston, take Exit 2 off the Massachusetts Turnpike to Routes 20 & 7 North. Follow signs for Bousquet and Pittsfield Airport (left at light onto Dan Fox Drive for 1 mile).

As I disclose whenever applicable, we experienced the summer activities, including the Adventure Park, as guests of Bousquet Ski Area. While we appreciate their hospitality, it in no way guaranteed a positive review.