Three days in Florence with kids

I’ve heard it said that Florence is not an ideal destination for kids, but I couldn’t disagree more. Our three days in Florence were among our best in Europe. Even with only a basic education in Renaissance art, which Florence is known for, we found plenty to do in this charming and picturesque Tuscan city. For us, the key to enjoying Florence with kids was to temper museum visits with lots of eating and shopping through the many street markets and artisan shops.

florence-italy-with-kids

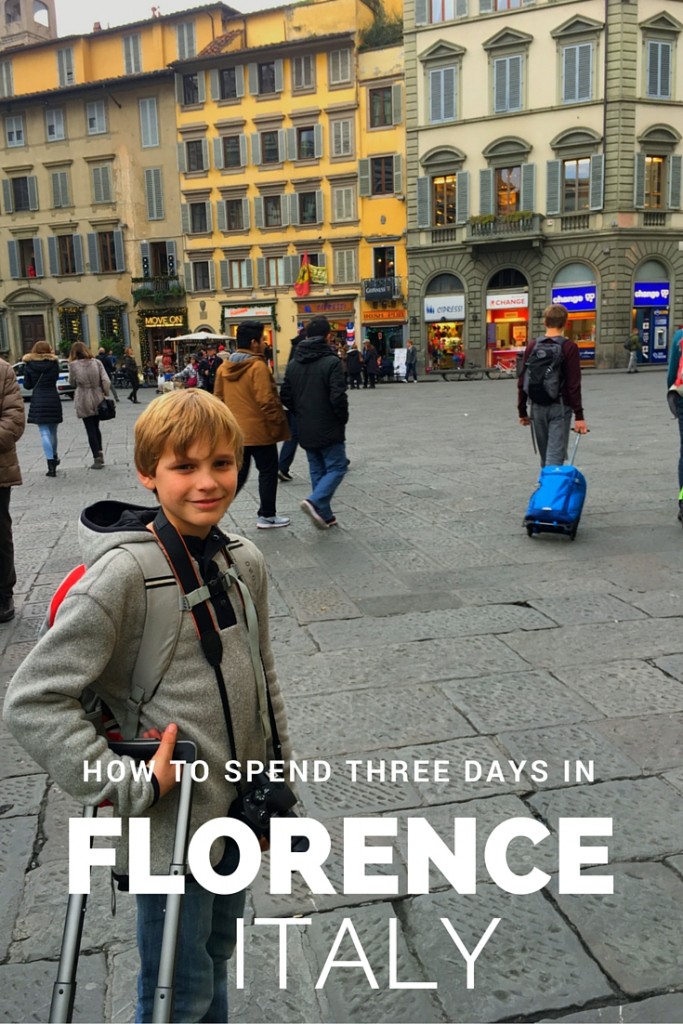
Florence is a very walkable town. Even from the main train station, Santa Maria Novella, families can easily walk into the city center in ten minutes. During our entire stay, we never needed any sort of transportation. After a fun but busy week in Paris, this fact alone set the relaxed tone for our stay. Right away, we noted that wherever we walked, we found beautiful alleys, shops, and art to peruse.

Florence is filled with historical sites and museums, most of which can be accessed on walking tours of the city with outdoor sculptures, exterior architecture, and free-entry churches. In fact, we only went in to three museums during our stay. Here’s how we spent three days in Florence with kids:

Day 1: David and Duomo

florence-with-kids

Florence is home to two major museums for Renaissance art: the Uffizi Gallery and the Accedemia. Most people would consider the Uffizi a must-do, and I don’t disagree…but with three kids who have not studied Renaissance art, we did the unthinkable: we skipped it. Instead, we went directly the the Accedemia to see Michelangelo’s David. This is a sculpture we DID study beforehand, and it did wow us. The Accedemia is not so big as to be overwhelming; it was easy to quickly find the David and the few other pieces of art we knew we wanted to see. These included the Prisoners and the hall of musical history, with wonderful instruments from various centuries. We spent only an hour and a half in the Accedemia, which may be considered a crime, but worked well for us.

We bought our tickets online ahead of time, which allowed us to skip the long ling out front. Instead, we only needed to go to the ‘advance ticket’ booth across the street from the entrance, where they printed out our tickets by reservation number. These are timed tickets, and we opted for mid-morning.

view-from-duomo

Note: if you have tall teens, have them bring an ID to guarantee them their free entry. Kids 18 and under are free, but apparently our 16-year-old looks older than he is.

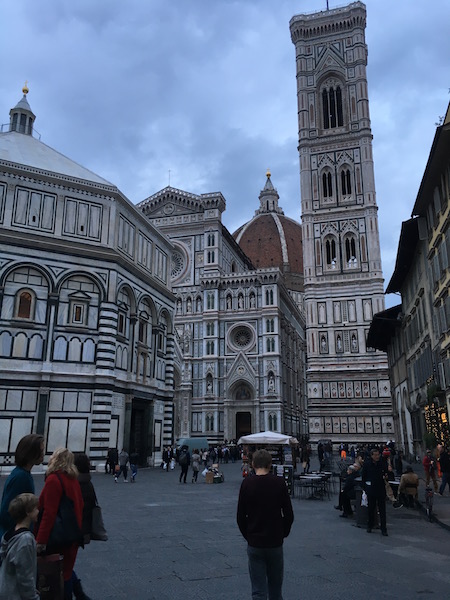
The Accedemia is a short, direct walk to the Duomo, Florence’s crown jewel. This dome is an architectural wonder, and kids love it. On the five minute walk, stop for sandwiches at the take-out window en route. There’s a small grocery store nearby with very affordable water bottles and juice. At the Duomo, the combined ticket gets families into the dome, the museum, and the camponile for about €12 a ticket. Entry to the cathedral is free. Teens pay full price; kids 12 and under are half price. It’s also possible to get a ticket for just the dome, though we recommend seeing it all, especially if you’re doing only a few paid museum visits.

Note: We bought tickets for the Duomo first thing in the morning, on our walk over to the Accedemia. The line for tickets is shorter at this time. You can buy tickets in either the main ticket line or at the campanile. Opt for the latter. When you return, you’ll still wait in a line to go up the campanile and the dome, but others will be waiting in both these lines AND the ticketing line.

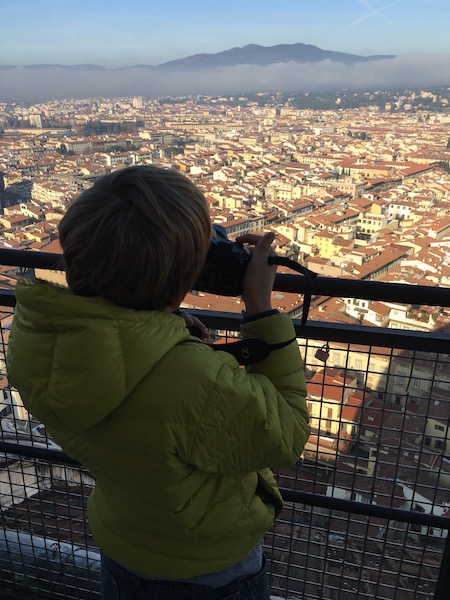
The line to go up into the dome gets long, but it moves fast. It’s a very interesting visit. First you go up a narrow, spiraling staircase, which spits you out on a balcony overlooking the interior of the lower dome. From here, you can look down at the cathedral interior, and up at the frescos on the dome. You’re moved along at a steady pace to another series of staircases to the upper dome area. This time, you’re in the unadorned interior of the outer dome. Imagine two layers of dome, with you sandwiched between. It’s not that claustrophobic, but close. This is a great place to note how the dome’s architect, Filippo Brunelleschi, constructed this masterpiece (he was inspired by Rome’s Pantheon dome). Finally, a final, steep, and narrow staircase takes you to the very top, where you’re deposited outside the tip of the dome for amazing city views.

Expect to feel the crush of humanity on this visit: while in a line, there are several places along the route where the people going up meet with the people going down, with only minimal crowd control by Duomo staff. There are quite a few moments of squeezing past people and letting others pass. If you’re tall, watch your head on the low ceilings. Consider not bringing a backpack, as the extra width will make it hard to navigate the stairs.

florence-italy

On the route back down, you’ll get the chance to stop at the upper interior dome balcony, where you can practically (but not quite) touch the frescos on the ceiling. It’s truly an amazing visit.

Note: There are over 400 steps on the accent, so bear this in mind. However, anyone of reasonable health and fitness can do it: the line of people move steadily but slowly.

After visiting the dome, you’ll probably need a break from stairs before tackling the campanile. Visit the museum, which rarely has a line at all. Here, you’ll see a life-size model of the front of the Duomo from the years before it was ‘re-modeled’ during the Renaissance, plus several levels of fascinating art and artifacts. Kids and teens will be especially interested in the collection of church relics on the ground floor. They include bones from the likes of John the Baptist and several saints. Young kids may be creeped out, as some bones are very recognizable as human, such as jawbones embedded in gold and jewels. We spent about an hour in this museum, but you could easily spend longer.

Day 2: Oltrarno walk and Da Vinci

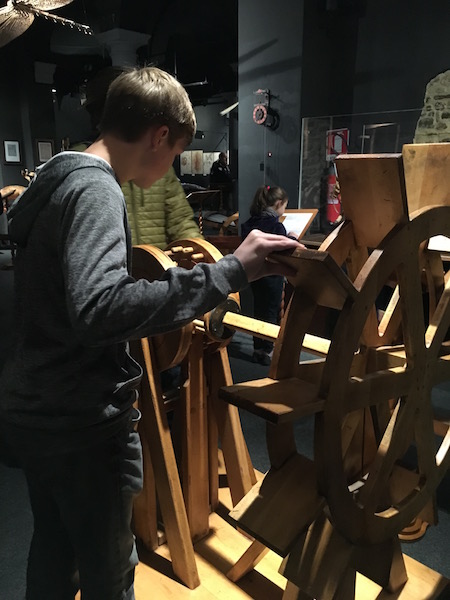
We spread out our museum visits, which meant we saved the fun Da Vinci museum for Day 2. There are actually two ‘campuses’ of this museum in Florence, and according to our guide books, they are quite similar…if you go to one, there’s no need to go to the other. There’s a flat entry rate for families (I believe it was €20), or you can opt to pay a la carte if you have younger kids (kids 12 and under are half price). The Da Vinci Museum is completely self-guided, and consists of a large collection of to-scale models of Da Vinci’s many inventions. The best part: it’s hands on. Kids can pull levers, move wheels, and push and pull things to see how Leonardo’s many contraptions worked. It’s fascinating for adults too: it was amazing to see how far ahead of his time Da Vinci was thinking. We saw his model for an odometer, a tank, a humidity tester, and so many, many more. His flying contraptions were there, as well as his anatomical sketches and replicas of his paintings, so kids could compare his artwork to his inventions and learn how he studied anatomy in an era when it was illegal to study cadavers.

da-vinci-museum

Note: If you have energy for another museum, the Galileo Museum is adjacent to the Uffizi and has Galileo’s actual telescopes (as well as his finger, interestingly enough).

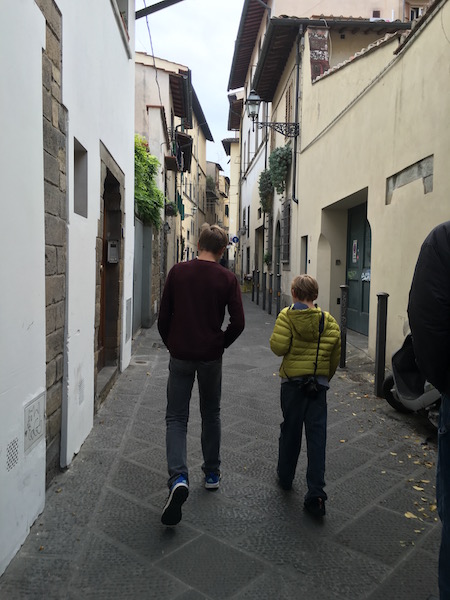
After a morning of museum visits, we had had enough. We opted for a walking tour through the afternoon. From the Galileo, we started outside the Uffizi, where families can see many sculptures outside in the courtyard. Then we crossed the Ponte Vecchio bridge (checking out the jewelry vendors while walking over) to the Oltrarno neighborhood. Oltrarno simply means ‘on the other side of the Arno’, and is much quieter and, in our opinion, less touristy than the Duomo side. This is where the many artisans of Florence have their shops, which you can peek into as you explore the narrow streets here. From the bridge, continue straight to the Pitti Palace. This imposing palace was home to the famous Medici family for generations. You can go inside, but we’re done with art for a bit, right?

florence

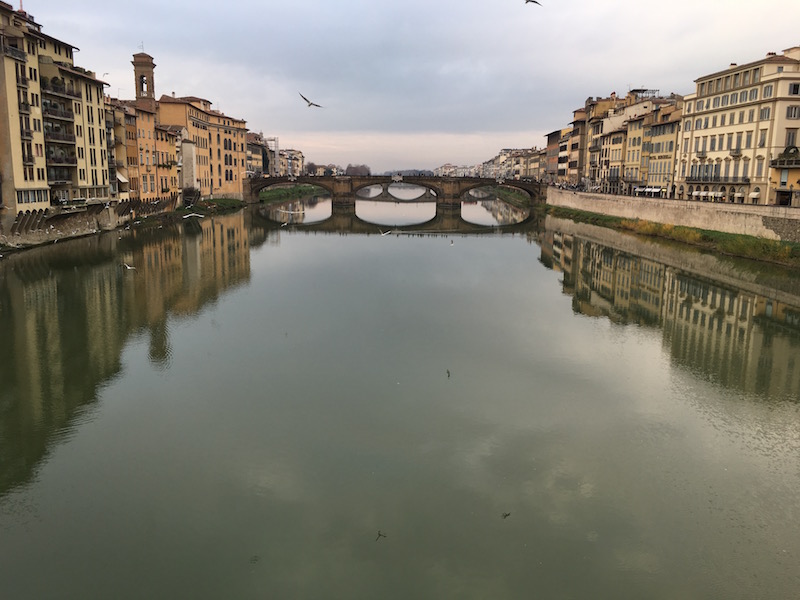
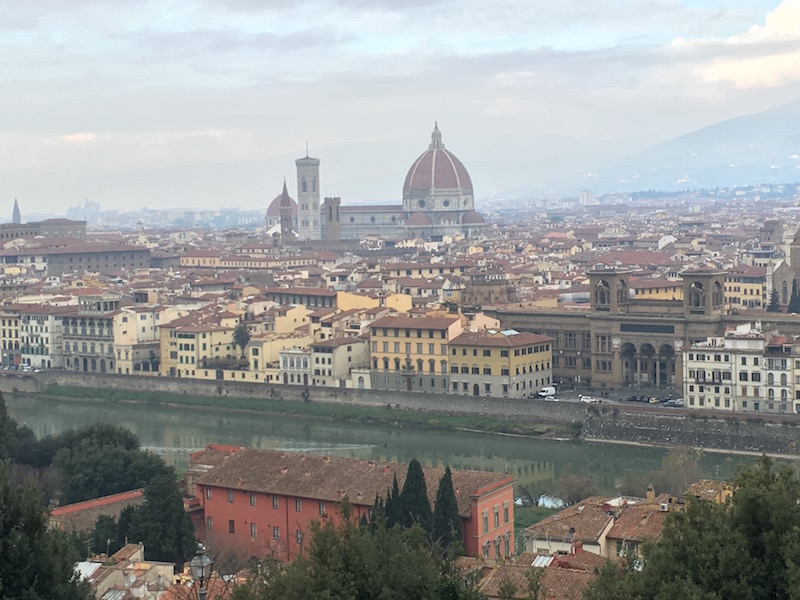
Instead, we continued, turning right down more artisan streets, exploring as we happened upon smaller piazzas and churches. Our favorites were in Santo Spirito. Eventually, we turned right again to find the river. As long as you always know where the Arno is, you can’t really get too lost. Once back near the Ponte Vecchio, head east along the Oltrarno side until you see the city wall and the stairs to climb to Michelangelo piazza, for great city views, vendors, and of course, another church.

florence-italy

After this long walk, we spent the rest of the day letting the kids wander at will, looking around the shops near the Ponte Vecchio. In this area, you’ll find lots of osterias (wine bars), cheese and meat shops (most with generous sampling), and leather shops. There are also many vendors selling trinkets, puppets, wool scarves, and the like.

Day 3: San Lorenzo and Mercado Centrale

North of the Ponte Vecchio and Duomo, the Mercado Centrale is Florence’s foodie market, housed in a big warehouse building full of light and windows. Several stories tall, this market is very fun to peruse; if you have time, pick out picnic supplies for a lunch outside. Next to Mercado Centrale is the San Lorenzo market, which is an open-air market of leather goods. Each stall entices with the smell of leather and the rich, bright colors of Florentine belts, wallets, journals, and more. This is where to spend those euros on souvenirs.

Where to stay in Florence with kids:

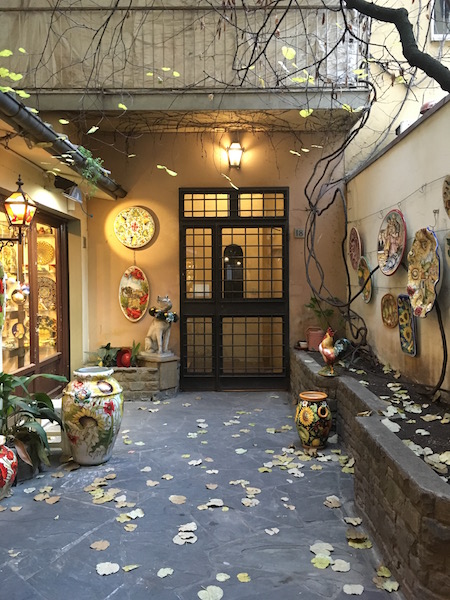
While we were in Florence, I didn’t see a bad place to stay, but we loved our location, just on the Oltrarno side of the Ponte Vecchio. We rented an apartment from AirBnb, and had beds for five, plus a living space and kitchen and large bathroom for less than €100 per night. Our place was located just above a pottery shop, and was very peaceful and quiet while still only steps from the action. For a link to the exact apartment we rented, check out this post on renting AirBnb in Italy.

florence-lodging

Where to eat:

Again, you can’t go wrong. We ate all over the city, but focused our attention on the Oltrarno. By Santo Spirito, we liked Borgo Antico, and right near the bridge, we loved Celestino, where the staff was especially warm and welcoming. By the Duomo, the Black Bar was our go-to place for gelato, and Osteria dei Pazzi was recommended to us for dinner. There’s also a grocery store by the bridge (one street into Oltrarno) with a nice cheese and meat counter and fresh pasta, for those with kitchens.

eating-in-florence

We only had one bad meal in Florence, right across from Pitti Palace at Bellini. Hopefully we just caught this restaurant on an off-night, but I’d skip it.

What’s your go-to activity in Florence?

Travel Gear We Use: Spring travel wear from Aventura Clothing

As you may have seen if you follow our Pit Stops for Kids social channels, I am again an ambassador for Aventura Clothing this year. What does this mean? It means I help Aventura promote their products with my honest reviews and endorsement of the spring travel wear I think works well for women traveling with their families. You can see my photos on the Aventura website, which is as close as I’ll ever come to modeling, and you’ll see me wearing Aventura in my Instagram feed and Facebook posts, because I authentically do wear it all the time.

Basically, my job is to show how the brand works for me, in my daily life and in my travels, because I genuinely love the products Aventura sells.

Why I love Aventura Clothing:

Aventura-clothing

It’s comfortable, practical, and stylish. Those who know me well can attest that I barely remember to check a mirror before walking out the door, and rarely take the time to put together a killer outfit. When I find a brand that’s stylish without much effort from me, I’m sold. And Aventura Clothing is designed to fit regular, healthy women…no tiny sizing here that will depress you. Best of all, most of Aventura’s pieces are organic cotton, which is environmentally-friendly and also helpful when traveling…shirts won’t wrinkle!

What I’m loving from Aventura this spring:

One of the perks of my ambassador position with Aventura is the opportunity to try out quite a few pieces each season. Yes, this is very fun! This spring, Aventura has quite a few new looks, ranging from fun tie-dye prints to floral designs to classic layering pieces. My absolute favorites are rounded up below.

aventura-clothing

Brielyn Striped Dress: I absolutely must have cotton dresses in my spring wardrobe. Dresses take half (or less) the room in suitcases as pants and shirts, and they look dressier and more festive when traveling. The Brielyn is a striped jersey dress with elbow-length sleeves that’s 50% organic cotton. It comes in four bright colors with crisscrossing contrast seams. Pair with: Wesley Sweater, an awesome cotton-cashmere sweater wrap ideal for chilly nights by the pool or on the plane.

Fleur Dress: This dress is v-necked and sleeveless, but still very casual. I love it because it’s stretchy (an organic cotton-spandex blend) and can go from day to night. Again, no extra packing needed. You can tell I’m a minimalist! It comes in three colors with distressed stripes on the hem.

Poet Tank: You’ll need at least two of these, which works out, because it comes in two color patterns. The talisman print on the Poet Tank dresses it up, so you can wear it to dinner in addition to yoga class. This is going to be a summer staple for me. Also needed: Bienne strappy camisole…under-layers are crucial when traveling.

Hathaway Top: Everyone needs at least one collared, button-down shirt for those days you need some coverage on your shoulders. Maybe you need to give your skin a break from the sun, or maybe you’re visiting a place where you need to cover up, like a cathedral. The Hathaway top is done is pastel colors for spring, is organic cotton, and feels very light when worn. It goes in my bag every time!

Galina Capri: I know skinny jeans are popular, but I just need a pair of pants with a little more give when I’m traveling. The Galina is just form-fitting enough to look tailored but still be roomy enough when I’m sitting a lot on airplanes. It’s cotton-spandex with a 26″ inseam, and comes in four colors.

Hats and scarves! Just get some! A hat or a scarf will instantly add class to any summer outfit, guaranteed. My favorite hat this spring is the Cruz sun hat, offering serious sun protection while looking cute and a little bit funky. But there are quite a few to choose from! The Cruz will be joining me on a cruise very shortly (how apt!) and I’ll be wearing the Phoebe this summer as well.

Want to try Aventura for yourself?

Get 60% off your order with one of my exclusive codes! I’m offering three ways to get one. Comment below, then: 1.  sign up for our free e-newsletter (sign-up bar is at the top of your screen), 2. subscribe to our feed, or 3. email me at amy(at)pitstopsforkids.com.

You can also join the #AventuraLife loyalty program! Those who join the #AventuraLife get discounts and free shipping depending on their level of membership…the more you spend, the better discounts and gifts you get. It’s more than just discounts though…#AventuraLife members embody the adventurous spirit that drew women like myself (and you!) to the brand.

Need more Aventura Clothing inspiration? Check out my archives for MANY more reviews of this brand!

Bahia Beach Resort in Puerto Rico with kids

There’s a reason I keep writing about vacationing in Puerto Rico with kids: this destination is affordable and convenient to reach from many points in the US and Canada. Within just a few hours, families can be on tropical beaches and exploring a different culture, without even needing a passport (for US citizens).

Bahia-Beach

If you’re planning a Puerto Rico vacation, we have another great resort pick for you: Bahia Beach Resort, located on the northeast coast along two miles of pristine beach. Bahia Beach lodging ranges from home rentals to the luxury of the St. Regis, with activities to keep your schedule packed your entire stay (though definitely reserve some time to explore further afield as well…see below).

Our top activity picks at Bahia Beach:

Bahia Beach activities range from relaxing to adventurous. Right on property, families can access golf, tennis, and miles of beach, as well as swimming pools and a kids’ club.

Hit the beach (and the pools): The two miles of white sandy beaches at Bahia can be accessed all year long, but for the poolside fans, there’s also a beach club with pool (and access to the sand), cabanas, a bar, and full poolside food services. When in Puerto Rico with kids, I recommend at least one or two full days dedicated to water and waves…find chairs or a cabana and camp out here from breakfast until dinner!

Go jump in a lake: Or rather, kayak on one! Yes, there’s a lake at Bahia Beach. At the Boathouse, get a kayak or canoe to explore 70 acres of canals and lakes on the resort’s grounds. Also accessible is the Espiritu Santo River, with mangroves and a wide variety of bird species. Families can also fish, paddle board, sail, or windsurf on the lake.

kayaking-in-puerto-rico

Take a day trip: Day trips to other points on Puerto Rico can be arranged at Bahia Beach, in some cases even eliminating the need to rent a car. Families can visit Old San Juan, which is located nearby and explore El Yunque, the sub-tropical rainforest at the eastern end of Puerto Rico. If you visit, start at the El Portal Visitors Center to get an introduction to the rainforest with exhibits and a film. From there, check out the Cloud Forest on the La Roca Trail, or discover waterfalls while hiking (I suggest a private tour to see the best sites).

Iguana Kids Club: Set the kids up at the Iguana Kids’ Club at Bahia Beach, and have a little adult time on the sand, in the pools, or dining out. Kids’ clubs vary greatly from property to property, so we always recommend visiting in person with your child before making definitive plans. What I like about Iguana Kids’ Club: it’s located primarily outdoors, under a pavilion, which just makes sense to me in a destination such as Puerto Rico. Ages 4-12 are accepted, and staff takes kids outside of the club regularly, whether on nature walks, for bird or turtle feeding, or for scavenger hunts. When kids’ clubs never take kids out of doors, I run from them fast! Of course, there will be some indoor moments, during which the club is equipped with fun inside gear such as  board games, a Wii station, movies, a reading area, kitchenette, and arts and crafts materials.

Have you been to Puerto Rico? What are your go-to activities?

Travel Gear We Use: Camping Comfort Items

We used to be hardcore minimalist campers…until we starting reviewing camping gear. Then we realized there’s a whole slew of fun, convenient camping items we now can’t live without. Turns out, we like to be comfortable! While we still camp in a minimalist fashion when it comes to backpacking gear, we’ve added the following camping comfort items to our car camping experience.

camping-comfort-items

Big Agnes Helinox Chair:

This lightweight chair weighs in at only 1 pound, 3 ounces, so you could conceivably take it backpacking. (It stuffs into it’s own sack). However, we bring it to the campsite for car camping, and it plays double-duty as a soccer game-viewing chair during my kids’ season. I love how easy the Helinox is to clean (spills wipe away) and to stow (simply fold the corded poles and wrap the mesh sling around it). A Helinox chair sets you back further than your standard foldable chair, but you absolutely can’t beat it for weight and convenience. You’ll barely know it’s packed in your car! Pick up the Helinox Camp Chair on Amazon for $99.95, or find it for a few bucks more at most outdoor retailers.

Grand Trunk Goods Double Hammock:

Grand Trunk Goods make some of the highest quality outdoor luxuries on the market (I love their travel pillows and sleep sacks). Naturally, when it comes to making a hammock, they excel…and for a very reasonable price. Their double hammock fits two adults (or three squirmy kids) and can be hung anywhere, using the included rope and carabiners. The hammock is made from parachute nylon, and stuffs into a small stuff sack for easy transport. We’ve taken ours on camping trips as well as vacations to condos and vacation homes. The most fun part of a Grand Trunk hammock: picking your color. The site offers over 20 color combinations. Pick up yours for only only $45 on Amazon. You can also upgrade to a Grand Trunk Skeeter Beater, which comes with a built in bug net!

amzn_assoc_placement = “adunit0”;
amzn_assoc_search_bar = “true”;
amzn_assoc_tracking_id = “pitstoforkid-20”;
amzn_assoc_ad_mode = “manual”;
amzn_assoc_ad_type = “smart”;
amzn_assoc_marketplace = “amazon”;
amzn_assoc_region = “US”;
amzn_assoc_title = “My Amazon Picks”;
amzn_assoc_linkid = “2b3ff3efebcf632ee007032e7c7a5424”;
amzn_assoc_asins = “B007ZGOWZQ,B001AIFLX2,B00EI3L1Q2,B00H5PUMFG”;

Eureka Cook Table:

We didn’t know we needed a camp table until we tried it…then couldn’t go back. Why? The Eureka Cook Table fits a double camp stove perfectly, and comes with an organization center below. This section zips closed to keep dust and dirt off your plates, utensils, and kitchen tools, and keeps small animals out. Where we camp, we almost always need a bear locker, so our food does not go in here, but it would be entirely possible to store food in the camp table if you’re in a safe area. With our stove on the table, we are free to spread out more on our picnic table, using it for card games, art projects, and board games after dinner. I worried the camp table would be bulky to pack and heavy to carry, but with it’s own carry case and easily folding legs, it’s been a breeze. I wouldn’t want to carry it far, but for short distances, it’s no problem. Pick up the Eureka Cook Table for $99.

Kelty Camp Pillow:

We can’t camp without pillows. Even while backpacking, I bring along a very small one. The Kelty Camp Pillow is compressible, fits into its own stuff sack (which is also handy for keeping it clean as you pack and unpack camp), and has an extra sleeve where you can stash extra clothing (socks, anyone?) or a lightweight jacket for added volume. They come in a variety of colors, so everyone can have their individual one. The Kelty Camp Pillow is only $16.


Coleman Trailhead II cot:

Until recently, I hadn’t slept on a cot since summer camp as a kid. When I tried Coleman’s Trailhead II cot, I was amazed how rested I felt! You’ll stay warmer off the ground, and since the Trailhead is designed in a ‘military’ style, it’s very sturdy, even for bigger adults. You get multiple side pockets down the length of the cot, where we like to stow flashlights, books, and small items like watches or lip balm. Best of all, it folds down small and stows in a carry case for storage. The Trailhead II is under $45 on Amazon.

amzn_assoc_placement = “adunit0”;
amzn_assoc_search_bar = “true”;
amzn_assoc_tracking_id = “pitstoforkid-20”;
amzn_assoc_ad_mode = “manual”;
amzn_assoc_ad_type = “smart”;
amzn_assoc_marketplace = “amazon”;
amzn_assoc_region = “US”;
amzn_assoc_title = “My Amazon Picks”;
amzn_assoc_linkid = “2b3ff3efebcf632ee007032e7c7a5424”;
amzn_assoc_asins = “B0038M659C,B003696236,B007RFG0NM,B012EVS48C”;

Klymit Static V and Static V Jr:

A cushy sleeping pad is essential for me when I backpack and camp. I know there are those who swear by minimalist pads, but I just can’t do it. The Klymit Static V feels downright luxurious with its air chamber design. It inflates and deflates in seconds, and is still only 18 ounces. Plus, it rolls into its own stuff sack that’s a quarter of the size of my other sleeping pads. It also limits air movement, which means you don’t lose heat while sleeping. With Klymit, I can be an ultra-lightweight camper and live in comfort! There’s also a Klymit Static V Jr, which is 3/4 length for adults, and weighs only 13 ounces. We have one for our 11-year-old, and my teens use it as well when they really want to shave off ounces. The Klymit Static V is under $50 on Amazon, as is the Jr model.

Want more camping info? Get Pit Stops for Kids’ camping gear list!

GSI Java Press:

Can’t live without a good cup of joe in the morning? Me, neither. I love, love, love the GSI Java Press, which travels well and still provides a great cup of coffee (or two) during camping mornings. Maybe I’m a snob, but I will not drink instant coffee, and the java press is lightweight, indestructible, and easy to pack with the rest of our kitchen gear. It’s double-walled and insulated, BPA-free, and brews a strong cup of coffee or tea. Pick it up on Amazon for under $30.

amzn_assoc_placement = “adunit0”;
amzn_assoc_search_bar = “true”;
amzn_assoc_tracking_id = “pitstoforkid-20”;
amzn_assoc_ad_mode = “manual”;
amzn_assoc_ad_type = “smart”;
amzn_assoc_marketplace = “amazon”;
amzn_assoc_region = “US”;
amzn_assoc_title = “My Amazon Picks”;
amzn_assoc_linkid = “2b3ff3efebcf632ee007032e7c7a5424”;
amzn_assoc_asins = “B00UTKNX64,B00OM1JJ3W,B00TY2HXE6,B002YT4DPS”;

Waka Waka Power +

Normally, we like to unplug when we go camping. But let’s be real: sometimes you simply need or want to have a source of power for your phone or other device. When we’re not backpacking ultra lightweight, I like to carry my phone for safety purposes (GPS positioning, etc) and when we’re luxury car camping, it’s nice to be able to watch a movie on the iPad. What? I told you this was a post about camping comfort. The Waka Waka Power+ is awesome because it’s a charger that’s powered by the sun. It’s small solar panel charges virtually any type of small electronic device within just a few hours. Plus, it has a light, so you can get up to 150 hours of illumination. When we tried it out, we had trouble at first finding a sunny spot to put the Waka Waka to charge. Once we’d gotten the knack, however, it could charge fully after a day outside (breakfast until dinner). There are multiple light settings (so you can save battery when needed), but we found we hardly use it for light. Instead, it’s our go-to phone charger. The design is flexible, so you can set it upright on a table, or hang it from the ceiling of a tent. There’s even an SOS emergency beacon. The Waka Waka isn’t packed for every trip, but when it stays home, it’s in our emergency supply box, for those ‘just in case’ moments. Grab the Waka Waka on Amazon for $79.

What item can’t you live without while camping? Find more Travel Gear We Use!

camping with kids

Disclosure: We received some of these items for the purpose of review. Without product reviews, Pit Stops for Kids would not be able to keep you informed on the latest gear.

Fernbank Museum, Atlanta GA

 Whether your travel destinations for summer take you to Atlanta or simply through Atlanta, The Fernbank Museum of Natural History is a wonderful place to stop with kids. With six extensive permanent exhibits and several visiting exhibits (including one on geckos through the summer!), an IMAX theater, a museum store and cafe, you could easily spend a day here. (At very least, you’ll want to plan on an entire afternoon or morning to get your money’s worth!)

fernbank-museum

The Fernbank has an entire section geared to young kids: there’s a great hands-on section for kids called NatureQuest. NatureQuest lets kids interactively connect with nature as if they were outside and is great for those younger kids who aren’t too comfortable being outside just yet. For all kids, a permanent exhibit worth noting is called A Walk Through Time in Georgiawhich lets visitors explore the natural history of Georgia and the story of our planet as they journey through lifelike geographic regions and historic re-creations. Highlights include a dinosaur gallery, a giant sloth, a cave, and the sights and sounds of the Okefenokee Swamp.

Seasonal Tip! Fernbank’s holiday-inspired exhibition features trees and other displays decorated by local cultural partners that recognize celebrations including Christmas, Hanukkah and the Festival of Lights, as well as traditions and practices like origami, indigenous art and national symbols.

Coming in 2016! Plan your visit around the opening of Fernbank’s new outdoor space, coming soon. Check on its status at the exhibits page. This is one element the Fernbank has been missing, so we’re excited to see this expansion take place. Included will be interactive outdoor elements, space for children to play and climb, and gardens to enhance the overall experience for those spending a full day at the museum…after all, fresh air is a must!

Distance off the interstate: Just a few minutes!

Hours: Open 7 days a week, but hours vary between the museum, IMAX, cafe, and museum store. See this comprehensive chart for current hours.

Admission Prices:

Adults: $18
Students and seniors (62+) with ID: $17
Children 3-12: $16
Children 2 and under (ticket required): FREE

IMAX admission is separate, but ‘Value Passes’, which include admission to both for a discounted price, are available.

Food Services: The Fernbank Cafe, located inside the museum, offers sandwiches, salads, pizza, and more!

Bathrooms: Located on-site.

Website: Fernbank Museum

Directions: From I-75/I-85/GA400 head toward downtown Atlanta. Take exit 248C Freedom Parkway (GA 10 East). Go 1.7 miles to Ponce de Leon Avenue and turn right. Go 1.7 miles to Clifton Road and turn left. Go 1/10 mile to the Museum entrance and turn right.
View Larger Map

Photo credit: Peter C Reblog this post [with Zemanta]

Travel Gear We Use: Best cameras for small hands

A good camera or HD video device is essential gear for most families traveling today. We agree, and take it one step further: it’s wonderful to put the camera in the hands of a child. Kids become more engaged with their surroundings when they have some control over documenting the trip, and we find our tweens and teens pay better attention on historic site visits or at natural attractions when occasionally looking through the lens of a camera.

best-cameras

This said, it’s not necessary to buy top-of-the-line camera equipment for kids! (Shouldn’t we parents get the good stuff, first?) Here’s what we deem to be the best cameras for kids:

Olympus Stylus Tough TG-860:

olympus-camera

Many cameras designed for young kids look like toys. I dislike this, mostly because kids know what the real deal looks like, and want their photography efforts to be taken just as seriously. This is why I love the Olympus Stylus Tough: it’s a real camera with a design that still appeals to kids. It truly is tough, with a rugged shell and shock-proof features. It’s waterproof up to 15 m, as well as crushproof and freezeproof. There’s easy selfie shooting, if you’re into that (your teens might be) and you get built in Wi-Fi, which makes it easy to transfer photos to a smart phone or the IO Share app. The optical zoom is decent at 5x, and I like the image stabilization. And yes, it shoots movies, too. Pick up the Olympus Stylus Tough on Amazon for $248.

NERF Action Camera:

nerf-action-camera

Yes, NERF! HD action cameras are very expensive, and frankly, I’m not shelling out the big bucks until my kids can do something darn noteworthy on their skis or see something pretty amazing while we’re on the go. In the meantime, we’ve been traveling with the NERF Action Camera, which features many of the same assets of the spendy brands without the terror of kids losing it or breaking it. You get a 5.1 MP digital sports camcorder that produces full HD 720p images and has a 4x zoom, much like mom and dad’s. It mounts on a helmet just like that other brand, and comes with a waterproof case. You also get a full touch preview screen, which makes it easy for kids to use on the fly. Our kids have used it while biking and skiing. Pick up the NERF Action Camera for under $60 on Amazon.

Nikon Coolpix L840:

nikon-coolpix

Our eleven-year-old has shown great interest in photography, so this year, we upgraded him to his first DSLR camera. We still didn’t want to break the bank, and we’ve been very happy with his Nikon Coolpix. He gets to learn about manual settings and lenses, and we don’t have to be too fearful of the cost of replacement. The Nikon Coolpix has 38x optical zoom, a low light image sensor, and a tilt LCD display, which makes it easy for a smaller and shorter person to get the correct angle on a shot. And it still takes HD video, too, of course. Pick up the Nikon Coolpix L840 on Amazon for under $200.

iPhone 5 or 6:

Lastly, don’t overlook the photography features on an iPhone. Even an iPhone 5 features an eight megapixel primary camera and 1.2 megapixel rear camera. Tweens and teens usually know more than their parents about photography apps available to make the most of this, and often a phone is already in a kid’s pocket. When younger, our kids aren’t allowed to have a working phone, but we ‘gift’ them with our old phones when we upgrade. They use them as iPods, for music, games, and photography. Given how often upgrades become available, these used phones make for great travel cameras.

amzn_assoc_placement = “adunit0”;
amzn_assoc_search_bar = “true”;
amzn_assoc_tracking_id = “pitstoforkid-20”;
amzn_assoc_ad_mode = “manual”;
amzn_assoc_ad_type = “smart”;
amzn_assoc_marketplace = “amazon”;
amzn_assoc_region = “US”;
amzn_assoc_title = “My Amazon Picks”;
amzn_assoc_linkid = “5cff3a8b5f0e508e11c71a553e7363cc”;
amzn_assoc_asins = “B01950SVYW,B00UVK2OOO,B00TXH2AZO,B01H1JY95E”;

What camera does your child use? What do you love–or not love–about it?

South Lake Tahoe lodging for families: Aston Lakeland Village

I might as well admit it: I’m a North Lake Tahoe girl. I grew up near North Tahoe, and because of this, I simply know the area better. While I do love skiing at Sierra-at-Tahoe and Kirkwood on the South side, my heart–usually–belongs to the North. Why ‘usually’? Because until a spring skiing visit last year, I didn’t know Aston Lakeland Village existed.

south-tahoe

Aston Lakeland Village is exactly what you want in winter ski or summer lake fun accommodations with the family: its townhouse give you room to spread out, you can cook in, you have pools and hot tubs at your disposal, and it’s affordable. Plus, in winter, you get a complimentary breakfast daily. Comped breakfast…in a townhouse? What?!

My beef with South Tahoe is the constant energy of the downtown ‘strip’. Because of its location in Nevada, South Tahoe has gambling, and a lot of it. Now, I know some people enjoy this energetic ambiance, but when I’m on a mountain getaway, I want tranquility. Even though Lakeland Village is only about half a mile from the casinos, it’s completely quiet, in a wooded setting right on the lake shore.

Did I forget to say Lakeland Village is, indeed, lakeside? This was the view from our room.

lakeland-village-view

I get excited when I talk about family ski lodging with true value, because it’s hard to come by. Enjoying a ski vacation, or a summer lakeside vacation in Tahoe, is an expensive endeavor. That fact is not lost on me, trust me. At Lakeland Village,  you get a swimming beach right on the lake, big townhouses with full kitchens, free breakfast (in winter), two pool complexes, free parking and wifi, and…wait for it…comped ski lift tickets with certain packages.

We tried this out at the end of March 2016, receiving lift tickets to Sierra-at-Tahoe (Lakeland Village also offers tickets to Heavenly). It was so convenient to get our tickets at check-in, put them on our jackets, and go straight to the lifts upon arrival at Sierra. Check Lakeland’s package deals before you book; it may be well worth it to opt for a lift ticket package. Discounted lift tickets are also available.

lakeland-village

Our townhouse at Lakeland Village had a living space with TV and fireplace, a large outdoor deck overlooking the lake (with table and chairs), two full bathrooms, and three bedrooms (plus an additional bedroom considered a ‘sleeping loft’). Um, we had more room than we knew what to do with. You could easily sleep 10 in this type of townhouse, which means Lakeland Village qualifies in my favorite type of ski lodging category: perfect for multigenerational groups.

We literally stepped off our deck to reach the beachside swimming complex, where we could dip into the hot tub. (Pools are closed in winter, but an additional pool and hot tub, both open year-round, are located near the reception area and lodge.) In summer, I can imagine BBQing from the deck while the kids swim in the lake (there’s a roped-off swimming area).

lakeland-village-townhouse

Townhouse pricing:

Lakeland Village offers standard lodge rooms all the way up to five-bedroom lakeside townhouses. We had a ‘lake view’ townhouse (which meant it was 50 steps from the beach instead of 30), and during the spring season, it was listed at $359/night. Split between a couple families, that’s downright budget-friendly, right on the water in South Tahoe. Prices will vary by season, of course, but with multiple deals offered every day, this is an option families should look into when searching for South Lake Tahoe lodging.

South-Lake-Tahoe-lodging

Included in the price was the free breakfast and full maid service daily (rare in town homes). The lift ticket deal is a separate package; just call when booking if you don’t see the option online. The only thing missing was a washer and dryer, which is so helpful for skiing families. There are coin-operated laundry facilities in the main lodge, but boy did I wish we had them in the townhouse.

When we go to South Tahoe, we ski at Sierra-at-Tahoe, because of its low-key vibe, great ski school, and expert terrain. Read our full review of Sierra-at-Tahoe here.

Disclosure: We stayed at Lakeland Village as guests of the resort, for the purpose of review. Without these stays, we would be unable to provide our readers with honest reviews.

Exploring Pompeii with kids

The ancient city of Pompeii, under the looming shadow of (what remains of) Mount Vesuvius, was not precisely as we imagined it. The layout, exhibits, and interpretive materials were not clearly marked, and it took some persistence to find what we were looking for (and even then, we missed things). It’s also most certainly a lengthy and expensive commute from Rome. All this said, we were glad we went. Here’s what to expect if you make the day trip:

pompeii-planning

From Naples, Pompeii is a short and simple metro/train ride away. It won’t, however, be a terribly pleasant one. We found that the local train system that connects the central train terminal in Naples to the outskirts (where you’ll find Pompeii) to be a bit grimy, even as far as metros go. Don’t expect a cushy journey, and do expect a lot of stops. However, it’s a straight line to the Pompeii Scavi stop (the second of two that are listed as Pompeii), and once deposited there, you’re directly in front of the ticket booth and entrance. In the Naples train station, head downstairs for their metro line, and buy tickets at the kiosk. At the time of our visit, metro tickets were €2,50 each (each way).

pompeii-casts

If you’re coming from Rome, as we were, you’ll first need to take the fast train from Rome’s Termini station, operated by TrenItalia. We took several journeys on this line, and both were very pleasant. The train is very fast, very comfortable, and yes, a bit expensive. You’ll want to book your tickets for this leg of the trip ahead of time. You can print these tickets at home (you’ll want it to show a bar code) or at the station, using one of the many TrenItalia kiosks. At the time of our visit, tickets for this leg of the flight were approximately €25 each.

Once at the Pompeii stop, you’ll see a line of food stalls, as well as a small cafe and vending machines. Pick up some water if you need some. Tickets for entry to the Pompeii ruins are just a few yards away, at the official ticketing booth. Don’t buy at the train station…this is a scam. There’s another entrance by Pompeii’s amphitheater, for those with tickets bought online. The ticket line is sometimes long, but it moves pretty fast. This is a good time to eat a quick snack.

pompeii-with-kids

There are also audio guides for 5 euros each. We picked these up, and while the audio program has some flaws, we still felt it to be money well-spent. First, the flaws: the locations where you can listen to information are numbered, but they’re pretty haphazard (don’t expect it to go numerically very often). Also, many descriptions instruct the user to ‘step inside’ to see certain artifacts or architecture, or to turn down this or that hallway. In reality, many of the dwellings in Pompeii are gated to the public. You can look in, but not step in (there are exceptions I’ll describe below). All this said, if you go with the flow and listen as you wish (and as you see numbers), you’ll learn a lot. We really liked the actual information presented. It was interesting to kids, too.

Once in the Pompeii ruins, visitors are left to their own devices to wander at will. This is both a blessing and a curse. It’s nice to have the freedom to explore on one’s own, in whatever direction desired, but it can also mean you’ll miss things. There are maps available, but they’re not terribly user-friendly. It’s best to enter and make your own path, listening as you go. Depending on which entrance you come through, you’ll either be near the basilica (meeting space) and forum by the main Porta Marina entrance, or by the amphitheater. Either way, here’s what not to miss:

Pompeii with kids:

In the amphitheater area, Piazza Anfiteatro,look through this entertainment space, then enter the wooden pyramid building that houses the molds of human remains, discovered by archaeologist Giuseppe Fiorelli in 1863. Keep in mind, these plaster ‘people’ are neither replicas or remains…Fiorelli made casts of the empty spaces they’d left behind, capturing their positions at time of death. It’s very sobering, and young kids may not be ready for it.

The Palestra Grande is nearby, as well as the domus of Marcus Lucrezius Fonto, both of which help tell the story of the daily lives of those who inhabited them and used them. The main street through Pompeii is probably the via dell’Abbondanza, which will link you with the forum side of the ruins. On this side, you’ll want to see the public bathhouses, the temples (what’s left of them) and basilica, and the simpler buildings that housed ‘cafeteria’ counters, sporting arenas, and more modest homes. In this area, we only had access to the bathhouses for interior entry.

pompeii-ruins

It’s also very interesting to simply walk the streets. You can learn about the city’s water systems, traffic systems, and other public works by listening to the extra materials in the audio guide (you’ll be prompted to these after listening to numbered entries). Don’t skip these…they’re among the most interesting. You’ll see the indentions of chariot wheels in the stone streets, and learn about the ‘crosswalks’ of Pompeii. Certainly, the quality of life was generally high.

If you go:

  • Be sure to allow enough time. We had three hours, and it wasn’t enough. Grab a painfully early train from Rome if you’re making it a day trip, or go in summer when the ruins are open longer per day. While we were happy to do this in one day, we wished we had more time.
  • Pack a lunch if you can. The cafeteria onsite is overpriced and not very good (no huge surprise here), and the lines can get long, cutting into your time in the ruins. It’s permitted to picnic just about anywhere along the roads. There IS a size limit on day packs, but if you have a large bag with lunch, you can keep it at the bag check and retrieve it any time. While mildly inconvenient, I believe going back for it would take less time than we wasted in lunch lines.
  • Validate your metro tickets from Naples to Pompeii. You;ll see the green or yellow validation machines in the station.

pompeii-baths

Hours and pricing:

Tickets are €20 per adults at the time of our visit. Kids 18 and under are free. If you have tall teens like I do, have them bring an ID. We were asked at several locations in Italy to show ID for free admission. The hours are as follows:

1st April – 31st October:    daily from 8.30 am to 7.30 pm (admission closes at 6 pm)
1st November – 31st March: daily from 8.30 am to 5 pm (admission closes at 3.30 pm)

Directions:

For the entrance to Porta Marina and Piazza Esedra:
Circumvesuviana Naples-Sorrento (Pompei Villa dei Misteri Stop)

For the entrance to Piazza Anfiteatro:
Circumvesuviana Naples-Poggiomarino (Pompei Santuario Stop)
FS (Italian railways) Naples – Salerno (Pompei Stop)

Have you been to Pompeii with kids? What was your favorite part?

Trip planning with Momaboard Family Trip Planners

I have a confession: I love planning trips. For me, it’s like a puzzle to put together or a painting to outline and fill in…first you choose your family travel destination, then you book airfare and hotel rooms, then finally, you fill in the details of what you’ll do, where you’ll eat, and what you’ll see.

notre-dame

It’s this last part that can be tricky, however, especially in a brand-new-to-you location. For our most recent major trip to Paris, I tried out Momaboard‘s Family Trip Planning Service (FTPS). This online service is wonderfully simple: you select the city of your choice, you read about the local, parent expert for that region (Mombassador), and you click ‘Let Momaboard Plan My Trip’. Don’t worry: they don’t plan the whole thing, and they don’t book things for you. (This fact appeals to a control freak like me.) Instead, you fill out a short questionnaire about your trip (who’s going, your dates, what you like to do), and the Mombassador provides you with a day-to-day itinerary with suggested activities, dining picks, and routes.

How I used the Family Trip Planning Service:

When I discovered Momaboard’s FTPS, I already had several days of my Paris trip pretty well organized. However, two additional days were still blank slates on the calendar. When I filled out my questionnaire, I asked Paris Mombassador Coralie Grassint to focus on these two days, letting her know what I already had in the works for my additional days and what I still wanted to see, such as the Montmartre neighborhood, Notre Dame, and the Louvre.

After only a few days, Coralie provided me with a detailed itinerary (again, just suggestions) that I could access via the Momaboard site using a secure password. From there, I was able to download the entire itinerary as a PDF, which I saved on my phone for reference during the trip.


When I clicked on the locations, they expanded, showing me more details. At the bottom, I was given maps and specific walking and metro directions, in addition to generalized tips and helpful local phone numbers. Here’s what an expanded page looked like:

momaboard

The way Coralie organized the activities per day was extremely useful, because while I knew basically what I wanted to do, I wasn’t sure which attractions to bundle together in each day, based on proximity and walking routes. Perhaps most useful of all, Coralie included restaurant picks for each day, based on both kid-friendliness and location. More than any other feature of the service, I used these restaurant recommendations. Without them, I would have had no idea which dining establishments to try in each area. (By the way, I told Coralie that we planned to eat at casual, budget-friendly restaurants, but I could have asked for upscale recommendations.)

Using the PDF, I added some of my two day itinerary to my TripIt app for easy reference, but also kept both a printed and digital copy of the entire itinerary so I could use it as needed. I found the level of involvement to be just right: I was still in control of my itinerary and could tweak it at will, but I had solid recommendations from a local parent at my fingertips.

So what does it cost?

A Momaboard itinerary of 0-7 days is $50, and an 8-14 day itinerary is $100. If you’ll be spanning multiple cities, you can email for a quote. We only needed advice for two days, but had I known about the service sooner, I would have asked for our full Paris week to be included. The suggestions based on your kids’ ages and interest combined with the step-by-step directions for navigation make a Momaboard itinerary absolutely worth the cost. I’m sure I’ll be using them again when we travel internationally.

To create your own itinerary:

Start at Momaboard.com, and follow the prompts to select the city you’re headed to. Their list of destinations can be found here.

As we disclose whenever applicable, we were offered a Momaboard itinerary free of charge, for the purpose of review. I’m sure I’ll be using them again, on my own dime!


Exploring Shasta Cascade: Whiskeytown National Recreation Area

Northern California hosts wonderful outdoor recreational opportunities for families, from Lassen National Park to Mount Shasta hiking trails and ski areas. If you only have a day, and want a taste of the area’s lakes, trails, and mining history, head to Whiskeytown National Recreation Area, just outside Redding, CA.

whiskeytown-lake

Whiskeytown is located just 20 minutes from I-5, and I’m ashamed to say I didn’t realize it was there for years! As residents of Southern Oregon with family in Northern California, we drive this stretch of I-5 regularly. We will now add stops at Whiskeytown more often. Here’s why:

Hiking trails and waterfalls:

We visited Whiskeytown in spring, the ideal time to hike to its many waterfalls. However, summer is still a great time to explore this aspect of the park, as the creeks provide excellent swimming holes. Whiskeytown boasts numerous hiking trails of various lengths. Below are our favorites for families:

whiskeytown

  • Brandy Creek Falls: Brandy Creek is located an easy drive from the Whiskeytown visitor center on South Shore Drive, and is only 1.6 miles. You can go out and back and turn around earlier to make the hike shorter, if needed. The trail follows Brandy Creek, which has a series of smaller but beautiful cascading waterfalls, most of which result in tempting swimming holes. There are picnic spots along the way. In summer, this trail provides lots of shade, and I know it would be a good tucked-away spot to spend the day, provided you get there early enough to snag a spot!
  • Boulder Creek Falls: When Mill Creek Road is open (in the late spring and summer months), the trail to 138 foot Boulder Creek Falls is only one mile. You can also access a trail that ends at the falls via South Shore Drive, but the hike will be 2.75 miles.
  • Mill Creek Trail: This trail is over six miles, but the first mile takes families past a historic stamp mill, mine, and water ditch, which makes the walk very interesting. If you want to shorten it, just take an out-and-back approach, and stop when you’re ready.

Brandy Creek

Note: Watch for poison oak on all trails, during all times of year. It’s very active in this area.

Historic buildings and mining artifacts:

The Tower House Historic District at the top of the park is accessed via Highway 299 and features the homestead and mining claim of pioneering friends Charles Camden and Levi Tower. They made their fortune both in mining and in supporting others who came for mining, opening a hotel on the premises and stamp mill. You can tour through their orchards, Tower’s gravesite, the El Dorado Mine (on the Mill Creek Trail), and the hotel and homestead. The buildings are closed in winter, but open on select days for interior tours in summer.

el-dorado-mine

Stop by the visitor center when you enter Whiskeytown to pick up a family guide to the Tower House Historic District. This single paper has talking points for families. It gives a basic itinerary for viewing the area, with suggested questions for parents to ask kids and suggested activities in the site.

After leaving Whiskeytown, be sure to take 30 minutes or so to stop at the historic town of Shasta. This historic state park on Highway 299 (between Whiskeytown and Redding) has the remains of mining era buildings to explore.

Creek and lake swimming:

If you’re visiting Whiskeytown during Redding’s hot summer months, there are four designated swimming beaches along the lake. Only Brandy Creek beach has lifeguards. We suggest taking one of the hiking trails to find a swimming hole a mile or so inland on foot…the crowds will be much smaller and the shade will be fantastic. There are multiple campgrounds within the park as well.

Admission fee:

There’s a $10 per car fee to enter the park, good for up to seven days. Pay this fee at the visitor center at the entrance. If it’s closed, there’s a self-serve fee station at the parking lot. Note: as a National Recreation Area, kids can get national park stamps at the visitor center, and participate in Junior Ranger programming.

Directions:

From Redding, Whiskeytown is on Highway 299, about 20 minutes from downtown. It’s an easy detour from I-5, but will be at least a half-day pit stop if you’re on a road trip.