Zion National Park in winter

Before I visited Zion National Park in winter, I pictured the famed slot canyons and rock formations of the park buried in snow, with park amenities shuttered for the season and the adjacent town of Springdale hard to access on wintery roads. I could not have been more wrong. Thanks to it’s low elevation and Southern Utah location near St. George, Zion National Park in winter is completely accessible, and often warmer than you’d think.

zion-narrows

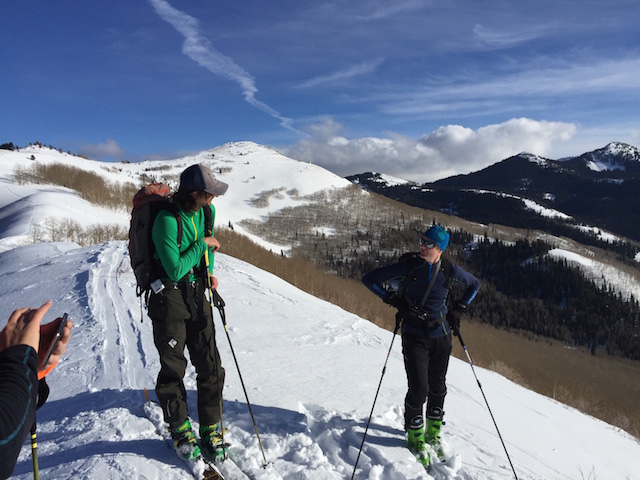
As we arrived from a weekend of skiing at Brian Head and Eagle Point (yes, you can ski and hike on the same road trip!), we rolled our windows down as we approached the park from Highway 9. It was a balmy 50 degrees when we entered the artsy, scenic town of Springdale, and inside the park, just enough snow dotted the ground and clung to the red rock to be picturesque but not problematic.

What to do in Zion National Park in winter:

narrows

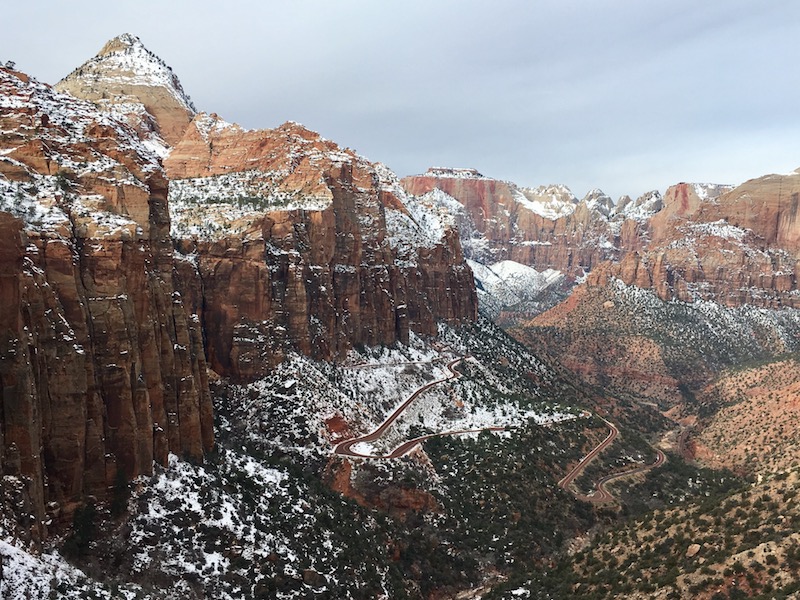
The short answer: pretty much everything you’d do in summer, but without the crowds. We hiked several trails that are usually highly impacted during the warm weather months, encountering only a handful of other people. During the winter, the Zion Canyon Scenic Drive can be done by car; in summer, you must take the shuttle. Most of the hikes that start from points along the drive are open during the winter months, too, which makes Zion National Park your personal playground in December, January, and February.

Hike The Narrows in winter:

zion-national-park

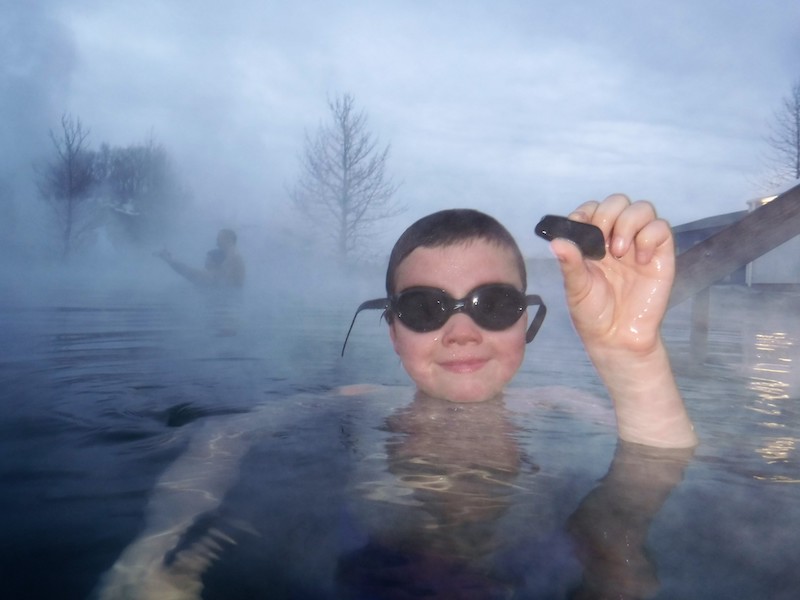
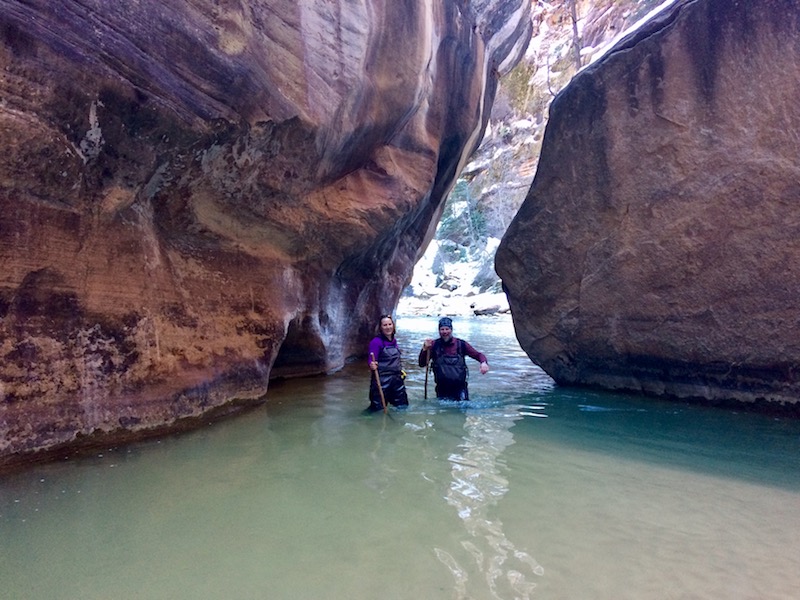
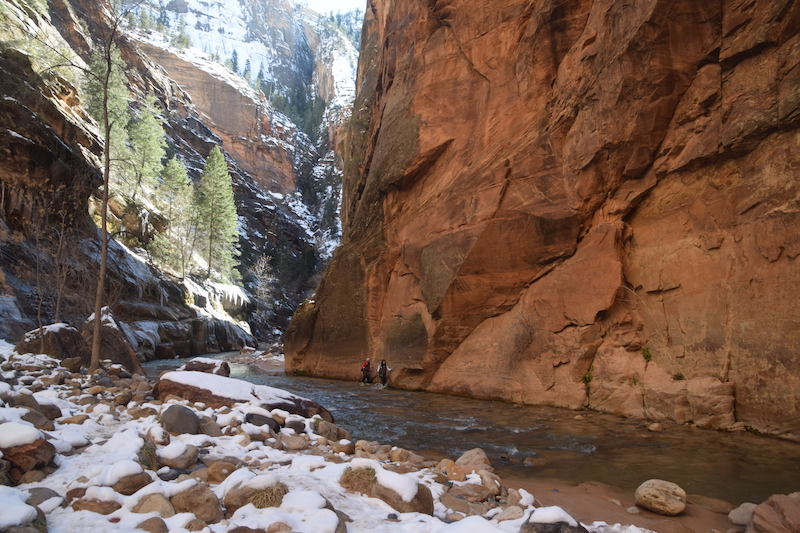
Hiking The Narrows was the highlight of our Zion winter trip. While we loved The Narrows in summer, going in winter is an entirely different experience. Start at Zion Outfitter, located at the entrance of the park by the visitor center. These guys can set you up with dry suits, special river shoes, and booties, which you’ll definitely want for the Narrows in winter. For $45/person, you get dry bibs (that go chest high), Adidas HydroLace canyoneering boots, neoprene socks, and a wooden hiking stick. For a little less, you can opt for waist high pants.

Note: you can rent the boots and socks in summer too, which I now realize would work better than the Keens we wore last time!

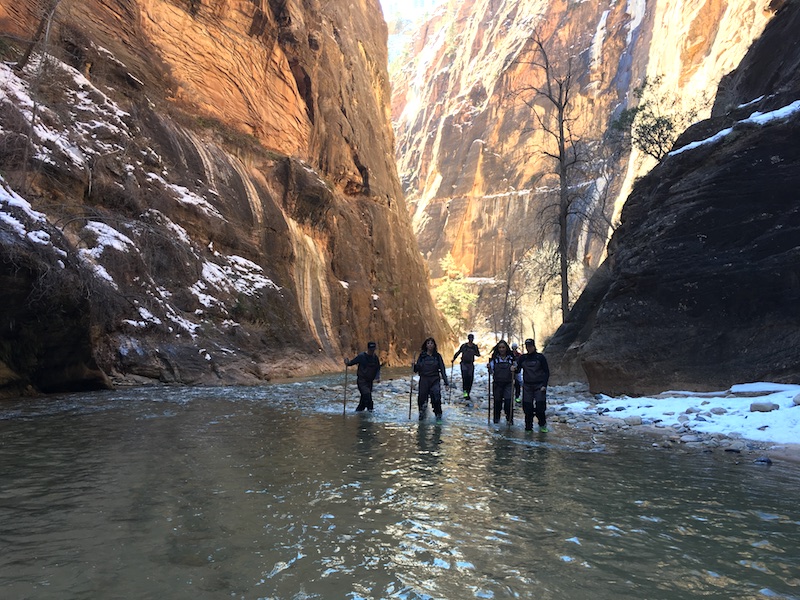
You can arrange for a guide to go with you in The Narrows, but families can also do it solo, provided you check the weather and conditions first at the visitor center. The Narrows are known for flash floods, which can happen any time of the year. To get to the river, go up Zion Canyon Scenic Drive to the last stop, Temple of Sinawava. You’ll take a paved trail for one mile, which ends at a good entrance to the Virgin River. During our visit, the trail was icy, so go slowly if needed, and be aware of icicles and potential falling ice above you.

Once in the river, make your way at will, sticking to the shallow spots as desired. The entire way up The Narrows to where it splits with Orderville Canyon takes a couple hours (it’s about 3.5 miles), but families can stop anytime; it’s an out-and-back. Take care to keep your upper body dry; water WILL pour into your dry suit from the top of the bib if you go too deep. Otherwise, the dry suit set up kept us very dry and comfortable.

Note: the canyoneering shoes WILL let in water; this is normal, and the reason for the wetsuit-like sock.

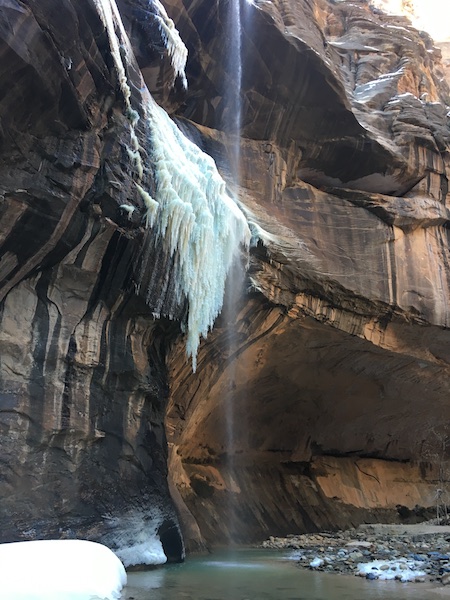
The Narrows in winter are truly magical: the snow and ice contrast with the red rock and water with such beauty, you’ll want your camera out at all times. And unlike in summer, when you’re wading through the river with crowds of people, you may have the river to yourself. I found myself completely alone more than once in the canyon.

narrows


Additional hikes:

The easy hikes along the scenic drive, including the Grotto Trail and Weeping Rock Trail are usually open in winter, but be aware that they may be icy. Bring extra traction for your hiking boots, like YakTraks, and you should be ok. While we were at Zion, we also did the Canyon Overlook Trail, which is located just past the tunnel within the park (take a right at the ‘Y’). Canyon Overlook offers big views for little effort; the whole hike is less than 1.5 miles, and though fairly strenuous, includes features that will be fun for kids, like stair climbs, overhangs, and wooden planks. Just take care with young kids as there are drop-offs along the trail, though the end overlook does feature a railing.

canyon-overlook

While we were at Canyon Overlook, a park ranger also recommended Sand Bench trail to us in winter. The Sand Bench Loop starts at the Court of the Patriarchs shuttle stop and is roughly 3.5 miles (round trip). From the shuttle stop, take the hikers’ bridge across the Virgin River. The trail crosses a stream, then continues past a landslide area from the ’90s. You gain elevation of about 500 feet, much lower than any hikes to the canyon rims. Plan to encounter sand, but as a winter bonus, it may be frozen or at least hardened.

Where to stay at Zion National Park in winter:

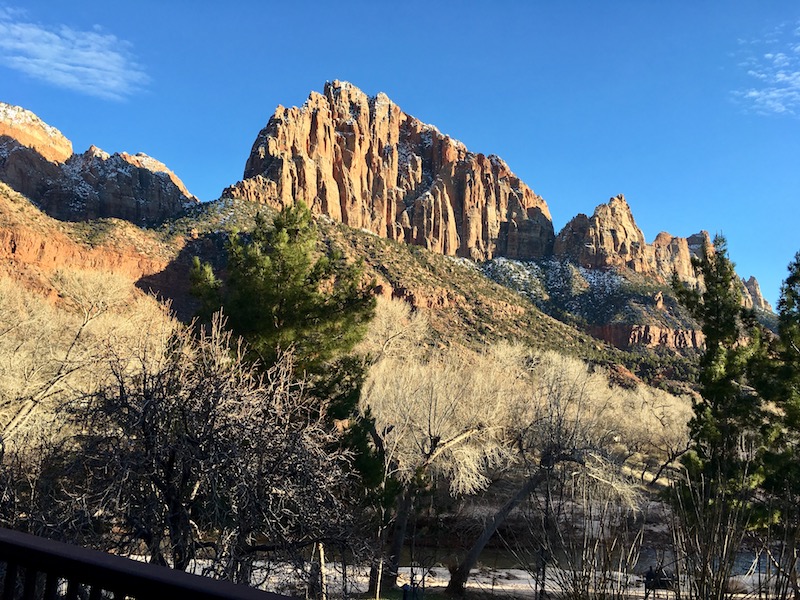
We have stayed at Cliffrose Lodge in both summer and winter, and love this property. See why it’s great for families here. The Cliffrose has been family-owned for many years, and the owners are committed to the area, putting money back into their property, and elevating the tourism experience in Springdale and Zion National Park. The lodge is just outside the park boundary next to the visitor center, and the view out of every window is fantastic. In summer, the gardens and access to the river turn the Cliffrose into an extension of the park for outdoor play, and in winter, the open, elegant lobby beckons. A full restaurant is slated to open in 2017, as well.

cliffrose-view

In winter, three outdoor hot tubs are at your disposal (in summer, there’s also a spacious pool), and a breakfast-in-bed (in room) menu is available for $10/person. Cliffrose suites are perfect for larger families, as they have two bedrooms separated by a full kitchen and dining area, with balcony or patio.

Where to eat in Springdale:

Springdale, the tiny town at the entrance of the park, is unlike any other ‘national park town’ I’ve experienced. It’s a destination in its own right, with art galleries, eateries, and specialty shops hugging Highway 9 against the backdrop of jaw-dropping canyons. From the Cliffrose, you’re only a few blocks from just about everything. The following restaurants are our favorites, with a few we haven’t tried added in that have been recommended by locals:

  • 9 East: this upscale Italian and Mediterranean bistro has been opened by a recent executive chef from Las Vegas
  • The Spotted Dog: American bistro fare
  • Bit ‘n Spur: upscale Southwestern/Mexican hybrid cuisine
  • Oscars
  • Kings Landing

How to extend your Zion National Park trip in winter:

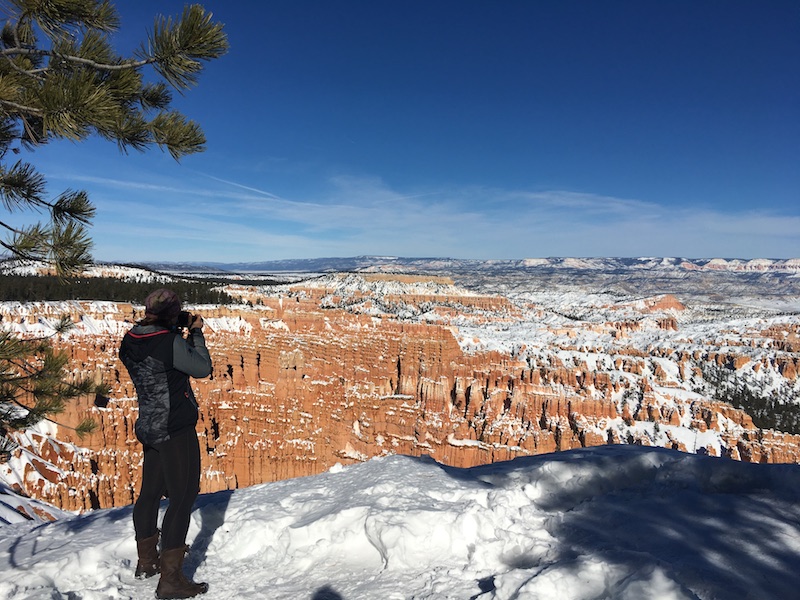
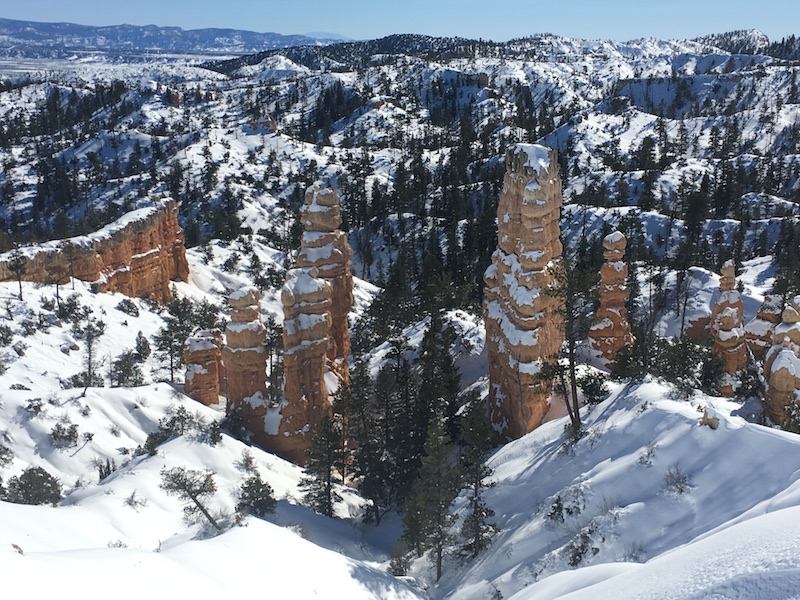
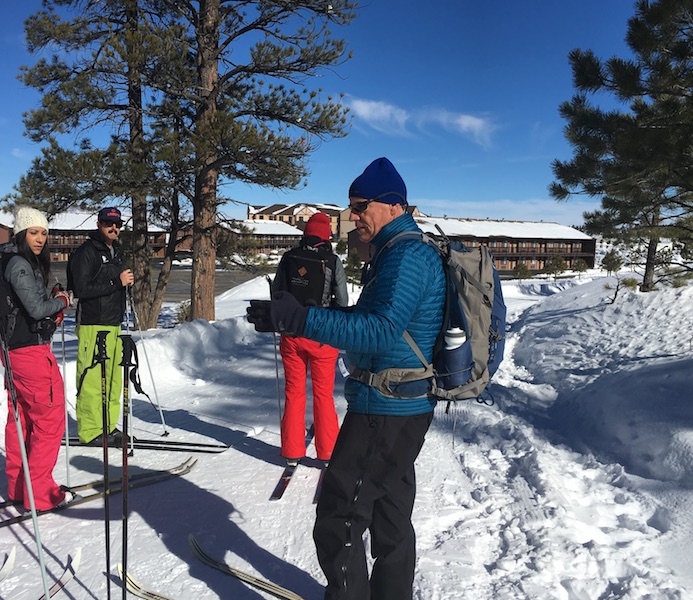
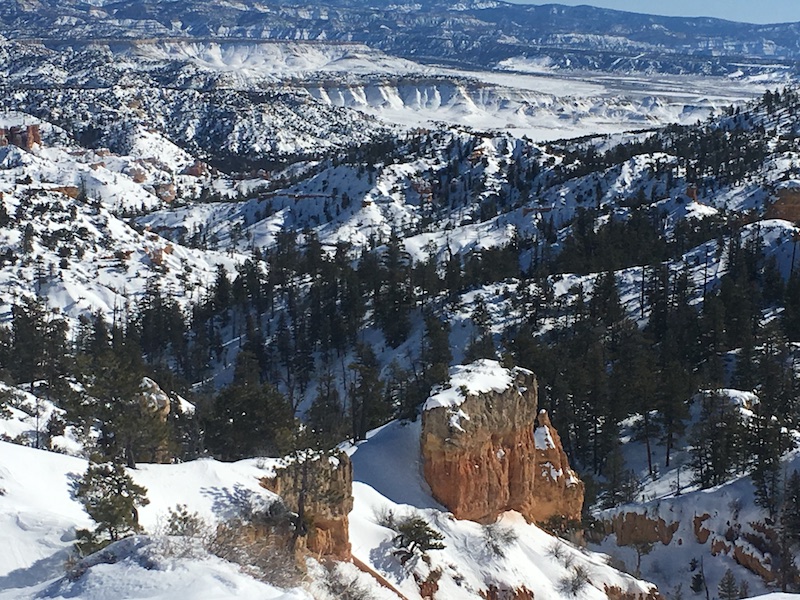
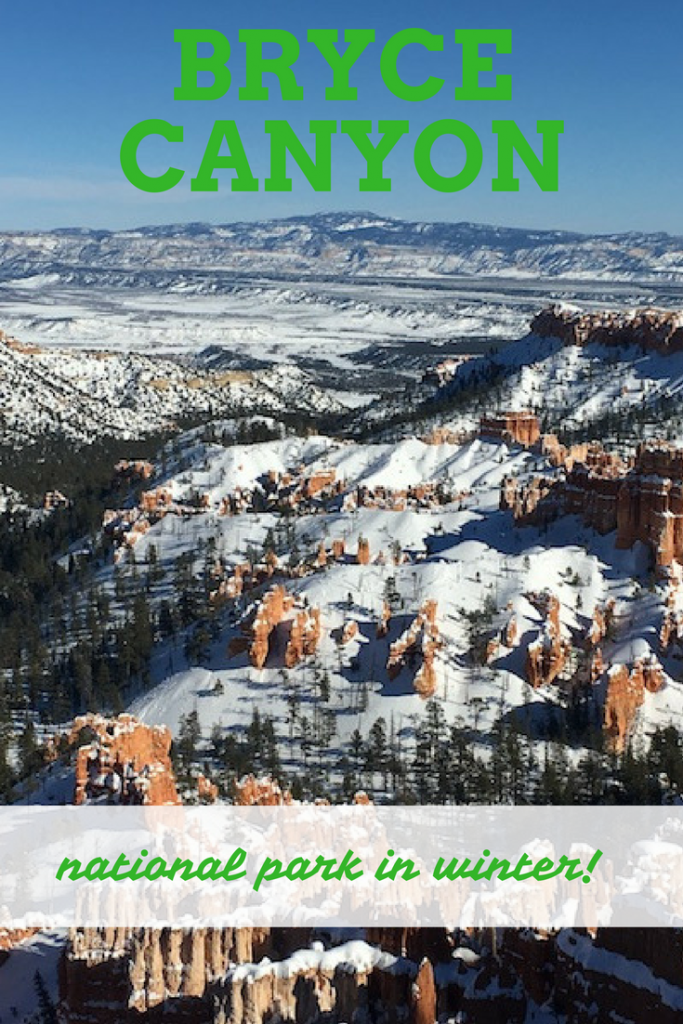
I recommend staying in Springdale at least three days in winter to enjoy both the town and the park, then extending your stay in Southern Utah to include Bryce Canyon National Park or a Southern Utah ski resort. Brian Head resort is only about an hour away, where families can snowmobile, ski, and snowboard to round out an adventurous vacation.
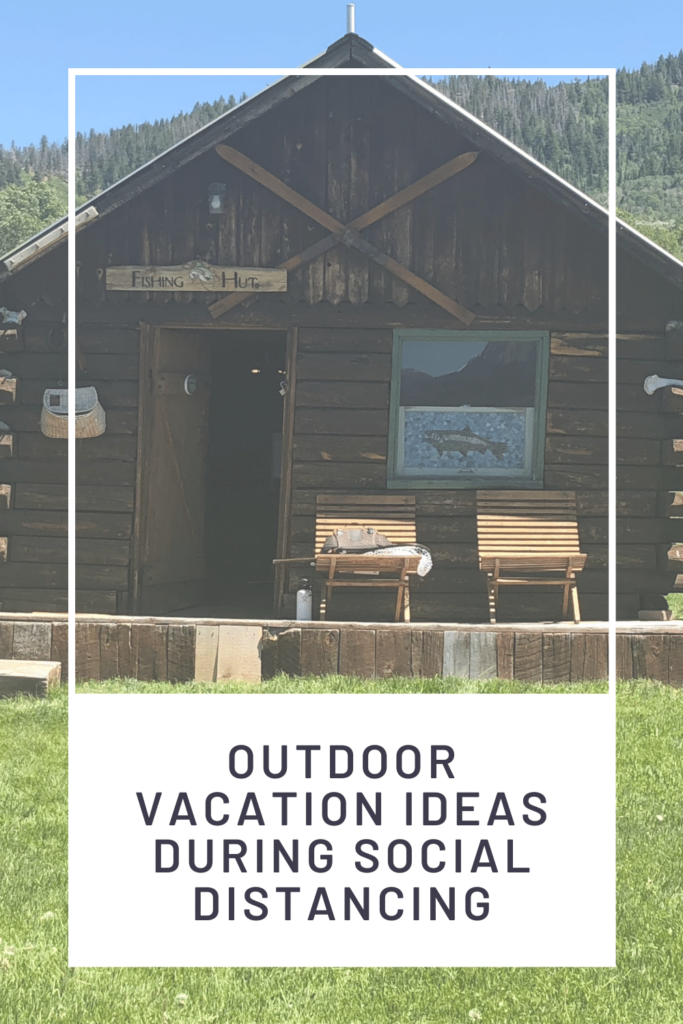
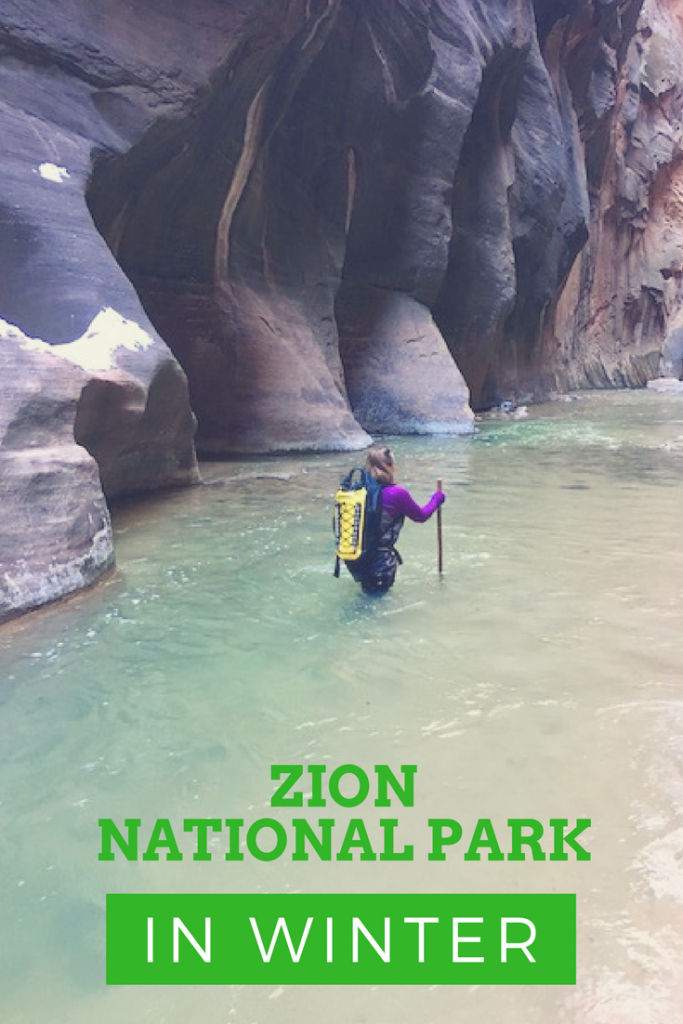
Pin it for later:

Zion National Park in winter? Yes, please!

I was a guest of the Cliffrose and Zion Outfitter for the purpose of review. All opinions remain my own.

Bryce Canyon National Park in winter

If you’ve been to Bryce Canyon in summer, you know this national park is incredibly scenic, and also incredibly crowded. Even the ‘shoulder’ seasons of late spring and early fall are becoming congested with tourists. But come in the heart of winter, and you’ll have this playground of natural wonders to yourself.

bryce-national-park

Things to do in Bryce Canyon National Park in winter:

Much of Bryce Canyon stays open year round. With an elevation of around 7000 feet, families may or may not encounter snow; we did, on  our trip, but I was told it varies by season. If there is snow, it’s possible to cross country ski or snowshoe in and around the park, and of course if you encounter dry ground, hiking is an option. Just keep an open mind and be flexible.

Start at Ruby’s:

On the north end of the park, just outside the boundary, lies Ruby’s Inn, which is actually an entire complex consisting of a activities center, wild west dinner show venue, restaurants, and hotel rooms. Reuben (Ruby) and Minnie Syrett arrived in the area in 1916 and founded Ruby’s in 1923. It’s owned by the family to this day.

If you need a place to stay overnight, Ruby’s has clean, basic hotel rooms on the edge of the park, but it’s a great stop if you’re in Bryce Canyon just for the day, too. In winter, Ruby’s offers a winter sports center with an ice skating rink, a nordic track with six miles of trails (which connects to more in the national park) and cross-country ski and skate rentals.

bryce-canyon

We rented skis and took to the nordic track, which curves around the Ruby’s complex to the edge of the canyon. After just a 15 minute ski, you are rewarded with amazing views of Bryce. I suggest taking the two mile loop with kids; cross-country skiing is not hard to learn and a fun way to see Bryce in the snow.

The restaurant at Ruby’s is adjacent, and has a family-friendly buffet at both breakfast and lunch, as well as a menu to order off of. At very low crowd time periods, such as when we visited, they may not offer the buffet, but will still have a full sale and soup bar. Ruby’s is not fine dining, by any means, but a solid choice for feeding the family. Next to the restaurant is an extensive store, where you can pick up souvenirs but also groceries, winter clothing, and anything else you may have forgotten.

See Bryce Canyon with an expert with Bryce Valley Tours:

You’ll have Bryce Canyon to yourself in the winter, but you may not know where to go or what you’re seeing. We had the opportunity to see the park with John of Bryce Valley Tours, who accompanied us on our ski trek and explained the geological history of the canyon as we skied. John also offers half-day and full-day tours, which can be tailored to your family’s interests. Half-day tours are $75/pp, which I think is a good value for the opportunity to have an expert guide you who knows which parts of accessible in snow, which are closed in winter, and the like.

bryce-valley-tours

Stop at the visitor’s center:

The Bryce Canyon visitor’s center is located directly past the entrance, and is small but worth the stop. The exhibit area explains the geological history of the canyon’s rock formations, including the hoodoos you’ll see everywhere. Get the kids their Junior Ranger booklets, and get stamps in your national park passports.

Drive to the most scenic lookouts in the park:

Bryce Canyon is a park that’s big on views. The major lookouts are all open in the winter, even in snow. Drive in and check out Inspiration Point—trust me, it’s aptly named—and Swamp Canyon. The latter is much more stunning than the name suggests. At each of these lookouts, short hiking trails are available. When we visited, the snow was several feet deep, but they were still open, albeit difficult to navigate. If you decide to walk a bit, be careful of your footing, as you ARE on the edge of a canyon. Snowshoes would help.

bryce-canyon

Tips for visiting Bryce Canyon National Park in winter:

  • Call the park ahead of your trip to stay up-to-date on any road closures or closed exhibits; this is the off-season.
  • Be prepared for any type of weather; you could get snow or sun. Make sure everyone in your group has winter boots, waterproof pants, a hat, gloves, and jacket. You don’t want to get caught off-guard and have to buy all this at Ruby’s!
  • If there IS snow, try snowshoeing to get around on the trails.
  • Wear sunscreen; the high elevation causes people to burn easily if the sun is out.
  • Hydrate and go slowly at elevation until you’ve acclimated. Check out our tips for adjusting to high elevations.

Everything you need to know about visiting Bryce Canyon in winter

Guide to visiting Iceland in the winter with kids

Unless you’ve been living under a rock, you’ve been hearing the word ‘Iceland’ related to ‘family travel’ for a few years now. Families can have a great adventure in Iceland during the warm months (in fact, stay tuned for a guide to camping in Iceland with kids), but many people are still reluctant to try visiting Iceland in the winter with kids. It’s a great time to visit, and if you read on, I’m going to guide you through your worries and reservations so you can take advantage of visiting during this time of year.

Why you should consider visiting Iceland in WINTER!

Advantages to visiting Iceland in the winter with kids:

  • Fewer crowds
  • Cheaper
  • Better chance of seeing Northern Lights
  • Museums and sights are open year round
  • The hot spots/tubs/pools are a big hit in the colder weather!

Why take kids to Iceland?

  • Iceland is very kid-friendly with lots of museums, exhibits and sights that kids would enjoy.
  • If your kids enjoy swimming, they will love visiting the many, many hot spots Iceland has to offer.
  • Icelandic tradition is steeped in elves and trolls, making it a fun fantasy land for kids with active imaginations.
  • It’s a great introduction to international travel because everyone speaks English as well as Icelandic, they drive on the right hand side of the road, and the money is in Icelandic kroners but easy to figure out. Just international enough to make it exciting!

Our concerns about winter travel with kids in Iceland:

  • Shortened daylight hours—We visited in early January when the sunrise was at 11:30 and sunset was 3:30. But it actually gets light around 10:30 and doesn’t get dark until 4:30. Keeping the kids on east coast time, they went to bed late and slept in late, so it worked out fine. (See ”daily schedule” below.)
  • Weather—No matter what time of year you visit Iceland, you have to be conscious of changes in the weather and adapt your plans accordingly. The days were around 40 degrees with very little change at night. It snowed lightly some days, but nothing that made travel difficult. On a few occasions, the wind made being outside too cold. All in all, being used to cold winter weather, as long as the kids were dressed appropriately (and adults!), we were fine. (See “clothing” below.)

What to see and do along the Golden Circle:

We started out by staying in Laugarvatn, along the Golden Circle about two hours from the airport in Keflavik. We stayed at Efstidalur II, a working cattle ranch. This farm hotel is in an excellent location to explore all the sights of the Golden Circle. They serve breakfast and dinner (not included in $140 room rate for a double) and have a wonderful ice cream parlor downstairs.

golden-circle

From this hotel, we could easily access Geysir, home of the famous Geysir and Stokkur geysers. This is a short walk along a path. It is a bit touristy, but a must. There is a café, restaurant and gift shop. It’s also close to Gulfoss, home of Iceland’s most famous double waterfall, Golden Falls.  This can be reached by walking along a path along the top of the ridge as well as down to the bottom of the falls. This location is not to be missed.

Pingvellir National Park is Iceland’s most important historical site where the Vikings established the first democratic parliament. It is also where the North American and Eurasian techtonic plates meet causing a huge fissure. There are many paths into the park from several parking areas. You can visit amazing waterfalls as well as walk along the giant fissure to a visitor center. Near Pingvellir is Fakasel Icelandic Horse Park. We did not go here, but it was recommended to us by locals. You can take a barn tour and see an evening show.

Hot springs to visit in the Golden Circle area:

  • Gamia Laugin (Secret Lagoon) in Fludir. This was wonderful. Bus tours visit here, so you need to come either before 3:30 or after 5:30. You can email them and request a time that is not during their tour hours to guarantee you get in. This pool is in beautiful rustic outdoor setting but with modern shower facilities and towel rentals. Kids loved floating around on the noodles provided and diving down for smooth stones along the bottom. Water was almost too hot for the kids for very long.
  • Fontano geothermal pool in Laugarvatn. This is a more modern facility with several man-made pools, hot tubs and shallow wading pools. It is also next to a lake you can go into (cold!) and then return to a hot pool. Kids loved this one too because they could play in the shallow water and not get so hot!

What we saw along the Ring Road south of Reykjavik:

Just beyond Selfoss, the Ring Road becomes very interesting with lots of green houses and Icelandic horses. After Hella there is flood zone that was covered in muddy lava fromt ohe 2010 eruption of Eyjafjallajokull.

icelandic-horses

  • Seljalandsfoss waterfalls—this is a roadside pull out with paths (icy!) to several impressive waterfalls. There were restrooms but no food service. Lots of jagged cave entrances and rock outcroppings.
  • Skogafoss waterfall—another road side stop with a path to the top of a huge waterfall. There is a restaurant here.
  • Just beyond this in Skogar is the Skogar Folk Museum that we did not have time for, but sounded like it would be fun for kids.
  • We did not make it as far as Vik, but would have liked to have seen its beach.

Reykjavik and the Blue Lagoon:

There’s so much to do in this part of Iceland in winter! Start with the Blue Lagoon: since this is the most famous of all the geothermal pools in Iceland, we had to visit! You need to make and pay for reservations in advance on line. You sign up for a day and time. We almost missed our time, but it would have been okay if we were a little late. This is pricey and very touristy, but it is also pretty amazing. It’s a huge lake, basically, with swim up bars. It gets quite deep and kids have to wear water wings, no matter what their swimming ability, to go out into the deeper water. Our kids did NOT like this rule at all and I wish I had been able to prepare them for it. There is a snack bar but other than a really fancy restaurant, no regular café-type food.

iceland-with-kids

There is a lot to see and do with kids in Reykjavik in the winter. If you are staying in the city center or old town, it is easy to walk everywhere. When booking your accommodations, make sure you are not on a busy street. The bars and pubs stay open all hours and are noisy at night Book a walking tour. We booked a walking tour with “Your Friend in Reykjavik”. Read about them on line or on TripAdvisor. It was just the six of us and our tour guide adapted the tour so the kids would have fun as well. On their recommendation, we booked it on a Saturday so we could visit the Saturday Flea Market. It was a two-hour tour through Old Town, the harbor, the city center, flea market and the town lake, Tjornin, where we fed ducks. This family run company was also very helpful before we even got to Iceland, with lots of insider recommendations and suggestions. Here are a few Reykjavik highlights:

iceland-in-winter

  • Saga Museum—This is a wax museum where you where a set a headphones and are guided through the museum listening to Viking history. It is a bit graphic and our 6 year old wasn’t crazy about it, but it was fun for the rest of us. It has a kid play area where you can dress up. It is in the harbor area. The museum has a fancy restaurant, but there are several cafes long the harbor.
  • Settlement Exhibition—This museum is built around the excavation of an ancient Viking long house. It is underground and has lots of very cool computer generated effects. There is also a really nice kids area with dress up, games, coloring sheets and a Viking set up. Highly recommended.
  • Hallgrimskirkja church elevator—take the elevator up to the top of this iconic church to get some great views.
  • Open Air Museum (Arbaer)—this was only open during the week for 2:00 tours, and our weather didn’t really cooperate but it would be a great place to take kids if it were nice outside.
  • National Museum—we did not take the kids to this, but it has very well organized displays and there were lots of kids in the museum. It has a separate head set program for kids.
  • The Laundromat Café—this is a great family restaurant with a downstairs play area for kids. We ate here four different times! It’s just minutes from Old Reykjavik along the main shopping street of Laugavegur.
  • Laugardalslaug swim complex—We had to drive to this, but it was only about 10 minutes. This is a huge complex that has several full size pools and a lot of smaller hot tubs around it. The kids loved it because it had a twisty slide you could go down.

Up next, packing advice and practical tips for visiting Iceland in winter with kids! Click on the button below to continue.

fathom-cruise

Pages: 1 2

Seven destinations for family biking vacations

Introducing your children to an active lifestyle has become more challenging with skyrocketing technological innovations. During family biking vacations, kids can quickly develop poor fitness and eating habits that lead to chronic diseases later in life without consistent physical activity. Limiting your child’s screen time to roughly two hours per day and encouraging spending time outdoors can significantly impact their mental and physical well being.

mountain-biking

Guide your family through health-based lifestyle changes by speaking to them about the importance of physical activity and maintaining a health and fitness routine yourself. If your children are less than enthusiastic about routine workouts and dietary additions, enroll them in an exciting sport or plan an exercise-centered vacation to get them in the spirit. 

In particular, biking trips are an excellent way to prevent your family from becoming sedentary couch potatoes while strengthening your bond and promoting a healthy lifestyle. Traversing unfamiliar locations at your own pace sans tour group is an engaging, fulfilling way to explore the world around you. 

Before you embark on a cycling adventure, you’ll need to prepare your bikes for transportation. Investing in a durable rack is crucial when lugging your beloved two-wheeler across the country. If you want to forgo the frame, carefully secure your bike with self-gripping straps to ensure safe, stress-free travels. Now that you’re ready to embark on a new adventure, examine the best cycle-friendly destinations and head out for the family trip you won’t soon forget. 

Choosing a bike for your youngster 

Before you land on the perfect destination, equip your youngsters with a sturdy, well-made bike. Parents should choose models that are lightweight and easy to maneuver, like those with aluminum frames. Determine which tire size works for your child, as the wrong measurements can result in discomfort and loss of control. If your children are toddlers, a 12-inch model should do the trick. For older kids aged six to ten, a 20-inch bike should do the trick.

woodloch pines

Discovery Trail, Washington 

Discovery trail in Washington is a scenic route, comfortable for all ages. Landing at 8.5 miles, riders will cut through sand dunes and meander along rolling curves. Awe-inspiring views of the Pacific Ocean offer a diverse landscape, and 20-foot trees will make your family feel like forest wanderers. 

Mammoth Cave Railroad Bike Trail, Kentucky

This green park features beautiful paved trails, swimming holes, and 365 miles of underground caves. Your family will jump at the chance to explore the grounds between cycling sessions, and the covered pathways are ideal for beginner bikers. 

Shining Sea Bikeway, Massachusetts 

Shining sea bikeway sits alongside Cape Cod’s peaceful shoreline. Sailing along the ocean on an established pathway will allow your family to relax as you glide by the sweet serenade of the sea. As you traverse the sandy beaches, look out for wildlife and curious otters and snap a photo for long-lasting memories. 

Shark Valley Trail, Florida 

At Shark Valley train in Florida, your children will beam at the opportunity to bike amongst mighty gators. Cycle through the gorgeous Everglades and safely travel past dozens of gators for a thrill of a lifetime. The vibrant green ecosystem and warm weather make for an unforgettable getaway and easy-going bike ride. 

Mid-Mountain Trail, Utah 

Located in the mountainous Park City, Utah, this trail is ideal for families looking to push their endurance and improve their cycling skills. Twenty-five miles of trail steadily climbs to mountain peaks, connecting three iconic ski resorts. This quintessential track is beloved by locals and biking tourists alike, often names one of the best in the country

Memorial Park Trails, Texas

These Houston trails allow you to explore the park at your own pace. Although some routes are more explored than others, your kids will likely come across countless friendly tikes on bikes. Other trails, like Little Cambodia, feature a more challenging terrain and separation, creating an intimate, private biking experience.

Teaching your kids healthy habits starts by getting them excited about exercise. Biking vacations allow your children to enjoy physical activity while becoming a tradition your family looks forward to all year long.

Belize adventure vacation: What to do with a week in San Ignacio Belize

If the first thing to comes to mind when you think of Belize is beaches and cays, it’s time to rethink this small country that’s big on outdoor adventure. For those who venture into the interior, especially the west side of Belize in the Cayo District, rivers, caves, Mayan ruins and culture abounds. Here’s how to spend a week or more in the Cayo District, based in the town of San Ignacio.

Belize adventure vacation: San Ignacio Belize

Why base yourself in San Ignacio? This small town of around 9,000 is within minutes of Mayan sites, and less than an hour’s drive from some of the best caving, tubing, hiking and canoeing in Belize. San Ignacio is friendly, easily explored on foot, and offers up what I believe to be the best boutique hotel in the region: San Ignacio Resort Hotel. (See our full review of the San Ignacio Resort Hotel here.)

You’ll want to rent a car or arrange for a hotel shuttle transfer from the international airport near Belize City to San Ignacio, which is about 80 miles to the west, near the Guatemalan border. Unless you plan to book guided tours daily, which frankly, is what we opted to do, you will definitely want your own car to explore the Cayo District. Here’s what not to miss:

Xunantunich and Cahal Pech Mayan ruins:

Both these archeological sites are rich in historical and cultural significance, and both are within easy distance of San Ignacio. In fact, you could walk to Cahal Pech from the San Ignacio Resort Hotel. Xunantunich is about a 25-minute drive and is the larger of the two sites. To get there, you’ll need to cross the Macal River via a small hand-propelled ferry system, which is free but requires passengers to exit the vehicle and stand on the moving ferry platform while crossing. The river is small and the process takes less than five minutes. From there, follow the road one mile to the parking area and ticket booth, then climb the hill to follow in the footsteps of the Mayan people who once lived here.

I highly recommend hiring a guide to tour Xunantunich and Cahal Pech, as we know we would not have understood half of what we looked at without Cruz, our trusty guide from San Ignacio Resort Hotel. From the main courtyard of the ruins, you can take in the ceremonial buildings of the priests and the living quarters of the royal Mayan families who once inhabited this region, and you can climb the steep steps to take in the views of the surrounding jungle. Cahal Pech is smaller, but allows for even more exploration of the interiors of the ruins; we wound our way along ancient corridors and through archways to one-time bed chambers. At both sites, be sure to note the ball courts where games were played, and peek into the small museum space at Cahal Pech.

Note: visitors to this region can also tour the famous Tikal ruins in Guatemala; it’s a short drive to the border for a border crossing, then about a two-hour drive. Your guide will hand over the reins of your day trip to a Guatemalan guide at the border.

Mountain Pine Ridge Forest Reserve:

I had no idea that a pine forest existed in Belize, until we toured Mountain Pine Ridge Forest Reserve. Located at about 3000 feet elevation, the reserve is located about an hour and a half from San Ignacio along pretty rugged (at times) dirt roads. Yes, it’s a long drive, but once inside the park, we found some of our favorite outdoor attractions in Belize. The change of scenery alone is stunning! While guided tours of this reserve are optimal, it’s definitely do-able to drive yourself as long as your vehicle can navigate the rough roads. You’ll want a good map of the area, and be advised that Google won’t help you once in the park.

The Rio Frio Cave is located about 11 miles down the main dirt road of the park, where a cavernous opening leads to what the Mayans once described as the Underworld. It forms a sort of tunnel here, with the Rio Frio pooling and winding through it. Nearby, the Rio On (there are lots of small rivers in this area) awaits, with a series of deep and shallow pools ready-made for adventurous kids (and their parents) to explore. Stop at the turnout for the River On Pools, where you can go to a picnic area and overlook to the left (where a series of steep stairs take you to the river and the lower pools) or to the right, where you can access a gentle trail to the upper pools. We chose to descend the stairs and climb and leap our way up the river, sampling pools as we went, but there is a small, rudimentary changing area and a sandy slope to the pools if you opt for the easier path. The River On Pools were our all-time favorite activity in Belize, and we could easily have spent all afternoon there. Perhaps because they’re difficult to get to, the pools are not crowded at all when we arrived right after lunch on a weekday in February.

Closer to the entrance of the park, you can also follow signage to 1000 Foot Falls, the impressive waterfall you’ve likely seen on postcards and posters of Belize. It’s a decent detour on another rough dirt road (it took us about 30 minutes to get there from the main dirt road), and features an overlook where you can snap photos of the falls and watch for hawks and raptors circulating along the steep, impressive ridgelines. While we were impressed by the view, we wished some trail networks existed here, because after the long drive, we were itching to get some exercise and spend more time along the ridge.

Note: there are a number of eco lodges in the park, but if you opt to stay in one, remember how remote they are! Once settled, you likely won’t be venturing throughout the Cayo District much until you depart.

St. Herman’s Cave & Blue Hole:

No, not that Blue Hole…the one everyone snorkels and scuba dives in is located on the ocean, whereas this Blue Hole is a delightful swimming hole deep in the jungle. Start by touring St. Herman’s cave, for which a guide is required. We loved this tour for several reasons: first, it’s unlike caves in the US with their guard rails, lights, and paved paths. St. Herman’s cave is navigated by climbing, hiking, and sometimes crawling through the limestone passageways. Secondly, the Mayan history is here is fabulous: you can spot shards of pottery and some large pieces of vases and dishes in the cave, as well as ancient remnants of ash and charcoal from campfires. The cave was once used for rituals and the space resonates with history.

It takes about 1.5 hours to navigate the cave, and by the time you emerge on the other side, you will be hot and sweaty (yes, this cave is warm!). This is when to go swimming at Blue Hole! There are also four distinct hiking trails through the jungle here, all part of the Blue Hole National Park, so if you didn’t come with a guide (and therefore can only peek into St. Herman’s cave) you can enjoy the trails at your leisure. There are also guided tubing tours through the cave, though personally, we thought it more fun and more peaceful to cave spelunk away from the splashing, noisy groups.

Note: ATM cave is one of the most popular in the region, and while we did not tour it, we were advised that St. Herman’s is more technical and more challenging to navigate. If you would prefer something a bit more relaxed while still beautiful and impressive, ATM may be the better option for you.

We spent four full days in San Ignacio and barely scratched the surface of all there is to do here. In addition to the tours described above, cultural tours of Mayan women’s co-ops (where traditional cooking can be learned) and San Ignacio (where the art of Mayan chocolate-making is demonstrated and sampled) should not be missed. The latter can be arranged on your own as you walk through town, but the former requires a guide. There are also Macal River canoe trips, additional caving options, and the Green Iguana Conservation Project, located at San Ignacio Resort Hotel. (See our review of the hotel for a full description of this on-site project.)

Guided tours can be booked downtown, but we highly recommend arranging your tours through the concierge at San Ignacio Resort Hotel, who will take the time to describe your options and make the experience seamless. Tours are kept to your own family group, so you get a personalized experience every time, and if you book multiple tours, they do their best to give you the same guide each day, so you establish a great report and friendship. You don’t need to be a guest of the resort to utilize their expertise, though I do recommend staying here!

Do you have a favorite Cayo District outdoor adventure? Share in the comments!

Backcountry skiing basics: How to get into the sport

It’s never been a better time to get into the backcountry and leave the crowds behind! Here’s how to get into the sport during the COVID season!

An avid downhill skier and snowshoer, I’ve been noting the small but growing trend toward backcountry skiing for some time now. This sport, which combines a love of nordic exploration and downhill excitement, attracts men and women (and yes, some kids) who want to carve their own line down mountain terrain and explore the wilderness at the same time.

backcountry-skiing

I got my first pair of backcountry skis in 2012, which were basically fat nordic skis with a three-pin binding. I found I could navigate single-track nordic trails with steep inclines much better than my nordic skier counterparts, and I was hooked. Today, all-terrain (or AT) ski gear is much more involved, but AT skiing is still a fairly diverse term. Just like the sport itself, it can mean something different to every enthusiast, from short hikes up to freshies from lift-accessed runs to full-day expeditions with beacons and probes.

In January, I was lucky enough to experience the sport in more depth, this time trying out top-of-the-line AT skis, boots, and bindings on a half-day, strenuous backcountry ski day in Utah’s Cottonwood Canyon near Solitude Mountain Resort.

I headed out with Utah Mountain Adventures after getting outfitted with Voile skis with Dynafit bindings and Scarpa AT boots. I carried a backpack with plenty of water, plus a shovel and avalanche probe. I strapped an avalanche beacon, provided by Utah Mountain Adventures, to my body.

AT-skiing

The only way to get fresh powder runs was to climb uphill, so my first lesson was in putting on skins. Turns out, this is easy. The hard part is to climb upslope. We climbed for over two hours, stopping for a few breaks, skinning up a mountainside in the Wasatch Mountains. I’d like to say I enjoyed the whole experience,  but in truth, by hour two, I was sweating enough to shed a layer and starting to feel hot spots (which turned into blisters) where my socks rubbed in my boots. I was told to loosen my AT boots for the uphill climb (there’s a walk mode and ski mode), and while I’m sure this is sound advice, it didn’t help on the blister front.

The whole uphill experience reminded me of hiking: there were periods of enjoyment while I took in breathtaking views and reveled in being in the wilderness in winter, but also periods during which I had to set tiny goals–get to the next tree, get to the next open slope–in order to carry on. In other words, it’s crucial to love the outdoors and the uphill ‘hiking’ process, or the joys of backcountry skiing may be lost on you.

Climbing in AT skis is not very difficult–it’s much like cross-country skiing–but there are moments when kick turns may be necessary to zig-zag along steep grades. Yes, there’s a learning curve to this, but here’s what I was told (and it helped): use as much of the flat plane of your ski base as possible. Staying on your edges, where you don’t have skins, won’t help you keep traction.

backcountry-skiing

Once we’d summited a peak in Cottonwood Canyon, the fun began. We took off our skins, stowed them in our packs, and switched our boots and bindings to downhill mode. (Dynafit bindings are unique in that they transition from climbing mode, with the heel untethered, to downhill mode, with the heel locked down just like alpine skiing, with one twist of the back binding. They also feature ‘risers’ that can be raised while in climbing mode, which assist on steep ascents, much like going a gear lower on a bike. Yes, they’re nifty.)

We picked our line for the descent, and carved down the beautiful, light powder. Thanks to the efforts of our uphill hike, the terrain wasn’t skied out like it quickly becomes on lift-accessed terrain. I happily followed the lead of our guide, who knew the area and how to traverse through the glades and open slopes and still find our starting point back at base. Without him, I would have needed a GPS in unfamiliar territory.

Raised in the deep powder of Tahoe, skiing off-piste before I knew what that meant, I loved every second of the descent. Yes, it was challenging, but also very satisfying, knowing I’d earned my turns. I never needed my beacon, but was glad for the security it offered. Back at the base of the mountain, I switched my skis back to climb mode, and ‘cross-country skied’ my way back to the car on flat terrain. The sun was setting by the time we returned, and trust me, I’d earned my pizza and beer.

What you’ll need to get started in AT skiing:

  • AT or telemark skis (these are the skis I tried)
  • AT or telemark boots (the most comfortable seem to be Dynafit)
  • any ski poles
  • backpack
  • shovel, probe, and beacon
  • breathable outerwear
  • plenty of layers (wool is best)

Tips for beginners (like me):

I recommend going with a guide, like I did, your first time out (or any time out in an unfamiliar area). Most guide services can also rent AT skis and boots, which are expensive to buy yourself at first. More importantly, guides know where to go and are trained in avalanche safety (check to make sure!).

Cascade Huts

Any time out in the backcountry, everyone in your party should carry a beacon and shovel, at very least. I fell once during my trip, and lost one ski. It was deeply buried almost instantly, and had it been me, I would have been glad for my beacon, guiding others to me. Luckily, I found the ski without needing my shovel. If you go out without a guide, you should have completed an avalanche safety course. They are offered almost everywhere now, from gear stores to ski resorts.

If you haven’t explored winter terrain at all yet, start by snowshoeing or cross-country skiing. Hit trails you’re familiar with in the summer months; they’ll have a different feel in winter! Alternatively, try backcountry skiing from lift-accessed terrain. At any ski resort, look at a terrain map to see where off-piste (or non-groomed) terrain is located. Make sure it’s open the morning of your ski, and then climb only from the top of a lift (shortening your ‘hike’). Yes, others will have the same idea, so make this one of your first few runs of the day. Afterward, relax with some cruisers. Some resorts, such as Keystone Mountain in Colorado, even offer cat rides to off-piste terrain, allowing skiers to find fresh powder without AT gear.

kat-skiing-at-keystone

Can kids AT ski? Sure, though it’s currently hard to find skis and boots to fit kids under age 12 or so. There’s a reason for this: AT skiing is a lot of work. My recommendation (that I’m following with my own kids): introduce the idea of backcountry exploration when kids are small, with snowshoe treks. Then, graduate to AT skiing when kids are teens. Make sure they’re expert skiers on groomed terrain, too.

Can snowboarders AT ‘ski’? Yes, Voile and other makers are now creating split snowboards, which split into two short ‘skis’ for the uphill climb, then come together to create a board for the downhill. It’s the coolest transformer yet!

I’ve heard the argument that AT skiing is popular because skiers can avoid the high cost of lift tickets. While this is true, and while I do think most lift ticket prices have gotten out-of-hand, I don’t think true AT ski lovers climb miles of terrain for this savings. It’s simply too much work to do it for any reason but a love of the outdoors and the sense of freedom. It’s a way to challenge oneself outside of the ski resorts, and well worth the effort of learning a new discipline within alpine skiing.

I toured the Wasatch with Utah Mountain Adventures at no cost, for the purpose of testing AT ski gear.

Best family vacations during a time of social distancing

If you’re an adventurous family, you’re probably itching to travel again. Travel is coming back, but it will look different than in the past. We took an amazing rafting trip–and felt completely safe–in the midst of CV-19, for instance. Then, we ‘glamped’ in a rural location. The key: focus on outdoor-centric vacations that naturally promote social distancing.

Outdoor vacation ideas for families needing to social distance.

Note: Be careful if you’re doing activities requiring a release of liability waiver, and make sure that you’re thinking ahead to any safety concerns that might be specific to your destination. 

Once you’ve considered safety, the following are some tips and ideas to plan an adventure-friendly family vacation.

Rafting in the Grand Canyon

The Grand Canyon is a beautiful bucket list-type trip. Rafting can be one of the best ways for your family to explore the area. 

There are options such as what’s offered by the Grand Canyon Expeditions Company that will take you along 277 miles of rafting for eight days. Alternatively, any rafting company, like OARS, can take you out into the wilderness for a rafting, kayaking, and camping adventure.

OARS

You can camp at night, and the trips are well-planned in terms of adventure but also safety. This trip is recommended for kids eight and older. 

South African Safari

International travel is limited right now with the ongoing COVID-19 situation, but when it resumes, consider a trip to South Africa. 

Many companies offer kid-friendly safari adventures so you can see giraffes, lions, and leopards in their natural habitat. 

Some of the high-end lodges in South Africa offer things like fine dining and pre-planned kids activities, so everyone in the family is happy. 

Great Smoky Mountains National Park (or any national park!)

Great Smoky Mountains National Park, located in Tennessee and North Carolina, is the country’s most visited park. It is a domestic and socially-distanced destination as well if you’re looking for a trip you can do now. 

The Smoky Mountains feature hikes, such as the 80-foot Laurel Falls hike. You can walk or drive Cades Cove, and there are also more tourist attractions like the Dollywood theme park in Pigeon Forge. 

Costa Rica

There’s no one specific way to enjoy adventurous travels in Costa Rica. The whole country is known for outdoor adventure. 

costa-rica

Some families opt for multisport trips that might include rafting, jungle hikes, and surfing. You can do ziplines in the cloud forest canopy, learn more about the rainforests’ wildlife, or visit the Arenal Volcano. 

The White Mountains New Hampshire

New Hampshire is an underrated travel destination. 

There are rustic lodges and huts that you can visit while you’re in the White Mountains. For example, there’s Lonesome Lake Hut, which is inexpensive, and you can access it via hiking. 

There’s also Cardigan Lodge, which is just two hours from Boston and accessible by car. 

Jackson Hole

Jackson Hole, Wyoming, is a good adventure destination in the summer and the winter. You can stay at a working ranch and visit nearby Grand Teton National Park. If you stay at a ranch, there are activities like guided fishing tours, floating trips on the Snake River, horseback riding, and nightly cookouts. 

During the winter, Jackson Hole is known for skiing. 

If you’re not a skier, you can take a winter tour of Grand Teton or Yellowstone National Park from a snow coach. You can take a dog sledding tour, go snowshoeing, or take a sleigh ride through the National Elk Refuge. 

The Swiss Alps

The Swiss Alps might be among the most breath-taking scenery you’ll find anywhere in the world. 

You can plan a family trip to hike and explore the alps organized by a company, or you can plan it on your own. 

The Alps, along with hiking, are known for river rafting, dog-sledding, and bike riding. You can visit restaurants perched on mountain tops and enjoy local cheese. There are beautiful chalet hotels and even the train rides are stunning. 

Scuba Diving in the Keys

Finally, the Florida Keys aren’t known for their beaches, but they are known for their snorkeling. 

If your kids are old enough, you can make your way through the keys by boat and snorkel the best spots. 

A lot of the resorts will offer scuba diving options. For example, Hawks Cay, located in Duck Key, can arrange scuba diving. 

If you want something longer or further offshore, many companies will arrange that as well. 

If you really wanted to be adventurous you could rent a catamaran and stay there as you wander through the Keys. There are scuba and snorkeling options for families with kids of all ages. 

Top spots include John Pennekamp Coral Reef State Park in Key Largo, Sombrero Reef, and Looe Key. 

Glamping on the Oregon coast at Bay Point Landing

Located in Coos Bay, Oregon, Bay Point Landing offers safe and affordable glamping on the Oregon coast. You can see their safety and sanitation measures here.

Glamping on the Oregon Coast: full review of Bay Point Landing in Coos Bay.

What elevates this luxury RV resort to ‘glamping’ status: its Airstream and cabin rentals, amenities, and location.

Located ight on the bay on the Southern Oregon ‘adventure’ coast, Bay Point Landing features a short section of sandy beach (stroll-worthy, not swim-worthy), grasslands and estuary, and bay. Wildlife is plentiful if you sit awhile at your fire pit and take in the views. You’re five minutes from Coos Bay and 25 minutes from Bandon.

Accommodations:

You can bring your own motorhome or RV and utilize their upscale slips, which include plenty of pull-through spaces and very nice fire rings and picnic tables. Or, you can enjoy glamping on the Oregon coast in one of their 14 Airstreams or 22 Scandinavian-style cabins.

We opted for an Airstream experience, and settled into our 2018 International with queen bed, water views, beach access, and deck chairs. The kitchenette came with just about everything we needed, including all pots and pans, dishes, silverware, and salt and pepper. There is no full oven, but you get a stove top with three burners, a fridge and freezer, microwave, electric kettle, pour-over coffee maker, and toaster.

We cooked up pasta and tossed a salad for our first night, then opted to explore the culinary offerings along the coast for subsequent dinners, but you could request a cooking grill to borrow.

We loved our fire pit and Adironodack chairs, and inside, we had two TVs with cable and fast WiFi. Two bundles of firewood and starter came with or rental.

We experienced the Airstream as a couple, working remotely. If you’re traveling with small kids, one Airstream will absolutely accommodate two adults and two young kids, but if you have teenagers, I recommend renting two Airstreams or two cabins next to one another.

Tips for luxury Airstream living:

  • There’s plenty of storage space, so definitely put your things away to avoid clutter in the small space.
  • The thermostat took us awhile to figure out: you need to hit the ‘program’ button to set your desired temperature. The Airstream heats up or cools down quickly once you have it set.
  • The shower has low water pressure, which is typical of an RV, but the hot water definitely comes out hot!
  • You have plenty of plugs and USB access throughout.
  • Bring slippers for the cold floors!
  • If you bring a dog (yes, Bay Point Landing is dog-friendly), utilize the pet sheet and blanket that comes included in your dog kit that accompanies your $25 pet deposit. It’s perfect for sandy paws.

Cabin info:

Guests have their choice between three types of cabins (there are 22 cabins total). ‘Dune’ cabins are the largest, sleeping six, with a private bedroom, open loft area, and full bath (with tub).

‘Drift’ cabins sleep four, and ‘Kamp Haus’ cabins sleep two. All have a full bath (with shower in Drift and Kamp Haus) and a kitchenette similar to what’s described in the Airstream section. You get outdoor chairs and fire pits (plus firewood).

For the cabins and Airstreams, it’s worth upgrading to oceanfront (bay front) for the fabulous views.

Amenities:

No matter where you stay, the amenities at Bay Point Landing really make the experience more special.

The Clubhouse:

Uniquely designed by acclaimed architecture firm, OFFICEUNTITLED, the clubhouse is several buildings in one, ‘deconstructed’ to give an open, airy feel (perfect for social distancing). In the Clubhouse spaces, you’ll find the indoor heated saltwater pool, kids’ den (small entertainment space), activity room (designed for older kids and adults with shuffleboard and a wall-sized Scrabble board), fitness center (with Peleton bike and other machines, plus a few medicine balls and mats), and check-in office with a small selection of groceries (and wine and beer).

Outdoor amenities:

On the grounds, dispersed between RV slips, you have a Bocce ball area, a kids’ playground, communal fire rings, individual showers and bathrooms, laundry facilities, and a fabulous pavilion that includes outdoor heaters, ample seating and tables, wind breaks, couches, and a large screen TV. This area is ideal for small group gathering, communal meals, and the like.

Costs:

Cabin and Airstream rentals are approximately $145-$230 per night, depending on cabin type and view type. RV slips are approximately $45 for a partial view. Inquire for exact pricing.

After spending three nights at Bay Point Landing, I only have two requests/wishes: the resort needs to implement a recycling program (currently cannot recycle onsite), and I’d love to soak in a hot tub on the deck outside the pool, overlooking the bay!

Disclaimer: As we always note when applicable, we experienced Bay Point Landing as guests of the resort, for the purpose of review. All opinions remain our own.

Exploring the Grand Canyon of Yellowstone: navigating Upper and Lower Falls

During a time when many vacations are not possible, outdoor activities in road trip-accessible locations offer the ability to safely social distance. Hotels.com asked me to share my favorite activities and tips for exploring Yellowstone, so start here as you plan a safe and responsible vacation.

Located a full 50 miles away from the central hub (and congestion) of Yellowstone National Park‘s Old Faithful, the Canyon Village area of the park offers arguably the most dramatic scenery with fewer tourists to contend with. In this “Grand Canyon of Yellowstone”, families can view yellow-tinted cliffs and the Yellowstone River at its most active at both the Upper and Lower Falls.

yellowstone national park

The best hiking and waterfall viewing is found at Lower Falls, which can be viewed by car pull-out along the North Rim Drive at Lookout Point and Red Rock Point. (South Rim Drive takes you to the Upper Falls at Artist Point.) If you’re hiking instead, take the South Rim Trail (though be advised that it is one-way), or the Brink of the Lower Falls Trail. Both offer great views of Lower Falls, which is actually longer in height than Niagara Falls. We opted to hike just 1/2 mile along the South Rim Trail, turning down steep steps to view the falls from an overlook. The entire hike, including the hike back to the car and the overlook detour, was approximately 1.5 miles…just right for a quick after-lunch excursion. The entire trail is 2.5 miles, though one-way.

national parks with kids

Be careful on all the overlooks and trails along the canyon with young kids. The way is often steep, and the drops are severe. We never felt unsafe, but we did require our adventurous kids to stay close by. Keep to the overlooks if series of steep stairs may be too much for little legs: the way is slow and long!

A good dining option near the falls is found at Canyon Village. Skip the often-crowded soda fountain and grille for the cafeteria.

Where to stay in and near Yellowstone:

Wondering about Yellowstone lodging? If you can get reservations well in advance (think 8-9 months out), a stay at the Old Faithful Inn is iconic (though often crowded). The Lake Yellowstone Hotel is another great option, or the park offers many cabin rentals in addition to campgrounds. You will need to reserve any and all of these well in advance. For an option away from the crowds, consider Harriman State Park, on the Idaho side. Its rustic yurts and bird sanctuary provide much-needed peace!

yellowstone river

What else not to miss:

In addition to the falls, time spent in the Madison section of the park will offer great geothermal displays, though crowds will teem here due to its proximity to Old Faithful (only 16 miles away). Another less crowded option in the park is Fishing Bridge and the Sylvan Pass area near Yellowstone Lake: the vistas are made even more beautiful here due to the lack of tourists. In our experience, Yellowstone’s West Entrance tends to get the most crowded, while the East Entrance is nearly always empty. Granted, visitors entering here will have a long drive to reach the center of the park (over 30 miles), but the way is rugged and stunning in its remoteness (just keep an eye on when the Sylvan Pass opens each spring).

No matter where you head in the park, expect slow driving on park roads, and plan to stop a time or two for wildlife viewing. During our single day in the park, we stopped for buffalo twice, a bear once, and an osprey nest (with osprey).

As I disclose whenever applicable, we are partnering with Hotels.com to bring you this post on Yellowstone’s Grand Canyon.

Family camping at new heights: Gear for elevated camping

Have you ever wanted to camp off the ground? Elevated camping is becoming more and more popular, because camping in tents and hammocks designed to be strung in trees allows families to camp on un-even terrain, away from pesky insects, and out of the elements. It’s also just super fun and cool. If you want to try elevated camping, here’s what you’ll need!

kammok

Kammok Wallaby paired with the Dragonfly net and Kuhli tarp

Gear for elevated camping:

Start with your hammock:

The first step to gear up for any elevated camping situation is to select your hammock. You don’t have to get fancy, but you will want to consider your various hammock options. Below, we’ve listed some of our favorites, and why we love them.

Grand Trunk: You can’t go wrong with a Grand Trunk hammock, in our opinion. We’ve tried many, from the lightweight single parachute nylon model for just $59 to the Skeeter Beeter Pro, which has integrated mosquito netting built in. You can get a double or single hammock in all kinds of fun colors and patterns at Grand Trunk.

Kammok: We love the Kammok Wallaby, which is just $65 and comes in multiple colors. Pair the Wallaby with Kammok’s Python Straps for $30 more, which make any hammock easier to suspend from just about anywhere. Either Kammok or Grand Trunk options would make for a great base hammock.

Sea to Summit: Sea to Summit makes an ultralight hammock that’s an absolute must if you’re purpose for elevated camping is to go light. It’s very thin, so you’d definitely need to pair it with a hammock pad (see below) to protect yourself from cold temperatures at night.

elevated-camping

Kammok Wallaby

Add your pad layer:

Klymit Hammock V pad: If you’re serious about sleeping above the ground, you’ll want the protection of a sleeping pad. Not only does the right pad help your hammock keep its shape (so you don’t roll up like a burrito) but it keeps you warm…without a pad, you’re exposed to the cold night air directly. Klymit makes a specialized hammock pad that’s shaped to fit. The Hammock V pad comes in an insulated version or non-insulated, and while it will set you back $169, we recommend the insulated if you’ll be doing a lot of camping.

If you use a regular sleeping pad instead, pick one that’s small and narrow to fit the hammock, and consider covering it with a specialized pad sheet, to reduce slippage. Klymit makes one of these too…the Quilted V Sheet will work, and it’s oh-so cozy!

Add your rain and bug protection:

Kammok Kuhli tarp or Grand Trunk Air Bivy: Both these items give solid protection from wind and rain, serving as a shelter/rainfly for your hammock. Of course, they don’t cover 100% of the space, so you’re still going to get wet if the rain comes in sideways. The Kuhli tarp and the Air Bivy are both extremely versatile and lightweight, making them a great addition to your camping gear whether you sleep elevated or not. We’ve used both for BBQs, car camping, and the like.

Sea to Summit Bug Net: For 13 more ounces, you can be protected from flying insects while sleeping in your hammock…worth it in my book! The Sea to Summit bug net works with all Sea to Summit hammocks. We haven’t tried it with other hammocks.

Grand Trunk Mozzy Net: The Mozzy Net is a good option because it’s versatile…it stands alone, so can be used with any hammock or even around a picnic table or kitchen area. The downside: it’s a bit clunky to set up; the multiple guy lines that make it adjustable to any situation also make it complicated to get the right shape until you’ve had practice.

amzn_assoc_placement = “adunit0”;
amzn_assoc_search_bar = “true”;
amzn_assoc_tracking_id = “pitstoforkid-20”;
amzn_assoc_ad_mode = “manual”;
amzn_assoc_ad_type = “smart”;
amzn_assoc_marketplace = “amazon”;
amzn_assoc_region = “US”;
amzn_assoc_title = “My Amazon Picks”;
amzn_assoc_linkid = “33b1ef183fd36a844f0ada42bfc9a3a3”;
amzn_assoc_asins = “B001AIHB76,B009YRUIC0,B06ZZ49PL4,B005TOR6RW”;

Add-on: Portable microscope

You’re up in the trees, so what can you see? When going camping with kids, it is always a good idea to pack some devices that can provide entertainment even though their primary purpose is educational. Such a device is a handheld microscope as it is an easy-to-use product that lets children explore the world around them, and even more, the world they can’t see with the naked eye. Usually, a handheld microscope connects to one’s smartphone, tablet, or laptop in order to provide magnified images of leaves, fruit, and a myriad of insects that one might discover at a campsite. This way, your trip with the kids can be both instructive and fun, as you’ll spend some time gathering items and bugs that you can look at in-depth.

Want to go big? Try a tent-hammock combo!

Kammok Sunda: If you want your hammock to actually be a tent, and vice versa, the Kammok Sunda is a two-person tent and hammock hybrid. It’s very pretty, but even better, it can convert to a stand-alone tent or a stand-alone hammock, depending your needs. This is a great feature, as there will be times you want to set up your tent-hammock in the air, but cannot find the suitable trees to do so. The Sunda is on pre-order right now, for $349.

tentsile

Tentsile Flite

Tentsile: We’re currently testing a Tentsile Connect, and have packed it a few miles into a lake in Northern California’s Trinity Alps. It’s heavy enough to relegate it to car camping and short backpacking trips, but oh-so-cool! It sets up with a ratcheting system for suspension that has a learning curve but is easy once you’ve tried it a few times. In our experience, a couple teenage boys armed only with the YouTube tutorial video were able to set it up in about 10 minutes on the first try. There are many sizes and styles of Tentsiles to choose from (some, but not all, get quite expensive).  Tentsile tents come with rainflies, which can be pegged on the ground, though the tents themselves are not meant to be on the ground. The two-person Tentsile we like best is $350.

tentsile connect

Tentsile Connect, set up in Trinity Alps CA

Note: the downside of elevated tents is their weight. Even hammocks can get heavy, once you add the rope you need, your tarp or cover, and a mosquito net. If you want to travel light, be sure to add up the weight of your elevated camping system before committing! 

Pin it for later!

elevated camping


SaveSave

SaveSave

SaveSave

SaveSave

SaveSave