Beyond the Blue Lagoon: Iceland hot springs off the beaten path

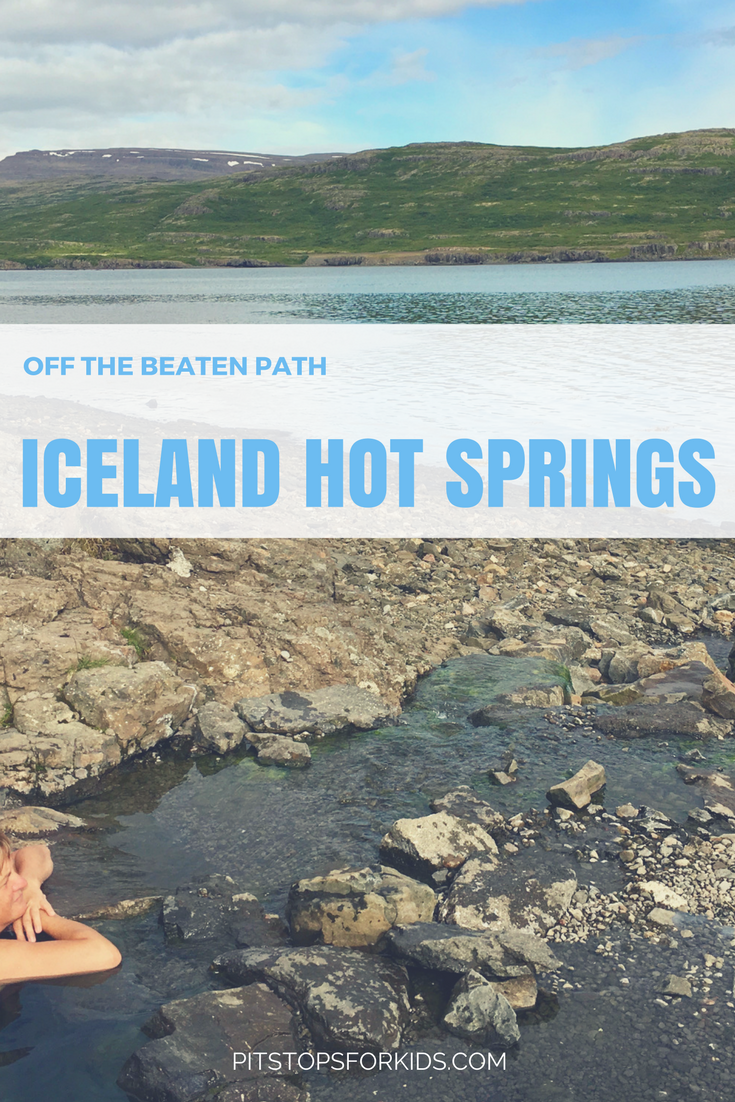
Yep, we went to Iceland for eight days and never went to the Blue Lagoon. Why pay a crazy entry fee to go to an overcrowded geothermal pool, when so many remote, beautiful, and FREE pools exist all over Iceland?

During our camper van road trip in Iceland, we dipped our toes in steaming water every single day, and never paid an entry fee of more than $25 (and usually paid nothing at all).

Where to find Iceland hot springs off the beaten path: 

iceland hot springs

Reykjadalur hot springs river:

In the south, just about 40 minutes outside of Reykjavik, the small town of Hvergerdi offers a 3.5 kilometer hike into the geothermal hills to a hot springs river. Yes, it’s well worth the hike. You’ll climb upward pretty steeply for the first km or so, then work your way up and down over hills with lovely views of the valley below. Eventually, you’ll see steam billowing up, and you’ll quicken your pace, because you’ll know you’re close! At the river, there’s a boardwalk with entry points along the small stream, and a few wooden walls that serve as changing areas. If you follow the boardwalk up, you’ll find the hottest water (so hot it’s almost painful), and as you walk down, you’ll find cooler water (closer to 35-37 C). It’s a lot of fun to move from section to section feeling the different temperatures.

iceland hot springs

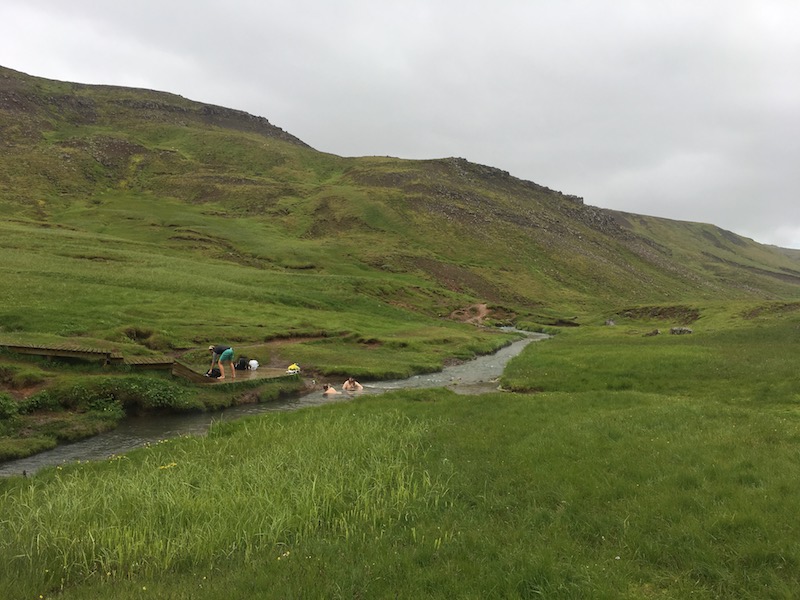
If you don’t want to change behind a wall, you can change in the small bathrooms at the little cafe at the start of the hike, or just wear your swimsuit under your hiking wear. Be sure to bring lots of layers, including rain wear, as there’s no protection from the elements (similar to all over Iceland). The hot springs river is free, and does get crowded on the trail (though even in peak season, we found plenty of space in the river to soak).

To get here: Take Route 1 (Ring Road) from Reykjavik to Hvergerdi. Drive through town following the Reykjadalur signage until you get to a gravel road ending in a parking lot.

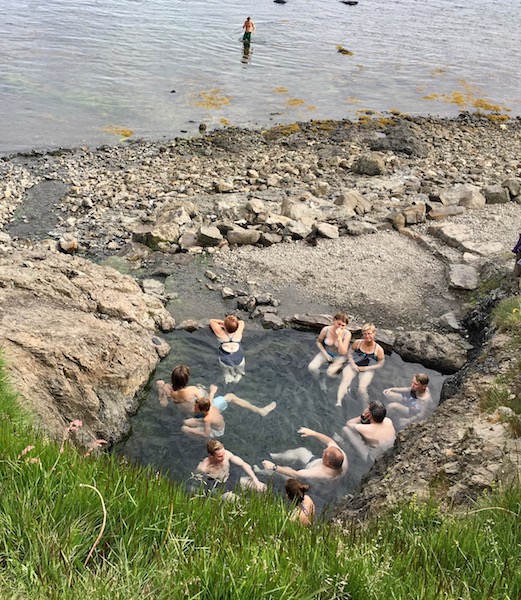
Seljavallalaug Hidden Hot Spring:

This one may not be so hidden anymore, but it’s still uncrowded. This geothermal pool is located in the middle of nowhere in a tiny valley with green mountains rising dramatically up all around it. The pool was made near the turn of the 20th century, for the purpose of teaching Icelandic children to swim (before the 1920s, unbelievably, most Icelanders could not swim). It has a single pool and rudimentary changing rooms (unisex…it gets interesting). This pool gets some criticism on TripAdvisor and the like, with people calling it dirty. It’s not dirty: it’s rich in algae, natural to Icelandic hot springs. The hike to the pool is only about one km, and our only complaint is that the water is a bit on the cool side (around 35 degrees). Toward the southern end of the pool where the geothermal water flows in, it’s closer to 40 degrees. On a warm day, this is fine, but on the cold, sleeting day we visited, it was painful to get out! This pool is FREE.

iceland hidden hot springs

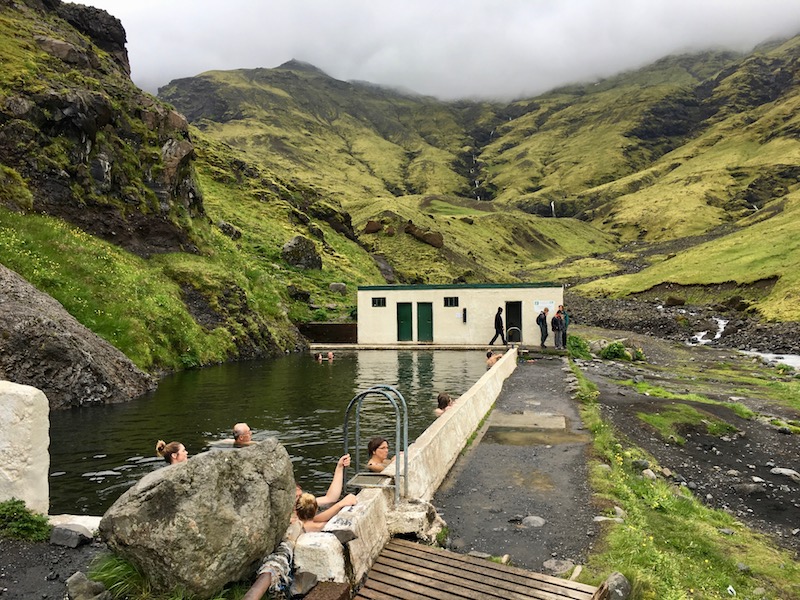
How to get here: From Route 1, turn down road 242 in the south. Follow the dirt road straight (don’t turn right) and you’ll get to a parking lot with an unused pool about 1/4 mile in. The hike is short into the valley (you can’t see the pool from the parking area though).

Laudar campsite hot pot:

This adorable hot pot (hot tub) is located in the Laudar campsite in west Iceland. The parking lot is at the Hotel Edda, and the walk is just a few meters. There’s a quaint changing hut (unisex, but fewer people are here) and the water is a perfect 38 degrees. You can camp onsite, too, if desired. This hot pot is FREE.

Iceland hot pot

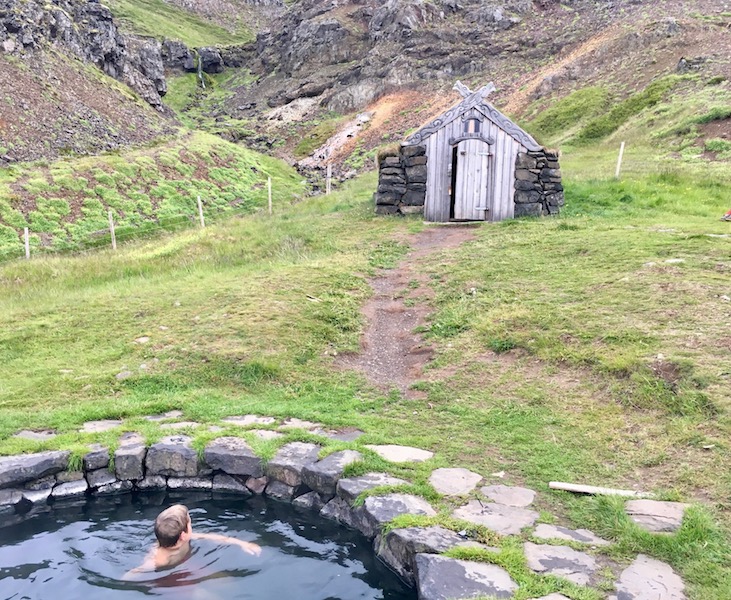
How to get here: From Route 1, take 60 all the way up through the isolated farmlands until you’re above the town of Budardalur. Follow the sign to Laudar.

Secret Lagoon:

So the Secret Lagoon is no secret, but it can be found just outside of the town of Fludir near the Golden Circle. You’ll find a large pool half-formed by natural rock, fed hot water from bubbling geysers nearby. It’s the most expensive pool we visited ($25 per adult), probably because of its proximity to the Golden Circle and its tourism traffic. No matter: it’s worth spending a few hours here.

iceland secret lagoon

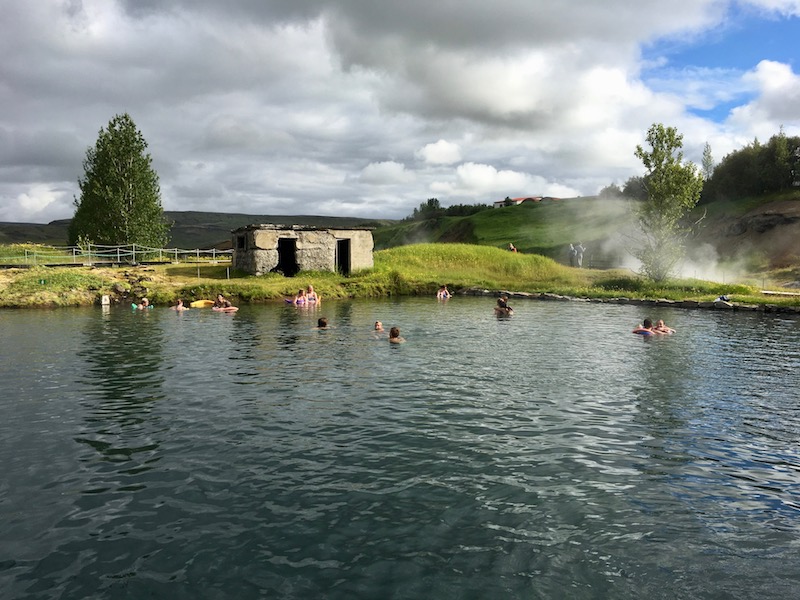
How to get here: Take road 30 to Fludir. The sign is just before you enter town. Go down a dirt road for just about a mile.

Hot pot of Flokalaundar:

If you’re willing to drive about two hours (mostly on dirt) from Reykholar in the Westfjords, you’ll arrive at a hot pot nestled right against the sea. Do as the locals do and jump between the warm water (around 38 degrees) and the freezing ocean and back. This hot pot is larger than Laudar but a bit busier. No changing rooms…change in your car or camper. There’s a small parking lot right nearby.

Iceland hot pot

How to get here: From Route 1, take 60 and follow it all the way up into the fjords. Be sure to have a full tank of gas, as there are few services before you reach Flokalaundar. Plan on narrow, steep dirt road for part of the drive. Is it worth it? Yes.

Tip: Can’t get to a natural hot springs one day? Look for a public Icelandic pool! Every town we drove through had their own (look for the water and swimmer signage), and each cost less than $10-$12. Inside each complex, you’ll find a geothermal fed warm outdoor pool (often with waterslides and other features), hot pots, and a steam bath, plus nice changing rooms and hot showers. Talk with locals here, and get to know the real Iceland. Remember to follow custom and shower nude before swimming. Never bring cameras or phones into the pool or changing areas.

Three favorite public Icelandic pools:

Note: Photos are not allowed of Icelandic public pools.

Laugardalslaug: Iceland’s largest public pool complex is only $8 for entry, and in our opinion, beats the heck out of the Blue Lagoon. There are two huge outdoor pools (one is a lap pool, the other has all sorts of features…basketball hoop, big twisty waterslides, climbing ropes, floating platforms, and water toys), four hot pots of various temperatures, a cold plunge, a huge steam bath, a massage area, and a large kiddie pool area. There are spacious and clean locker facilities and hot showers. On the grounds are also sand volleyball courts, exercise equipment, and a ropes course. Laugardalslaug is located in the suburbs of Reykjavik.

Drangsnes: The public pool on the Steingrimsfjordur fjord in the north has all the usual amenities, with a location right on the sea. Best of all, the town has arranged for free hot pots to be placed and maintained right on the beach, should you not need the added amenities of showers.

Kirkjubaejarklaustur: This public pool has views of the town’s pretty waterfall from the hot pots, plus a nice sized swimming pool with small water slide and a kid’s hot pot/wading area. What we loved about this pool was its local vibe: we had the opportunity to talk with many Icelanders here, and all were welcoming.

SaveSave

Deschutes river rafting with Sun Country Tours

During our recent visit to Pronghorn Club, we were fortunate enough to enjoy the Big Eddy rafting trip with Bend, Oregon’s Sun Country Tours. ‘Short but sweet’, the Big Eddy trip is only 1.5 hours long (2.5 door-to-door from Sun Country) but promises more whitewater than most families see on the average float or raft trip (at least it was more than we had seen!).

Deschutes river rafting:

Our trip began with a short bus ride from Sun Country to the Big Eddy drop-in site on the Deschutes River (near majestic Mt. Bachelor), conducted by a friendly bus driver. Once on the water, we met with our guides (one per raft of 4-6 guests), donned lift jackets and were assigned oars (kids must be taller than the handle to be issued one), then started down the 3 mile stretch of river on the tour. Both the beginning and ending feature calm, still water ideal for swimming, and our guide encouraged the kids (and adults) to jump from the raft and float downstream. The kids especially loved being spun around while standing on the bow of the raft, one at a time.

The river offers a few ‘warm up’ class 1 and 2 rapids before the class 3 Big Eddy, before which the guide pulled us over to the river bank to dock and overlook the rapids before tackling them. The kids loved seeing what we were going to raft, and our guide used the opportunity to instruct the adults in the group on where to paddle and when (though I promptly forgot). Once back on-board our raft, the kids were secured in safe spots (Toby was given a special rope to hold) and we were on our way.

The whitewater of the Big Eddy was truly like a wall after wall of water; we were bounced from crest to crest, and the kids shrieked with more delight on each one! I loved the experience, despite continually looking back in the boat to ensure my kids were still in it! Afterward, everyone was laughing with relief at surviving the thrill (including the six-year-olds in our group who hadn’t been too sure about the whole thing). We celebrated with a few more small rapids, during which the kids were allowed to ‘ride the bull’ (I.E. sit on the front of the bow with no hands). We docked after the last of the rapids, and were transferred back to Sun Country.

Distance from the interstate: Five minutes from Hwy 97.

Cost per person: The Big Eddy tour is $46 per person. Other Sun Country tours start at $73.

Dining options: None. The Big Eddy tour is easily fit in between lunch and dinner or breakfast and lunch. Full day tours include lunch.

Directions: Sun Country is located at 531 SW 13th St., Bend, OR. From Hwy 97, take exit 138 toward Downtown/Mt Bachelor, then turn right onto NW Hill St. Continue onto NW Colorado Ave. At the traffic circle, continue straight onto SW Colorado Ave. Turn right onto SW Emkay Dr., then take the 1st left onto SW Donovan Ave. Take the first right onto SW 13th St.

As I disclose whenever applicable, we experienced the Big Eddy tour as guests of Sun Country Tours and Pronghorn Club. While we appreciate their hospitality, this compensation came with no expectation of a positive review.

Three northwest backpacking routes for families

Parents with young children: you absolutely can backpack with kids! Our family has found success by choosing backpacking routes that are short on distance but big on rewards, whether that be in the form of a fun lake or river to swim in, dramatic scenery, or both. The following three northwest backpacking routes for families deliver.

Before you read on, check out our tips for backpacking with kids!

northwest backpacking routes

Northern California’s Trinity Alps:

Just south of dramatic Mt. Shasta at the top of Northern California, the Shasta-Trinity National Forest offers some of the best backpacking for families. While word is now getting out, the Trinity Alps used to be very uncrowded, while still offering up vistas on par with the Sierra Nevada.

For families, we recommend the 5.2 mile route from Swift Creek Trailhead to Granite Lake. From the Swift Creek Trailhead of the Trinity Alps, families hike for one mile before crossing Swift Creek at a large bridge and taking the Granite Lake Trail. After that, it’s 4.2 miles of a pretty strenuous uphill hike. Take your time, knowing that you don’t have to hike too far but will be rewarded with one of the most stunning alpine lakes you could ask for.

Make a home base at Granite Lake, and spend an extra day day-hiking up above it (the terrain turns to sub-alpine granite with great views). If you want to make a full loop of it, you can continue to Horseshoe Lake, reconnecting with the original Swift Creek Trail to follow the creek back to the parking lot. We have always been content to simply play at Granite Lake, however.

How to get to the trailhead: Swift Creek Trailhead is at the end of Swift Creek Road, accessed from Highway 3. (From I-5, grab Highway 3 at Yreka.) You’ll pass a national forest ranger station near Fort Jones, where you can grab your backcountry permit.

backpacking-trail

On the Granite Lake Trail

Southern Oregon’s Sky Lakes Wilderness:

The Sky Lakes are beloved to our family. They’re right in our backyard, so we’ve logged a lot of hours on trails here. The great thing about Sky Lakes is the flexibility; there are multiple options for making larger or shorter loops between its many small alpine lakes. The elevation is lower than many backpacking routes, so the nights will remain warmer (but you’ll also experience more mosquitoes, so aim to visit in August or September).

The Sky Lakes are generally split between Lower Sky Lakes Basin and Upper Sky Lakes Basin. You can see it all in a 12 to 14 miles loop, but we recommend staying on the Upper Sky Lakes Basin end to see Trapper Lake and Lake Margurette. You can camp at either, and experience the other in a day hike, should you wish. Start at Cold Springs Trailhead, and when the trail splits, follow the upper toward Natasha and Margurette lakes. The entire hike is only about 3.2 miles, and isn’t too steep. If you’re ambitious, you can also access the Pacific Crest Trail above Trapper, and walk along it for a while.

How to get to the trailhead: Cold Springs Trailhead is located off Highway 140. From Medford (and I-5), take Highway 62 to Highway 140. At mile marker 41, you’ll take gravel road FR 3651 at the Cold Spring Trailhead sign, and follow it 10 miles to the parking lot.

stuffing backpacking bags

Setting up camp

Central Oregon’s Jefferson Park:

Very few wilderness areas are as breathtakingly beautiful as Jefferson Park. And yes, it is indeed a veritable ‘park’ of alpine creeks, lakes, trickling waterfalls, and towering peaks. You have to earn it though: the route in from either side takes some time for families. We recommend the slightly shorter route from Whitewater Trailhead (the other option is Breitenbush Trailhead further north).

You’ll go about four miles before reaching Whitewater Creek, with stunning views of Mt. Jefferson all the while. After the creek, you’ll join the PCT temporarily as you enter the park. Once in, you’ll see many trail options leading a short distance to multiple small lakes. We suggest Russell Lake or Scout Lake. Take fishing poles, and the fish seem to really bite here. You can rejoin the PCT for a long day hike should you wish, or can simply set up camp and enjoy the lake. No matter which lake you pick in the park, the round-trip mileage will be about the same: 11 miles or so.

How to get to the trailhead: Take exit 253 off I-5 in Salem. Drive 60 miles east on North Santiam Highway 22. Between mileposts 60 and 61 (10 miles beyond Detroit), turn left on Whitewater Road 2243. This gravel road forks in about 100 yards, keep right. Follow this road 7.5 miles where it dead-ends at a large parking area.

Jefferson-peak

Jefferson peak

I think it’s time for us to discover some shorter backpacking routes in Washington state next! While we have experience in this region, it’s for longer hikes for more experienced backpackers. If you know of great routes for families in Washington, please leave them in the comments. And always remember to call the local ranger station before your trip for weather and trail closure information, as well as any detailed driving directions you may need.

Family friendly urban bike routes in the U.S.

If you’re heading to one of the popular cities in the U.S. for vacation, you might want to consider doing some exploring on two wheels. There are plenty of cities around the country that offer family-friendly urban bike routes where you can learn more about the area and see some great scenery. Make a plan to check out the following urban bike paths with your family.

urban bike routes

Cherry Creek Trail, Denver

Extending from downtown Denver to the high prairie grasslands, the 42-mile Cherry Creek Trail is one of the best ways to see the area. The paved trail starts at the confluence of Cherry Creek in downtown Denver. It then follows the creek past busy downtown streets and top attractions, such as the Colorado State Capitol building, Larimer Square, Union Station, and the Colorado Convention Center. As the trail heads out of the downtown core it goes through some historic neighborhoods, Cherry Creek State Park, and suburban residential areas.

Lakefront Trail, Chicago

See Chicago’s famous and stunning shoreline on full display when you ride on the Lakefront Trail. With the shores of Lake Michigan on one side and the Chicago skyline on the other, the 18.5-mile paved trail takes you by some the city’s most famous landmarks. A few of the attractions you’ll ride past include Navy Pier, Lincoln Park Zoo, Soldier Field, Monroe Harbor, and the Museum of Science and Industry.

Minuteman Bikeway, Boston

If you want to include some history with your bike ride, there’s no better place to do it than the Minuteman Bikeway in Boston. This 10-mile paved rail trail follows roughly the same route Paul Revere took during his famous ride. The trail connects the neighborhoods of Bedford, Cambridge, Lexington, and Arlington. It stops at the Alewife Station, where you can park your bikes and hop on mass transit to go right into downtown Boston.

BeltLine, Atlanta

The BeltLine is a former railway corridor that circles Atlanta. When completed, the trail will offer a nearly continuous loop around the city for transportation and recreation. So far, Atlanta has converted around 22 miles of abandoned railroad track to a multiuse trail. You can tour the city on the Eastside Trail and ride through the beautiful Historic Fourth Ward Park. Best of all, even if you’re traveling to Atlanta without your bikes, you can rent some using a bike sharing program and still tour the lovely BeltLine.

Burke-Gilman Trail, Seattle

Another lovely rail trail is the 27-mile multiuse Burke-Gilman Trail in Seattle. The trail runs from Puget Sound in North Seattle all the way to the town of Bothell. Along the way, you’ll ride the shorelines of Lake Union, Lake Washington Ship Canal, and Lake Washington. You’ll also enjoy relatively flat terrain, gorgeous views of the water, and a great tour of the surrounding neighborhoods.

No matter which city you decide to travel to in the U.S., you’re sure to find some scenic urban bike routes that will help you explore the area and learn more about where you’re visiting.

SaveSave

SaveSave

A Boston 4th of July: Tips for Celebrating on the Esplanade

All people want to spend the Fourth of July in special fashion. If you’ve never been to Boston, heading there in the beginning of July is as good a time as any. Below, you’ll find tips regarding how to spend it right during the Esplanade celebration.

washington-dc-fireworks

Weather:

New England weather is fickle, and natives know weather patterns change on a dime. In July, temperatures can range from the 60s and get up into the 90s, not to mention thunderstorms may inspire a downpour in the blink of an eye. To be certain you’re spending the celebration in hospitable conditions, check the weathercast at WBZ Accuweather, or, use your smartphone to check the CBS Boston Weather App.

Clothing:

There’s no dress code to enjoy the festivities, but if you’re concerned about your level of comfort, you’ll want to bring a light jacket or sweater; it can get mighty chilly during the evening hours. During the day, you’ll want to bring along sunscreen if you burn easily or a hat to keep the sun off of your face. As mentioned, weather conditions change quickly; it is a good idea to bring along an umbrella or rain coat just in case.

Shoes:

Regardless of how you get to the center of festivities, walking will be on the itinerary. Therefore, ensure you wear a good pair of comfortable shoes. This is especially a concern if you’re driving to the event; you’re more likely to win the Boston Marathon than find a great parking spot during the celebration. Event organizers encourage goers to take public transportation to be more green and to alleviate traffic coming into the city. Alternatively, if you’re coming out of town, peruse the web to find hotels in Boston residing by the festivities.

Public Transportation:

The closest trains (on the Boston side) are Charles-MGH (on the red line) and Arlington Street (green line). The trains are open late on the Fourth and expected to offer free rides home after 10 pm.

duck-tour-quacker

Handicap Parking:

All are encouraged to attend the festivities, and handicapped parking is offered at the Charles Circle LAZ Parking Lot (adjacent to the Massachusetts Eye & Ear Hospital). Of course, the police will be vigilant to ensure that no one without handicap plates take advantage of limited parking spots. The lot will close once full or after 6 pm (whichever comes first).

Leave at Home:

Though convenient, backpacks are not allowed in addition to shopping bags. Additionally, coolers (on wheels), fireworks, grills, propane tanks (BBQ equipment), and firearms are to be left behind since none of those items are permitted inside the festivity grounds. Sorry, Boston loves animals but they are not allowed inside! Of course, you can attempt to ‘sneak’ something in, but it’s not a good idea; security checkpoints are in effect, and items not allowed inside will be confiscated.

Vantage Points:

There are multiple areas to enjoy the events taking place. The Oval is considered the ‘best seat in the house,’ with the right side optimal for watching the fireworks exhibition. However, lines to get in this area start early and the space fills quickly. Don’t assume you can send one friend to reserve space for more people; such tactics are not allowed! The Island Lagoon is also a good area, but will be considered a secure area too; you’ll need a bracelet to get back inside once you get in. Speakers are aligned along the Charles River; you won’t be able to see what’s going on, yet you’ll be able to hear the music and festivities from there. It’s not ideal to see the fireworks due to a number of trees from there, though you may be able to maneuver yourself around the crowd and get a good position.

Some attempt to see the sights from the Mass. Ave Bridge but it’s off limits to the public, and depending on police and civil officials, the Longfellow Bridge may also be closed to the public. Memorial Drive will have speaker towers and food vendors. Alternatively, if you know someone with a boat, you can park in the Charles River for a truly exceptional view of the celebrations.

Jane Sandoval is a travel consultant. She loves to write about her experiences online. Her articles can be found on many travel and vacation sites.

Summer in the Berkshires: Bousquet Mountain Adventure Park review

Bousquet Ski Area’s Adventure Park is a vertical playground of high rope courses, zip lines, nets, and ladders, all set against the backdrop of the beautiful Berkshires. With three levels of course ‘elements’ to master, everyone will be challenged here, and everyone can get a taste of what ropes courses are all about.

Bousquet mountain


Bousquet Mountain Adventure Park review:

We met first with our instructor, who fitted us in harnesses and gloves and explained to us how our clips and ropes worked. It seemed complicated at first (and we’d done this before!), but once we’d had time to go through the steps with her and review what we’d learned on the practice cables and zip line (very low to the ground), we felt very confident about maneuvering through the course. I loved that due to Bousquet’s cable and clip safety system, it’s virtually impossible to be completely unclipped from the cable at any given time. I felt completely at ease allowing Nate (12) and Calvin (9) loose on the course, always with instructors nearby.

Of course, I wasn’t about to miss out on the opportunity to play on a high ropes course, so I joined in, too. The first level is relatively low to the ground, and a great place to get the hang of things. Participants go in one direction through the elements, which eliminates traffic jams (a non-issue since there were only a few other people on the course at the time) and ensures you experience everything. Once you’ve completed Level 1, you’ll want to try Level 2 (straight above you), though of course, if you opt out, you can experience Level 1 again. Level 2 was certainly more challenging to me, and by Level 3, I was ready to leave it to the kids (i.e. monkeys).

One of the best parts of Adventure Park are the zip lines that connect elements. We’d experienced zip lines and high ropes courses before, but not together! Attached to each of our harnesses were zip line apparatuses (apparati?) which we used to zip ourselves from area to area on short zip lines. (Note: on the higher elements, some ‘commando’ work is required for lighter, shorter people; you’ll zip part way, then need to pull yourself the rest of the way, which takes some upper body strength!)

We couldn’t help but compare Bousquet’s Adventure Park to Big Sky, Montana’s high ropes course, and though the scenery was certainly more stunning at Big Sky, the kids preferred Bousquet’s multi-level course. I found Big Sky’s course to be more dramatic (it’s higher, for one, and accessible only by rope ladder), and had a hard time directly comparing them.

The Adventure Park is awesome, but what makes Bousquet great for traveling families are the multitude of other activities to do on-site in summer! Toby (age 6) and our nephew Homer (age 2) were too young to explore the Adventure Park (where participants must be 70 pounds and at least 48 inches tall), but with mountain day passes, had free rein of the water slides, activity pool, and miniature golf course. Day passes also include three activity tickets to be used for the bungee trampoline, bounce house, climbing wall, go-kart track, or Frisbee golf course. Everything is located in one place (including the Adventure Park), which makes it easy for families to pick and choose how they spend their day based on interest and age, while still staying together.
Bousquets-adventure-course

Note: We were told that kids under five feet tall could only experience Level 1 of the Adventure Park, but after completing this level, our instructors allowed Calvin (just shy of five feet) to continue on up. It was explained to me that the height requirement is in place not due to safety, but due to cable placement; some cables on the higher elements are spaced in such a way that the reach from the child’s harness to the cable might be uncomfortable. Also, kids’ lower weight ensures they will need to complete some upper zip lines ‘commando’ style. We didn’t find the former to be a problem, and Calvin enjoyed the latter! I always recommend following an operation’s guidelines and deferring to their instructors’ judgment.

Ticket costs: Adventure Park passes are $35 per adult (over 5 feet tall) and $29 for juniors (under 5 feet tall). Day Mountain Pass tickets (which include the above listed, minus the Adventure Park) are $28. Activities can be purchased ‘a la carte’ as well, but the day pass is by far the best deal! In fact, we’ve reviewed many zip line and ropes course locations, and I can say without doubt that Bousquet’s offers the best value on a high ropes course I’ve ever seen!

A spectator pass can be purchased for those not experiencing the activities for $7.50. (I always appreciate when an operation offers this!) And be sure to check Bousquet’s ‘deals’ page before planning your trip: they offer $10 Mondays on their Mountain Passes and $20 Tuesdays for the Adventure Park!

Hours: Bousquet’s summer hours are 10 am to 5 pm, daily.

Reservations: 413-442-8316. We didn’t need reservations arriving when the park opened at 10 am on a week day, but to be safe, call ahead!

Website: http://www.bousquets.com/

Directions: Bousquet is located at 101 Dan Fox Drive, Pittsfield, MA. From Boston, take Exit 2 off the Massachusetts Turnpike to Routes 20 & 7 North. Follow signs for Bousquet and Pittsfield Airport (left at light onto Dan Fox Drive for 1 mile).

As I disclose whenever applicable, we experienced the summer activities, including the Adventure Park, as guests of Bousquet Ski Area. While we appreciate their hospitality, it in no way guaranteed a positive review.

Top family-friendly resort towns in the U.S.

The United States is a hugely diverse country with hundreds of thousands of unique locations spread out across a wide space. Choosing an American vacation destination is difficult in any situation, but especially so with a family in tow. With every additional trip taker comes another person’s enjoyment and happiness to consider. Selecting where to travel will require, to some extent, successfully finding a place where everyone can have a great time

Top family-friendly resort towns:

29-palms-inn

While it’s true you can only please everyone some of the time, some people every time, but never everyone all the time, there are American vacation destinations which are more likely to keep everyone happier than others. Here are the most family-friendly destinations in the US and some basic tips on planning a trip there:

Palm Springs, California

Once the resort town where Hollywood A-listers went to escape the pressures of Tinseltown, Palm Springs now caters to a more middle class demographic without skimping on the luxuries provided to the likes of Clark Gable and Frank Sinatra. Not to mention the addition of numerous family-friendly experiences including hiking trails, water park, record-breaking aerial tramway, and hot air balloon rides.

However, the signature experience for families staying in Palm Springs is booking several days in one of the city’s iconic resort options. Those choosing a Palm Springs family resort can easily find one with amenities and activities for just about any age group. Whether it’s laying by the pool, swinging golf clubs, or learning to pilot drones, the daytime fun culminates with pristine accommodations overlooking said pool or the surrounding beauty of California.

Breckenridge, Colorado

While Aspen will always be the iconic American ski resort destination in terms of premium luxury, Breckenridge, Colorado exists as an accessible alternative for working families. Located at the base of the Rocky Mountains, Breckenridge is the ideal ski resort town for families interested in snow-based adventure, time spent in a spa on the outer deck, and all the other trappings of the idyllic alpine experience.

In addition to these signature elements of a cold climate resort, Breckenridge offers a variety of things to do in the warmer months. These include zip lining, fly fishing, historical walking tours, escape the room, and much more.

Branson, Missouri

Bart Simpson once quoted his father Homer as saying Branson, Missouri is what Las Vegas would be like “if it were run by Ned Flanders.” For readers unfamiliar with the animated series wondering what the joke is, Ned Flanders is the very wholesome, very Christian, and very family-friendly neighbor to the Simpsons. While poking fun at the sentimental and old-timey atmosphere of the Ozark resort town, it’s an accurate description which in no way knocks this iconic American family vacation destination.

silver-dollar-city

In addition to watching performers presumed to have retired decades ago, Branson offers a number of exciting, unique, and ultimately unforgettable experiences for the whole family. These include the amusements and thrills of Silver Dollar City, the Ripley’s Believe It or Not! Museum, and Hannah’s Maze of Mirrors.

Orlando, Florida

Where do we begin? 50 years ago, Orlando was little more than a swampy, sleepy town for retirees looking to get away from it all after a lifetime of hard work. Then Walt Disney showed up and decided to build the most famous family friendly resort destination in the entire world. The rest, as they say, is history.

Yet there’s more to do in Orlando besides visiting Minnie and Mickey, though a family can easily spend an entire week on Walt Disney World grounds and never get bored. Additional Orlando-based attractions include Universal Studios Florida, Gatorland, Medieval Times, and the Kennedy Space Center.

From coast to coast, the United States is in no short supply of family-friendly vacation destinations. If the challenge revolves around finding a place to please everyone under one roof, resort towns are the way to go. Among them, the aforementioned are proven to be the best.


SaveSave

Aerial adventure in St. Louis: Go Ape-St. Louis

Driving through beautiful Creve Coeur Lake Memorial Park in St. Louis, you could be forgiven for thinking you’ve stumbled across an Ewok village. Actually, it’s Go Ape-St. Louis, an aerial obstacle course with ziplines.

go ape


The Go Ape experience

Our treetop adventure began with check-in at the red barn, where the attendant holds keys, wallets, and phones behind the counter for safe keeping. Before we headed out, a guide took us through safety training. Participants are responsible for securing themselves to the lines at every point during the adventure. That sounded intimidating to me, but the training was straightforward and thorough.

go ape St. Louis

We started with a ground-level mockup of the safety systems used throughout the course, including the instructional signage posted at every crossing. Once the guide had checked our comprehension, we walked to the first station. It is low to the ground; for those who are unsure if they’re going to be able to handle the experience, this serves as a test site. If, after going through this first station, you don’t want to proceed, Go Ape offers a refund.

None of us quit, though. We went through one at a time so the guide could ensure we knew what we were doing. Then we were released to explore the course at our own pace.

go ape

Think of Go Ape as an aerial obstacle course. Each site begins with a rope ladder and ends with a zipline, but in between, we navigated bridges, swinging platforms, hanging rings, and more. (You do get a rest between—there are platforms between every component). As our guide said, what makes this fun is having to earn the zipline rides.

Obstacles are rated from easy to extreme, and any time there’s an “extreme,” there’s also an easier option. We took all the “extreme” paths, and I found it more physically demanding than I had anticipated. But I never felt in danger or even particularly aware of the height, because at all times, I was tethered to a safety line. I knew if I lost my balance, I’d only fall a foot or two at most. In fact, most of the time you can choose to take the easy way out and glide from one tree to the next, using the safety harness. But where’s the fun in that?

The single exception to the “short fall” is Go Ape’s central attraction: the Tarzan swing, which is pretty much exactly what it sounds like: a long arc across open space that ends in a net you have to climb to achieve the platform on the far side. There are actually two, and the first is a warmup for the second. That second is a doozy, but if you chicken out at the last moment, there’s a bypass. (I’m proud to say I made the jump. Although my 12-year-old showed me up by doing it twice.)

Video of the Tarzan swing:


Note age limits: Although some Go Ape locations have a course for younger kids, St. Louis does not—yet, at least. Here, it is open to ages 10 and up. One adult (18+) must be in the treetops for every two children ages 10-15. 16-17 year olds don’t need a chaperone on site, but they will need a waiver signed by a parent or guardian.

Ground Level at Go Ape:

If your family is like mine, your spouse and most of your kids wouldn’t touch an aerial obstacle course with a ten-foot pole. Never fear. Adjacent to the red barn is a spray park and a really nice playground. And if the family wants walk along at ground level and watch their more adventurous counterparts, they can do that, too. You’ll also find employees roaming the course to offer support and suggestions to those in the treetops.

go ape

The rope ladders at the start of each site are enclosed within a locked fence; you have to have a code to enter. Inside, Go Ape provides water and paper cups as well as educational signage about conservation, endangered species and information about the trees and undergrowth surrounding you.

Making a day of it:

A treetop adventure lasts 2-3 hours. But because Go Ape partners with state and local parks, there’s always more to do in the immediate vicinity. In St. Louis’ Creve Coeur Memorial Park, you can supplement your treetop adventure with fishing, kayaking, canoeing, dirt biking, or disc golf.

Preparing for your treetop adventure:

Wear jeans and sneakers, and bring gloves. You can go without, but your skin will be happier if you have them. If you forget, Go Ape sells gloves on site.

Hours/Admission:

Hours vary, but Go Ape is generally open March through November. Your best bet is to book online ahead of time. Walk-ins are accepted, but having a reservation guarantees a spot when you arrive. Check out their FAQ page to get more details.

Location:

Go Ape is located at 13219 Streetcar Dr., Maryland Heights, MO 63043. Parking is free on site.

My son and I enjoyed our treetop adventure as guests of Go Ape, but our enthusiasm for the experience is all ours.

St. Louis with kids: Missouri Botanical Garden

The Missouri Botanical Garden, established in 1859, is regarded as one of the top public gardens in the world. This 79-acre paradise, located only five miles from downtown St. Louis, exists thanks to local 19th-century businessman Henry Shaw, who admired the great public gardens of Europe and wanted to offer his hometown a similar resource.

children-garden

The gardens are exquisite, with pools, ponds, and fountains to please the eye. You can easily spend a full day there, although the visitors’ guide provides a helpful list of what to see if you’re short on time. The tram tour, available April through October, lets you see the whole garden in half an hour without wearing out the little ones. The spherical Climatron houses tropical plants, and next door, the Brookings Exploration Center offers hands-on learning about plants, trees and the environments in which they grow.

  • If you have time for a more in-depth visit, you can wander the beautiful grounds, which are set up to showcase gardening styles from around the world. A few don’t-miss-this spots include:
  • Feeding Koi fish in the spectacular and often-photographed Japanese garden
  • Walking through Tower Grove House, Henry Shaw’s Victorian home, housed in the park (April-December)
  • The observation tower and maze beside the house (My kids played tag in it—which might not be wise or even possible if the crowds are big, but it was quiet in that part of the garden when we visited.)

missouri-botanical-gardens

Children’s Garden:

But without a doubt, the highlight of the Missouri Botanical Garden for families is the Children’s Garden. Open April through October (and requiring a separate admission of $5 for kids 3-12; little ones and adults are free), this extensive play area is one part garden, one part children’s museum, and one part playground. But your local park never had a playground like this! Each area represents a piece of Missouri history or geography: steamboat, tree house, cave, fort, Native American camp, and general store stocked with toy food, to name a few. There’s even a splash pad in the summer. (See this map to get a sense of the scope.)

Staff offers daily programming from 10:30-2, giving kids an interactive look at tree identification, wetland biodiversity, and more. Your kids will not want to leave this area. Even my preteen boy wasn’t ready to go.

Note: The Children’s Garden is large and when there are a lot of kids around, as there were the day we visited, it can be easy to lose track of your children. Set up a meeting spot and make sure your kids have your mobile number with them in case they need to ask an adult for help finding you.

Getting the most out of your visit:

Keep an eye on the weather. There are things to do indoors, but you will probably spend most of your time outside. On certain days, the garden offers interpretive and educational programming, and in the summertime there are concerts in the amphitheater. Large-scale exhibitions are also hosted in the summer—in 2017 the Climatron will be home to a collection of large glass art—and other festivals are scattered throughout the year. The garden can be crowded during some of these events, so plan accordingly.

Picnicking is NOT allowed on the grounds, but re-entry is permitted. Keep a cooler in the car or take time to enjoy one of the authentic Italian restaurants on The Hill, just a few blocks away. Easier still, eat on-site, at the Sassafrass Cafe, which offers mostly locally-sourced soups, salads, sandwiches and kids’ fare for $10 and under.

For a lasting keepsake of your visit, check out the large Garden Gate Shop, which sells plants, home furnishings, books and tools both for growing plants and for cooking up the fruits of your labor.

Accessibility:

By and large, the garden is accessible to wheelchairs and strollers, including much of the Children’s Garden. Walkways are wide and smooth. Parents with nursing or easily overstimulated children might want to take advantage of the “calming corner” inside the Brookings Exploration Center. For kids with sensory issues, check out the “Pre-Visit Guide” prepared by the garden.

Location, Parking, Hours/Admission:

Missouri Botanical Gardens is open 9-5 daily and is open in the early mornings and Wednesday evenings for walking. Admission is $12 for ages 13 and over; kids are free, and residents of St. Louis County get half-priced admission every day and free admission on Saturdays.

The Children’s Garden ($5 ages 3-12) and the tram ($4 ages 3-adult) require separate tickets, and during some special events, garden admission may be higher, so again—check the garden calendar.

The garden is located at 4344 Shaw Blvd., St. Louis, MO, 63110. Parking is free on site, and there is quite a bit of it, but on busy days cars are parked for several blocks up the surrounding streets. Using public transportation will earn you a $1 discount on admission.

Our family visited the Missouri Botanical Garden as guests of Explore St. Louis, in exchange for an honest review.

Photo credit

Exploring California Gold Country and the state capital

For families interested in California history, a trip through Gold Country and Sacramento will hit many highlights, focusing on the Golden State’s storied gold rush past.Raft and gold pan in the same river where gold was first discovered in 1848, ride historic steam locomotives, tour the state capital…and visit countless historic museums.

Start or end in Sacramento:

old-sacramento

The state capital is, in many ways, the heart of the California history experience. Here’s what not to miss:

Explore Old Sacramento:

In addition to one of the best railroad museums we’ve ever seen (the California State Railroad Museum may even be THE best), Sacramento’s historic district hosts fun shops and eateries and carriage rides along the river. Go during the evening to avoid the heat of summer, or visit any time during the off-season. Read our review of Old Sac and the museum, and also be sure to check the fun schoolhouse museum!

Tour the Capitol:

It’s architecturally stunning, rich with history and free to the public. The California State Capitol Museum is open daily, except for major holidays. The Capitol is located on 10th Street between L and N streets, downtown Sacramento. Learn more here.

Learn even more about Sacramento history:

Don’t miss Sutter’s Fort State Historic Park, which is located in the city but feels a world away. Read our review of Sutter’s Fort. Next, pan for gold yourselves at Amador County Park’s Volcano Memorial Park, located four miles east of the town on Sutter Creek-Volcano Road. The park provides a picnic area, grassy lawns and a gold panning area where you can pan for gold nuggets. Also try Sutter Gold Mine to pan for gold and visit sites (13660 Highway 49, Sutter Creek).

Raft on the American River in the foothills of gold country:

The American River packs a big punch with history and big rapids colliding in an adventure-filled weekend. We recommend rafting the Middle Fork of the American River with OARS.

Where to Stay:

The Citizen Hotel sits adjacent to City Hall and the Capital Building in Sacramento. The historic 1926 Cal-West Insurance building with modern amenities displays such “tongue-in-cheek” touches as leather-bound vintage law books in the lobby, famed political quotes in the elevators, black-and-white political cartoon drawings from midcentury Sacramento Bee cartoonist Newton Pratt throughout the hotel, and lampshades screen-printed with the constitution of California.

Embassy Suites Sacramento is located right on the river at the entrance of Old Sacramento. We even walked from the hotel to the railroad museum. If you’re looking for a location closer to this area than to the capitol building, Embassy Suites is a good bet with their large rooms and complimentary breakfast.

Explore Nevada City:

Nevada City, north of Sacramento on Highway 49, sprang up almost overnight during the California Gold Rush. There’s a lot of history here, including museums and mine tours.

el-dorado-mine

Check out the Firehouse No. 1 Museum:

This museum is run by the Nevada County Historical Society, and despite its name, features exhibits ranging from Victorian-era bridal wear to Chinese railroad workers’ artifacts. Afterward, stop by the Nevada Theater, a big brick building downtown that has hosted the likes of Jack London.

Get more of your train fix:

If you haven’t gotten your fill of train museums, check out the Narrow Gauge Railroad Museum, located between Nevada City and Grass Valley. Learn more about the Narrow Gauge Railroad Museum.

Check out a mine shaft:

Visit Empire Mine State Historic Park, where kids can take a mineyard tour, see a mine model, visit a blacksmith shop, and hike or horseback ride over the park grounds. Daily tours are offered, and many seasonal events and special programming days occur throughout the year.

Visit Coloma:

Coloma California is where California’s gold rush began. Located on Highway 49 between Sacramento and South Lake Tahoe, the Coloma-Lotus Valley is central to California’s Gold Country. Right on the South Fork of the American River, the town offers families the opportunity to bike, hike, and raft in addition to getting their California history on.

coloma with kids


Start at Marshall Gold Discovery Park:

See the site of the gold discovery that started the 1849 California Gold Rush, and the working replica of Sutter’s Mill, then learn to pan for gold. Meet docents dressed in period clothes and working as blacksmiths or doing other crafts of the time. The park is pretty touristy, but the history is definitely there.

Stroll through town:

The downtown streets of Coloma is lined with historic building in varies states of repair; some are dedicated historic sites in their own right, others are crumbling in disrepair. Read the plaques on the buildings and stop for a few ‘fun’ detours to souvenir shops and ice cream parlors.

Where to stay:

Whether you’re camping or looking for a cabin stay, the American River Resort is our pick: it’s located right on the water, has plenty of activities for kids.

What’s your favorite California Gold Rush town?