Five day guided rafting trips Rogue River review with O.A.R.S.

If deciding whether multi-day guided rafting trips are right for you, you’ve no doubt read all the information available on numerous river rafting websites, scanned itineraries, and compared reviews. But which to pick? Nothing beats a day by day report from ‘the field’: we spent five days in July on the Wild and Scenic Rogue River with O.A.R.S. 5 day Rogue River trip. Read on for our full experience, plus river rafting tips.

Day 1:

Day 1 actually starts the evening before departure, with a meeting at departure point Morrison Rogue River Lodge. We met our lead guide Laurie at this point, who handed out dry sacks in which we were to pack our personal belongings and sleep kits. (Families can bring their own sleeping bags and pads, or rent from OARS.) Laurie answered any last-minute questions, and let us know our departure time for the river the following day (8:30 am). This was also the point at which we met our fellow rafting partners. On our July trip, we had a total of 11 clients in the group: a family of four (kids aged 7 and 10), family of three (kid aged 10), family of two (myself and son Calvin, aged 12), and couple of two.

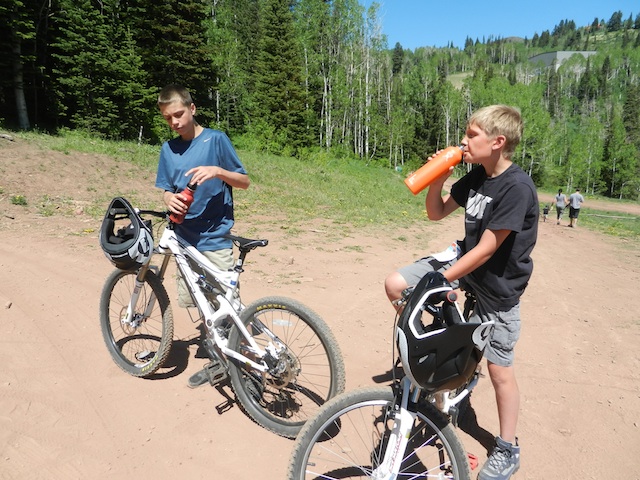
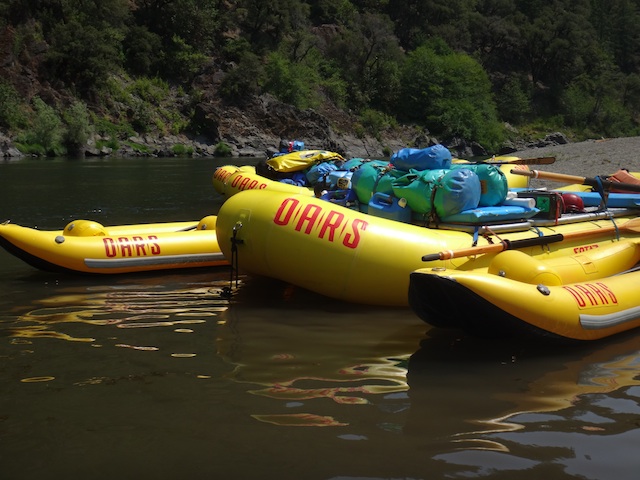
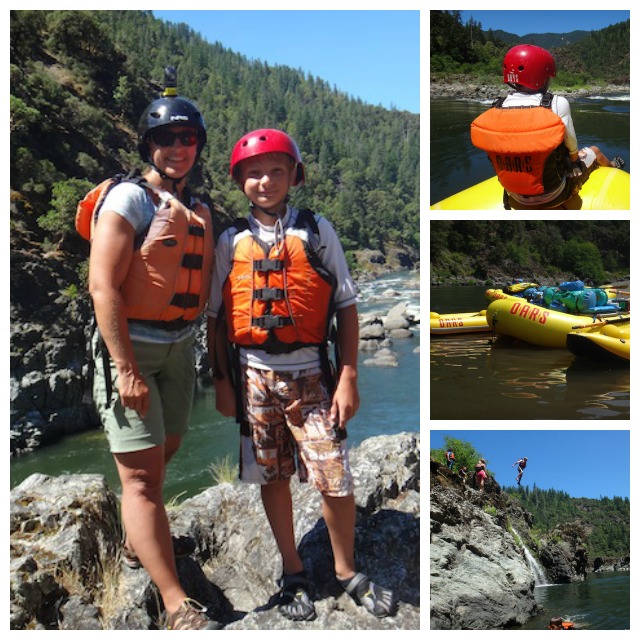
We departed from Almeda Bar the next morning (a very short van ride from Morrison’s), and met our additional three guides, Alyssa, Noah, and Jenae. After a safety talk from guide Alyssa and an introduction to our modes of transportation on the river: oar (gear) boats and inflatable single and double kayaks (or duckies), we floated through mild riffles and flat water, a good warm-up for our first challenge: Rainie Falls. Rainie is a Class V rapid, but there is an optional Class IV route, which we took. Rafters 12 and up had the option of ‘duckying’ through; the rest of us rode as passengers on the sturdy gear boats. Calvin opted to ducky: it’s worth noting that lead guide Laurie had, in only a few hours time, already been able to access his ability level as competent for this challenge.

OARS river rafting

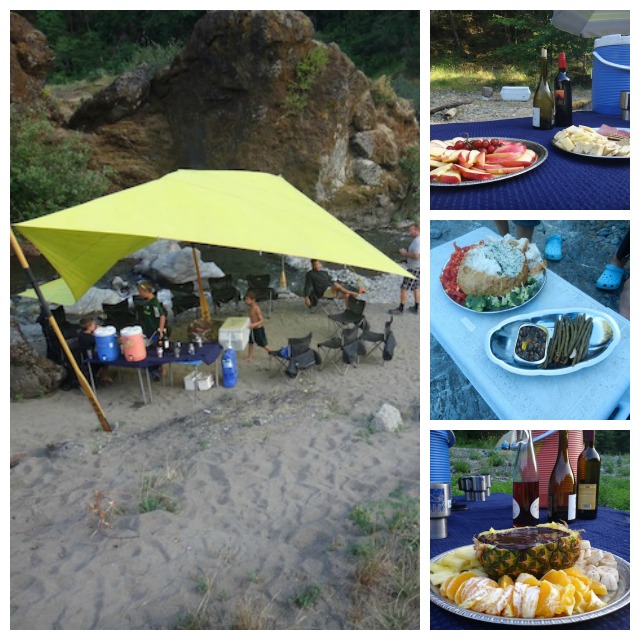
We stopped for our first lunch shortly after Rainie Falls, where we were introduced to food procedures. OARS always has a hand-washing station set up by the food table, as well as ice-cold water and a ‘juice of the day’. Rafters use assigned OARS mugs throughout the trip. Lunch blew us all away: delicious cold cuts and pulled pork sandwiches, along with appetizers of crackers and cheese and fresh fruit. There’s always a cookie option for dessert!

We rafted another few hours, stopping periodically where our guides knew of good ‘jumping rocks’ and swimming holes, then made camp at a sandy beach overlooking the water. We were introduced to the ‘groover’, the portable toilet system (if you’re used to camping, this will be no big deal), and our first of many delicious dinners (baked salmon with cobbler for dessert). Wine, beer, and soda are available at dinner.

Day 2:

By Day 2, we felt we had gotten our feet wet (pun intended) and more people were eager to try the duckies. We had mild water in the morning, making for a perfect opportunity for the younger kids to kayak. Our guides stopped for lunch near a short hike to a historic cabin (Whisky Cabin) and excellent swimming hole in a nearby creek. We spotted rattlesnakes on Day 2, as well as bald eagles and osprey. We camped on Day 2 on a gravel bar on the shore, perfect for the fishermen in our group. The rest of us swam, played games with the guides, and played cards.

River Rafting OARS

Day 3:

During our evening pow-wow the night before (during which the guides let us know the plan for the following day), we learned that we’d have a short river day on Day 3, allowing us to reach our desired campsite before others (its beauty and location make it popular). While I was initially disappointed to be stopping before lunch, I quickly realized that a day off the water still meant a day of fun. Our camp was between the river, a sandy beach, and a creek, with the historic Rogue River Ranch (with museum) above us. We explored the ranch, played games, swam, and creek hiked all afternoon, with no worry about ‘what’s for dinner’, food prep, or clean-up. Our energetic guides had everything under control. I loved having time for journal writing and novel reading while the guides led field games at the ranch.

food on OARS trip

Day 4:

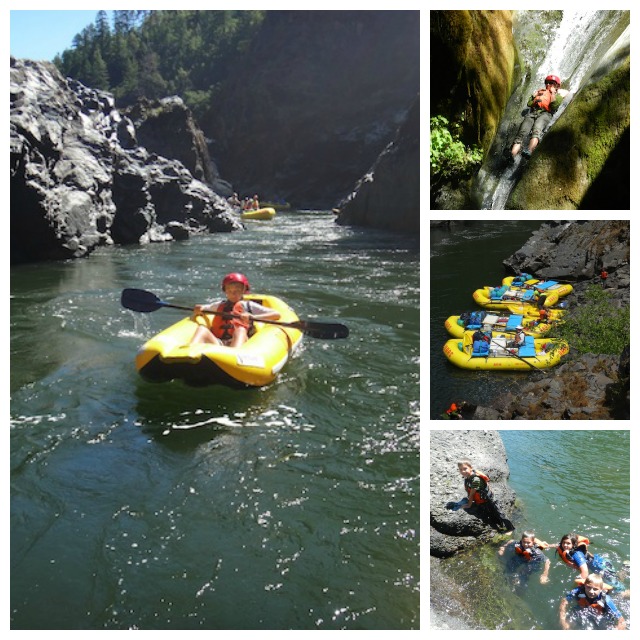
By Day 4, our small group had really gelled, and the kids very much enjoyed each other’s company. We had a big day on the river: exciting Blossom Bar rapids and scenic yet challenging Mule Creek Canyon. Our morning started with a swim test (after a breakfast of eggs benedict), necessary for anyone wanting to ducky through the canyon. Calvin and one adult tried and passed. (The swim test involves purposely tipping over your kayak, swimming, flipping it back over in the water, and getting back in.)

We scouted Blossom Bar before rolling up the duckies and taking the gear rafts through, then re-inflated them for Mule Creek Canyon. Our ‘ducky-ers’ did great, despite our guide losing an oar boat oar to the jagged rocks. We emerged from Mule Creek Canyon at Paradise Lodge, a unique lodge accessible only by river, and enjoyed ice creams on the sunny deck overlooking the water. We camped nearby, celebrating the 4th of July with yet another gourmet dinner and dessert. The guides surprised us with a corn-on-the-cob eating contest and birthday cake for Calvin and another rafter. Their culinary skills were truly amazing.

adventure with OARS trip

Day 5:

Our last day took us through more beautiful scenery and our best ‘rock jump’ yet: up Tate Creek to a swimming hole with a rope climb to a natural water slide. We pulled off the river once more for yet another jump into the Rogue, photos by yet another waterfall, and yet another excellent lunch (tuna salad sandwiches and lox). Departing the river at Foster Bar, none of us were quite ready to be done.

River rafting tips:

1. Ask about your fellow rafters before booking. We had a great group of people, but don’t just hope to get lucky: inquire about the demographic of your group before committing. Definitely aim for a trip with other kids attending if you’re bringing your own. Kids will have fun even if they are the only ones underage, but a big part of the enjoyment for us was the fellow rafters.

2. Leave modesty at home. If you’re not squeamish about the ‘groover’, you’ll have a better time. The unit is always set up somewhere private, but it’s still in the outdoors (no walls or doors to lock). Toilet situation aside, you’ll be spending multiple days camping with strangers; after Day 1, we were quite comfortable with one another.

3. Follow the packing list. The OARS packing list is very thorough, and we found it very useful. Even if you don’t think you’ll need rain gear or a jacket, bring what’s on the list. It’s also helpful to have comfortable shoes for in camp at night. Opt to use one of OARS sleeping pads instead of a Therma-Rest style: they are three-times as thick and comfortable!

4. Bring camp toys. Even following the packing list to a ‘T’, you’ll have room for a few toys. Bring a Nerf ball or deck of cards, or even lawn games. If you think you’d like to fish, bring your equipment (room will be made on the boats) and a license.

5. Definitely have a good hat and two pairs of sunglasses each. We lost two pairs on the water, and we were thankful for our hats from day 1.

6. Don’t bring food. You won’t need any. Really.

7. Bring a tip. I put mine (cash) in an envelope inside a small dry back (available at sports stores). The lead guide does not return home with you on the van after the trip, and it’s best to give it directly to him or her to distribute. These guides earn their tips (and more) and it will be safe on the trip.

Disclaimer: We experienced OARS as guests of the tour operation, for the purpose of review.


Top 10 Toronto kid-friendly activities for families

We love Toronto kid-friendly activities! Don’t let this bustling center for business and commerce intimidate you! Families visiting Toronto will find much to do with kids, and much to love amid the busy streets and lively waterfront. Plus, Toronto public transit is very intuitive and affordable: with only two major subway lines, you won’t get lost! Leave your car at the hotel, and ride, boat, or walk to all of the following top Toronto attractions. Don’t forget to buy a Toronto CityPASS or Go Card to save cash while you play!

Tip! Save up to 43% on Toronto’s 5 best attractions at CityPASS. Shop Now!

Click on the arrow on the right of the first image to play the slideshow.

[slideshow gallery_id=”2″]

Photo credit: Pit Stops for Kids, Bobolink, waterfronttoronto.ca

Toronto on Dwellable

A walk through Toronto’s St. Lawrence Market

The historic St. Lawrence Hall houses the St. Lawrence Market, a farmer’s market nirvana teaming with the freshest local produce, fruits, berries, and homemade jams, syrups, and crafts. Families will also find stalls selling local meats, desserts and pastries, fresh sandwiches, and just about anything else you can imagine. The St. Lawrence Market is a great place to spend a rainy or cold day in Toronto, or the best spot to pick up a picnic or to-go lunch to eat along the Waterfront or over on Centre Island.

St. Lawrence Market


St. Lawrence Market


There are two levels within the market building, plus tents selling wares in nice weather outside. If you get there early (before 8 am), you can usually see trucks dropping off the day’s produce from Ontario farms. The main floor level sells aisle after aisle of produce, berries, fruits, and meats, as well stalls with bakery goods and ethics foods (we saw Indian, Thai, and Chinese foods while we were there). Seating is scarce, so you’re better off taking food to go.

St. Lawrence Market

While you could certainly spend the better part of an hour sampling the fruit, veggies, hams, bacon, and cheese upstairs, don’t leave without checking out the downstairs section. This part of the market is primarily reserved for rare or speciality items, making it both educational and fun for kids (and adults). Check out row after row of exotic spices (most of which you may never have heard of!), gourmet cheeses and meats, speciality candies, and local homemade goods such as pure maple syrup. There are a few fabric and toy stalls as well, and random offerings of trinkets here and there, but St. Lawrence is primarily about the food!

St. Lawrence Market

Hours of operation:

Check the website for up-to-date hours, as they change seasonally. During the time of our visit (early summer), St. Lawrence is open weekends from 5 am to 3 pm.

Directions:

The market is located at St. Lawrence Hall at the corner of Front Street and Jarvis.

Toronto on Dwellable

Toronto Islands: Centre Island activities kids love

Visible from Toronto’s Waterfront and harbor, the Toronto Islands are easily accessible, easy to navigate, and easy to see in one day. Pick a sunny day of your Toronto family vacation to check them out! While a few islands are largely residential (or home to sailboat slips) or wildlife refuges, Centre Island is all about family fun. Here’s where to start for Centre Island activities kids love:

Centre Island with kids

Franklin Children’s Garden and Park:

The first thing you’re likely to encounter after getting off the ferry on the islands is the Franklin Children’s Garden, Centre Island’s main picnic and playground park. This interactive garden–featuring Franklin the Turtle from the books series by Paulette Bourgeois–allows kids to explore in any manner they’d like. The garden is divided into sections, where kids can garden themselves, listen to storytelling, or play on hands-on sculptures from the Franklin series.

Gibraltar Point Lighthouse:

The Island Lighthouse is the oldest landmark in Toronto. Sitting on Gibraltar Point, it’s light has shone for over 150 years, guiding ships and boats into the Harbour of Toronto. The light is a good destination for a family bike ride: it allows kids to have a fun goal and the route is completely flat. If you’re riding bikes as a family on the islands, you can find them at Centre Island beach, or you can rent in the city and bring bikes across on the ferry.

Centre Island playground

Centreville:

With 600 acres of amusement park fun, Centreville is no doubt the prime destination for families on the islands. Centreville is from the old-school of amusement park fun: its 30 rides are all young-kid friendly and have been around for decades. In addition to carnival-ride fun, Centreville has a petting zoo, green spaces, over a dozen food vendors and restaurants, and entertainment. Don’t expect big theme park thrills, but rather low-key fun.

Centre Island Beach:

A short walk from the ferry docks, Centre Island Beach can get crowded on summer days…get there early to stake out a spot! Public bathrooms and showers are available, as are changing rooms and several food vendors (including pizza). The bike rental shop is near the pier. While there are a few other swimming beaches on the islands (including a clothing-optional beach…you’ve been warned!), Centre Island beach is most popular due to its proximity to the ferry and the rock breakwater, which is ideal for young kids. The water here is shallow and calm, and clean to swim in due to its position away from the harbor. Remember, however: Lake Ontario is pretty chilly!

Tip! Save up to 43% on Toronto’s 5 best attractions at CityPASS. Shop Now!

Getting there:

Access Centre Island one of two ways: 1. grab a ferry from the ferry terminal at 9 Queens Quay West ($6.50/adult, runs year-round and every 15 minutes in summer) 2. take a Toronto Harbour Tour (LINK), which drops families off if desired at the mid-way point of the tour, picking up on the hour ($15-$25). From the ferry drop-off, it’s easy to find Centre Island activities by signage, or grab a map!

What to do on the Toronto Waterfront with kids

The Toronto skyline sits comfortably on the shore of Lake Ontario, which families should put to good use while visiting this urban, multicultural city. If you’re spending the morning at Rogers Centre or the CN Tower, or even St. Lawrence Market, pair it with an afternoon and evening along the Toronto Waterfront. This part of the city is currently undergoing a revitalization project (as of 2013), but don’t let construction deter you. Here’s what to do on the Waterfront with kids:

Toronto waterfront

Harbourfront Centre:

Access the Waterfront from Kings Street (at Sincoe or John), then explore the harbor side walking and biking path that connects to Harbourfront Centre. To one side, you’ll find the ice skating rink (which is converted to a pond with paddle boats in summer) and outdoor concert facility, and to the other, a large collection of waterfront shops and restaurants. Adult-sized bikes can be rented at convenient coin-operated kiosks in several locations (also throughout the city), or bikes can be rented at local shops. If you have bad weather, duck indoors to peruse the shops, but otherwise, stay by the harbor to check out the historic ships (you can go into the largest to see free exhibits inside), watch the ferry boats, and see planes land at the unique Centre Island airport.

Toronto harbor tours


Harbour Tours Toronto:

If you feel like going out on the water yourselves, you have two options. Ferries depart from the main ferry terminal at 9 Queens Quay West on a regular schedule for Centre Island for only $6.50 per person, or you can opt to take a ride with Harbour Tours Toronto. This harbor and islands tour also departs regularly (it was every 30 minutes at the time of my visit in early summer), will drop off passengers on Centre Island if desired (and pick them back up!) but otherwise cruises between the Toronto Islands and through the harbor on a one hour tour. Tickets are steeper at $25 for adults and $15 for kids (with online booking discounts available), and for the price, families get a somewhat silly, entertaining for kids narration from a guide, plus many photo opportunities as the glass window and open-air boat tours the harbor. Along the way, I learned quite a bit of history about the islands as well as what they’re used for today (recreation, residences, and wildlife preservation, depending on the island) during my tour.

tour Toronto harbor

Tip! Save up to 43% on Toronto’s 5 best attractions at CityPASS. Shop Now!

Sugar beach:

Located on Lower Jarvis Street, south of Queens Quay, Sugar Beach is in comfortable walking and biking distance of Harbourfront Centre and offers beach atmosphere for families without the time or inclination to head over to Centre Island. Imported white sand and playful pink beach umbrellas make Sugar Beach a great place to let kids play in the sand, and a creative water feature allows for cooling off. (Swimming is not allowed in the harbor.) There are plenty of restaurants nearby, as well as picnic tables, and event space for seasonal festivals and entertainment.

Roundhouse Park

Roundhouse Park:

Created in the 1990s, Roundhouse Park is located above the Waterfront by approximately two blocks, en route to the CN Tower (head up Simcoe). A great place to let kids loose before waiting in line for the tower or taking in an event at Rogers Centre, Roundhouse Park is the home of the Toronto Railway Historical Association, which operates a live steam miniature railway, displays engines and other train cars, and replicas of early train station offices. Kids can see a full roundhouse featuring a fully restored locomotive turntable, and adults can grab a brew at Steam Whistle Brewing. There are additional green spaces and park squares with benches and room to run around, though this is open to streets. Roundhouse Park is a great last stop of a fun family day at the Waterfront before heading back to a downtown hotel or getting on the subway.

Summer at Park City Mountain Resort: Mountain Biking trails

The Canyons Resort in Park City has the only gravity-based mountain biking in Utah. Expert riders will be well challenged on the miles of black diamond-level single track trails and terrain features in the Canyons Bike Park. But that doesn’t mean there isn’t something for everybody. Whether visitors crave the adrenaline rush of lift-served bike park fun or the cardio boost of hilly mountain biking trails, Canyons Resort in Park City have both all summer long…at every level.

canyons bike park

We visited at the start of their second full bike park season, and found a full operation under way. Start at Canyon Mtn Rentals, where families can buy Red Pine Gondola tickets for just $10 per person or High Meadow bike park tickets for $30. The difference: the gondola ticket will grant you access to mountain bike trails and single track with uphill and downhill, whereas the bike park ticket will allow you to enjoy chairlift served downhill only trails.

canyons bike park

Bike rentals are also available at Canyon Mountain Rentals, of course, for $110 all day, $85 half day. This sounds steep (no pun intended), but these are top rate downhill mountain bikes, and come with a protective gear package. (Gear can be rented separately if that’s all you need.) We rode with a 14-year-old and 12-year-old, and protective arm and leg pads were not available in their sizes. Full face helmets were available, however. After my 14-year-old crashed hard, sending a pedal into his shin, he’d recommend opting for the leg pads even if they’re a bit big.

Note: Bike sizes are on the adult-sized end of the scale. We found bikes that properly fit our kids, but anyone under age 10 may have a hard time. (For this reason, our eight-year-old did not participate.)

The Video Review:

Where to go:

Grab a bike trail map at the base, and head up the Red Pine Gondola. From the Red Pine Lodge, it’s easy to access the bike park with a High Meadow pass, or start on regular mountain bike trails without. Either way, you’ll want to return to Red Pine Lodge for lunch: during the summer months, this quick service option serves favorites from all the winter restaurant venues. The salads in particular are excellent, and the sun deck makes for a great place to compare feats (or injuries).

canyons bike park

In the bike park:

If you’re a novice, definitely start with White Rabbit, the easiest course. Progress from there to Flying Salmon, a green beginner trail, then be advised that the next trail up, Wild Mouse, is quite a bit harder. We had been gravity-based biking only once before, and the beginner runs at The Canyons were just right for us.

canyons mountain biking

On the trails:

It’s easy to get on the wrong trail as you navigate the mountain, even though the trails are marked. Disregard the ski run signage, and follow the smaller bike markers. For beginners and intermediates, the popular Mid-Mountain trail is challenging with some fairly steep ups for the first mile. (To access, start at the zip-line hut just above Red Pine Lodge.) Unless you’re an expert, you’re better off skipping the black diamond bike trails (as they are downhill only and can include steep switchbacks and drops. We found ourselves unwittingly on one at one point, and navigated it very slowly (a luxury only possible in non-bike park areas). Even so, we had some falls and injuries. Respect the trails, and follow the advise of the ratings.

canyons mountain biking view

For a nice four-mile ride from Red Pine Lodge to the base area, take Mid-Mountain to Ambush (both intermediate). If you miss the corner to Mid-Mountain at the Orange Bubble Express, as we did, you can connect with Richochet (expert, but we navigated it ok) to Short Swing (intermediate, but I crashed hard), to Ambush.

Note: Trust the level ratings of the trails, but know that conditions, such as loose rocks, mud, etc can change. For this reason, an intermediate trail one day may prove more challenging to you than an expert trail. Go slowly when in doubt! Secondly, have your kids ride in front of you: my worst wreck occurred while turning my head to look back to make sure my 12-year-old was behind me!

Single track trails also depart the Red Pine Lodge area the opposite way (west), but deposit riders a good distance from the base area. Plan to ride in the bike park or on mountain single tracks for at least 2-4 hours at the minimum, and all day at the max!

red pine lodge

Hours:

The gondola runs 10 am to 5 pm, and the High Meadow chair (servicing the bike park) runs from 10 am to 4:30 pm (staying open late on Wednesdays all summer until 7:30 pm). Rentals are available from 9:30 am, and yes, it will take you the full half-hour to get your gear.

Want to learn about more to do in Park City and The Canyons in summer? Check out our Park City guide!

Disclaimer: Our family was hosted at The Canyons to experience the mountain bike park for the purpose of review. 

The Museum at Warm Springs

While traveling between Bend, Oregon and the base of Mt. Hood at Government Camp along remote Highway 26, one might think there’s nowhere worthy of a pit stop. Not so! The Museum at Warm Springs is nothing short of a high desert gem. Located inside the Confederated Tribes of Warm Springs reservation, the museum is tucked on the side of the road near a gas station and across from the small Indian Head Casino. We’ve driven by without a glance more than once before taking the time to visit following a stay at nearby Kah-Nee-Ta Resort and Spa.

museum at warm springs

We were treated to a private tour of the museum, but visitors self-guiding will have no problem getting much out of this museum as well. Every aspect of the design has been consciously considered; in fact, the museum has won honors for its presentation. Even at the entrance, the symbolism is evident in the drum-circle arc of a front patio and brickwork depicting basket-weaving design. The interior vestibule is shaped like a long house, and a bubbling stream accompanies guests up the front walk, reminding all of the life-giving importance of water.

Inside, the museum houses collections garnered over the past 20 years from tribal members living in the area. The exhibits are incredibly well-done, and take guests from early life on the high desert and Columbia Basin through reservation life in present day. Our favorite section included a small, circular room where visitors can listen to intertribal and single tribal songs and drum beats, along with the viewing of dances on a screen.

The day-to-day ancient living of the Wasco, Warm Springs, and Paiute tribes are depicted through displays featuring lifelike models. In fact, we learned that these human replicas were created by applying molds to the faces of today’s tribal members, which were used to make the models. Guests can tour behind open displays of Native American dwellings, including teepees and buildings, to see what a traditional interior looked like. We learned about the many variations of baskets and their purposes and deeper meanings, as well as the weapons, hunting practices, and fishing practices of the native people.

An entire room is devoted to a timeline of the shift from traditional life to reservation life, starting with the Treaty of 1855 and carrying on to today. Learning how the tribal land was distributed, how three distinctly different tribes came to be located on the same reservation, and how early reservation life–including the injustice of boarding schools and the stripping of the native language from young people of the tribes–effected the native people was but well-depicted and sobering.

There are a number of hands-on activities for kids, as well as many multi-media presentations to keep them engaged. The museum is best for school-aged kids, but even preschoolers will get much out of it. Tip: on your way out, look for the single missing ‘bead’ in the brickwork on the outside of the building. In Warm Springs intertribal culture, every traditional basket and beadwork design has one mistake in it, to symbolize that nothing is perfect, and this symbolism is carried over in the museum architecture. It’s hard to spot!

Distance from the interstate:

Directly on Highway 26, approximately  one hour from Highway 97 in Bend or almost 2 hours from I-84.

Admission and hours:

The museum is extremely affordable at $7 for adults, $4.50 for students (13-17), and $3.50 for kids (age four and under are free). Open 9 am to 5 pm daily in the spring/summer season. Check site for winter hours.

Food services:

No food services on-site, though there are nice picnic areas and a short walking trail. Families could easily make this a picnic lunch stop and museum visit.

Directions:

From Bend, proceed north on Highway 97 past Redmond (15 miles) and Madras (26 miles) to Warm Springs (14 miles). From Portland, travel Highway 26 past Mt. Hood (45 miles). 105 miles total.

Disclaimer: We experienced the Museum at Warm Springs as guests of the museum.

What to do in Park City in the summer with kids

Park City, Utah is truly a year-round resort town. It’s one of our Best Ski Town picks, but that doesn’t mean families shouldn’t visit during summer months: on our visit in June 2013, Main Street was bustling, and parking was challenging to find. Restaurants and bars were hopping, and some shops were open late. Summer in Park City offers much more than just town life, however. Read on to learn what to do in Park City in the summer with kids:

park city in summer

1. Mountain biking:

Mountain bike single track trails can be found throughout the Park City area and surrounding mountainsides, but  Canyons Resort sports the only gravity-based, lift-accessed bike park. Novices through experts will be challenged here with rollers, jumps, and switchbacks on downhill trails of every level. Bike rentals (and costs) can be found at Canyon Mountain Rentals. Read our full review of mountain biking at Canyons.

park city mountain biking

2. Hiking and fishing:

At Canyons Resort, well-marked, designated hiking trails take ambitious hikers as high as Ninety-Nine 90 Peak; on the Fantasy Ridge trail (access from Tombstone trail) or beginners can easily trek to Alpine Lake on the Alpine Lake trail. (Paddleboats can also be rented on Alpine Lake, but don’t let the name deceive you: this body of water is more like a large pond. Kids will enjoy seeing the large trout in the waters, however.)

3. Utah Olympic Park activities:

The site of the bobsled, ski jump, and additional winter Olympic sports during the Salt Lake City games, the Utah Olympic Park  has lots for non-Olympic hopefuls to do as well. Families can tour the free museum, take a tour of the facilities (which includes the chance to stare down the distance of the ski jump), and watch Olympic training in progress. There’s also three zip lines, a three-level high ropes course, and an alpine slide. Parents can buy experiences a la carte, or give kids access to all three activities for $40…a great deal! In the busiest summer months, expect some wait times, but staff and instructional support staff are very friendly here.

4. Exploring Park City’s Main Street:

Shopping is fun even for the kids in Park City, with ample touristy t-shirt shops to check out, bookstores, and candy stores. Adults will find gallery-quality art and collectables as well. Have dinner at our favorite, Main Street Pizza and Noodle Company, then stop at the Rocky Mountain Chocolate Factory for ice cream or a caramel apple for dessert.

park city dining

5. Mini Golf or Disc Golf:

Do both in one day at The Canyons: mini golf is located at the base and open from 10 am to 5 pm in summer, and disc golf is located at mid-mountain, starting at the Red Pine Lodge. Get tickets to either in the base area, and plan to wear sunscreen for either high mountain outdoor activity!

mini golf in park city

Wondering where to stay in Park City? Check out our reviews of Hyatt Escala, Westgate Park City, and The Grand Summit, all of which offer great outdoor pools and on-site recreation.

Cliff Creek Cellars: family-friendly vineyard and tasting room

Located in the heart of Southern Oregon’s wine region, Cliff Creek Cellars is a family-friendly vineyard that makes for a great stop for families vacationing in Ashland Oregon or enjoying fishing, hiking, or rafting along the Rogue River. Surprised? Don’t be! More and more wineries are becoming family-friendly destinations, and Cliff Creek is a prime example.

family-friendly winery

What makes Cliff Creek great for families?

Location:

Cliff Creek is easy to access from I-5, making it a great alternative to a road-side rest stop. And if you’re not traveling I-5 en route elsewhere, it’s easily woven into the fabric of a family day outdoors in Southern Oregon. As part of the Upper Rogue Wine Trail, Cliff Creek is situated adjacent to the base of Table Rock outside of Gold Hill, making it the perfect post-hike rejuvenation spot. Or perhaps you’ve rafted the Upper Rogue (meandering nearby) or fished the morning away. No matter what your outdoor fun in this picturesque valley, Cliff Creek is nearby as an end-of-day oasis.

Cliff Creek cellars

Setting:

Cliff Creek’s low-key atmosphere, partnered with plenty of outdoor space, makes it naturally family-friendly. When we visited on a sunny Sunday afternoon in May, we were far from the only patrons. However, because we could spread out along the casual picnic tables dotting the tidy lawn, no one else cared that we’d brought along two energy-filled kids. In fact, we were greeted with smiles from Cliff Creek’s staff and a wag from Max, the resident dog. While the kids ran out into the open space adjacent to the tasting room to explore the water feature and pond, sculptures and vineyards, we settled nearby to enjoy Cliff Creek’s tasting flight.

The wine is excellent, but truth be told, we’d come for the scenery and ambiance. Cliff Creek sets out lawn games for kids (and adults) to enjoy, and if the kids get bored, someone is on-hand to bring out corks so they can have ‘Cliff Creek cork races’ down the small creek leading from the water feature. Kids are welcome to explore the vineyards (you can easily see them from the lawn), and additional entertainment comes in the form of chasing the very willing Max around the property.

Cliff Creek dog

Snacks and drinks:

While Cliff Creek is certainly a full-scale winery, the emphasis here is on a social experience. Groups enjoying tastings happily mingle, and for the kids, root beer or water is always on-hand.  We ordered one of Cliff Creek’s cheese plates, and were happily surprised by a house-made charcuterie spread that fed all of us. Guests are welcome to bring picnics to the winery; it’s a great place to eat and sip some wine after a family hike.

Cliff Creek tasting room

Distance from the interstate:

15 minutes from I-5.

Cost:

A flight of tasting wine is $10 per person. Cheese and charcuterie plates range from $8-$11. Bottles of wine, at the time of our visit, ranged from $15-$35.

Hours of operation:

Thurs-Mon from 12 pm to 5 pm

Directions:

Cliff Creek is located at 1015 McDonough Road Gold Hill, Oregon. From the Gold Hill I-5 exit, take OR-234/Sams Valley Highway. Turn left on Ramsey Road, then right on Sams Valley Road, and finally another  left onto McDonough Road to the vineyard.


Block Island guide for families

Summer is an excellent time to visit Block Island Rhode Island! This small, flat island off the coast of the state is often overlooked (mainland Newport is also a great destination), but families looking for a slower-pased vacation or weekend getaway will love Block Island’s laid back feel, casual dining, and quaint lodging. Block Island has long been known as a romantic ‘B&B’ type of weekend away, but it actually has a lot to offer families with young or school-aged kids. Below, our Block Island guide showcases what’s best for kids:

block island for families

What to do on Block Island:

Once you’re on-island, you’ll want to get your hands on some bikes. Virtually all of Block Island is covered with free bike paths (open to pedestrians, too), and this is by far the easiest way to get around. In fact, we don’t recommend bringing a car…leave it on the mainland and hop on the ferry without it (see below).

Then head to the beach. The entire perimeter of Block Island’s 3×7 miles contains beach access, and all are public and yours for the taking. Block Island beaches are wide and open, and ideal for families with young kids. It can get windy, as it’s prone to do on many New England beaches, but when the weather isn’t cooperating, there is always the option of packing up and heading to souvenir shops, art galleries, and the toy stores.

Check out the Ball O’Brien Park and North Light House when not beach going, or spend an afternoon indoors at the historical society  (best for older kids). For more active days, head to New Harbor Kayak Rentals for traditional water sports, or try SUP (Stand Up Paddleboarding) at Block Island Parasail.

Dining on Block Island ranges from fine dining to farmer’s markets, and it’s easy to bring picnics on a bike ride or to the beach from local grocery stores. Sandwich shops and delis will also pack up picnic to go.

Where to stay on Block Island:

Accommodations on Block Island range from B&Bs and cottage rentals to hotels and inns. For families staying more than a few days, we recommend a home rental with HomeAway. Otherwise, look for lodging that caters to families. A decent number of Block Island hotels discourage children (and some even ban those under 12, like the 1661 Inn and Hotel Manisses). Others, like the Atlantic Inn, are touted as quiet and peaceful…which may or may not be for you. Our picks for kids: The National Hotel and the Narragansett Inn.

Getting to Block Island:

You can only arrive on Block Island by ferry or plane. The island is located 12 miles off the mainland, and for kids, getting there really is half the fun. Most families opt for the most economical means of travel, the Block Island Ferry, which leaves from Point Judith, Rhode Island, and is the only ferry option that allows cars. You’ll need to make a reservation in advance if you’re bringing a vehicle; otherwise, no advance notice is required. If you’re in a hurry, the Block Island Hi-Speed Ferry is an option for travelers without a car, as is the Express Ferry, which departs from New London, CT. Flights on New England Airlines are expensive, but can be had.

Photo credit.