Exploring Custer State Park with kids

Haven’t been to Custer State ParkGet ready to be impressed! This state park encompasses 71,000 acres, making it larger than some national parks. In fact, some argue that Custer should be a national park, and after visiting, I agree! Plan to stay at least two nights to see the majority of what this park has to offer, or at least one full day to see some highlights. Here’s how to tackle Custer State Park with kids:

custer-state-park

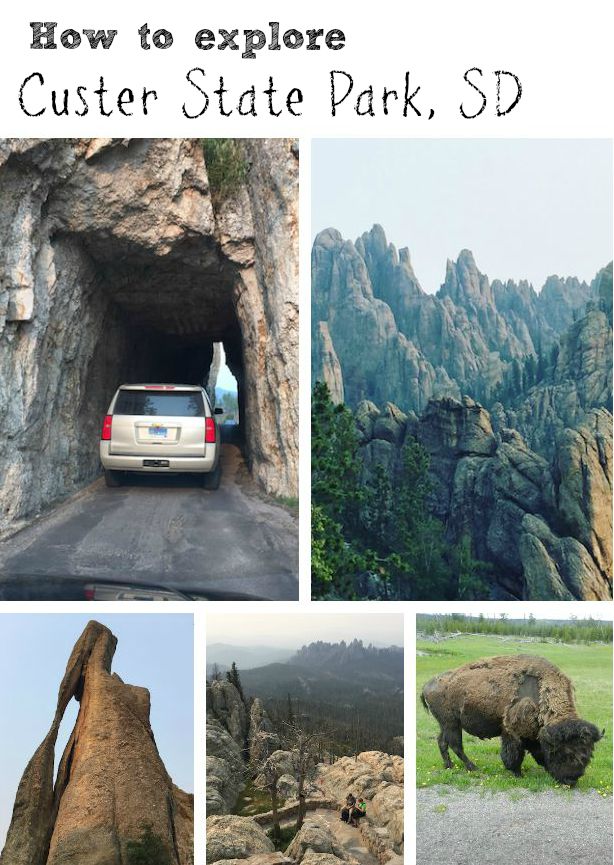
Start with the Needles Highway Scenic Drive:

It’s not often I recommend driving through a park with kids, but Custer’s Needles Highway is breathtaking, and easy to access from the western park entrance at Custer. Plus, it concludes at a great lake and hiking option (more on that later).

needles-highway

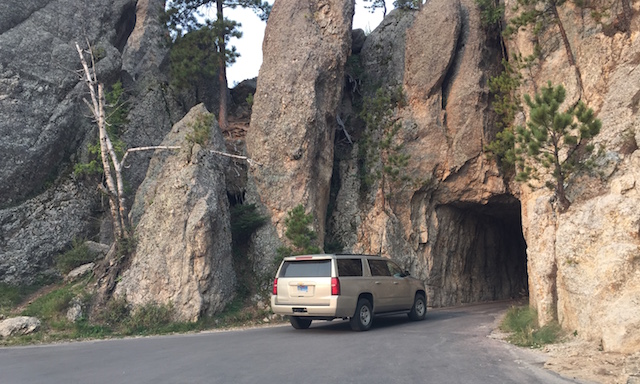
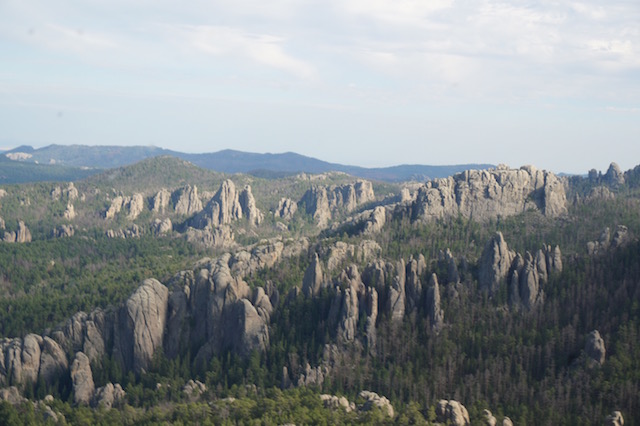
After driving past the stockade area and coming into the center of the park, the Needles Highway will head north, winding first through meadows and grassland where you’ll want to keep an eye out for bison. Then, it climbs into the more dramatic, rocky part of the park, taking you through several narrow stone tunnels and opening up on incredible vistas of the Cathedral Spires, Needles Eye, and Little Devil’s Tower. Definitely stop a few times along the way to snap photos (you won’t be able to help yourself), especially after the tunnel that delivers you to Needles Eye. This natural wonder is indeed a rock formation in the shape of a needle’s eye. Hint: mountain goats can often be spotted on the craggy peaks beyond.

needles-eye

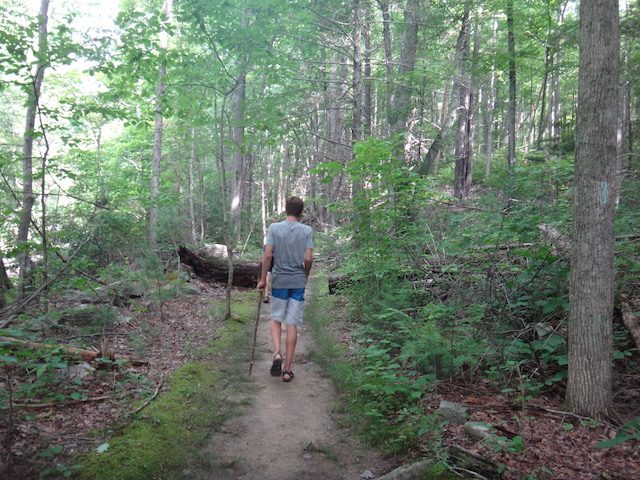
Take a hike (or two or three):

Custer State Park is filled with kid-friendly hikes of various mileage and degree of difficulty. We’ll start with what may be the most spectacular:

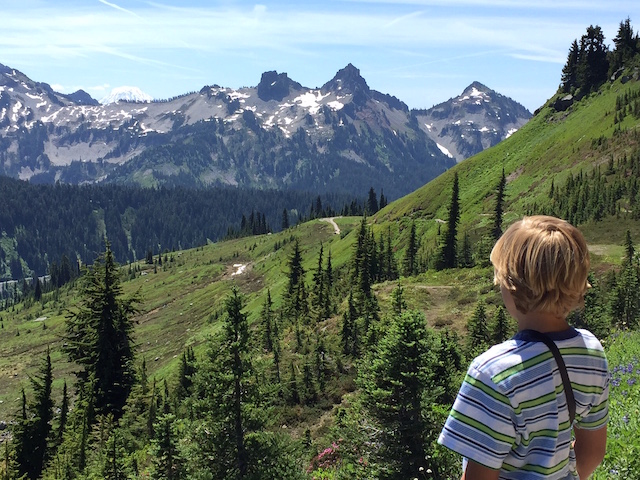
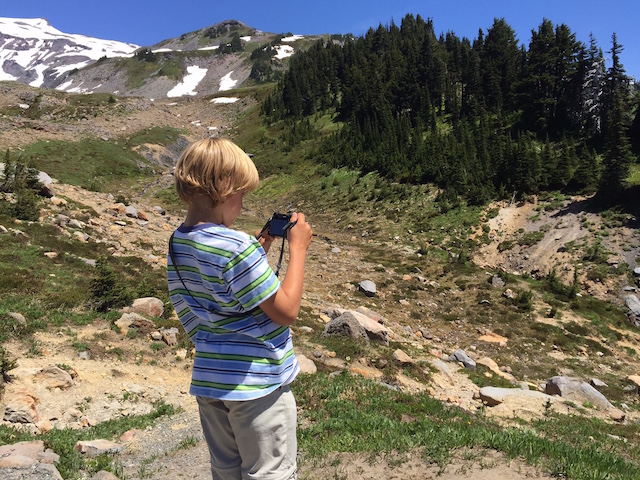
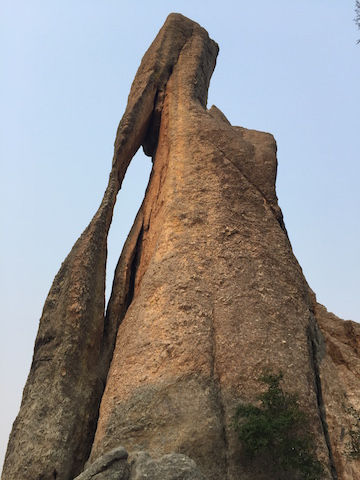
Harney Peak: Harney Peak has the distinction of being the highest point east of the Rockies (at over 7000 feet elevation). There are several trails that will get you there, marked Trail 9, Trail 4 East, and Trail 4 West. The shortest route to the top of the peak is Trail 9, which is a 3.1 mile (one-way) trail starting at the Sylvan Lake.

harney-peak

The trail is well-maintained, and moderate in difficulty for the first two miles, then gets quite rocky and steep for the final mile. Young kids can absolutely do this hike with the right shoes and the right attitude, and teens will definitely be able to handle it. Most of the way is fairly shaded, but because the final stint is in the open, and because the trail gets very crowded as the day goes on, I highly recommend hitting this trail early in the morning. Pack a picnic lunch to eat at the top, which rewards you with a wonderfully constructed fire tower lookout built by the CCC in the 1930s.

view-from-harney

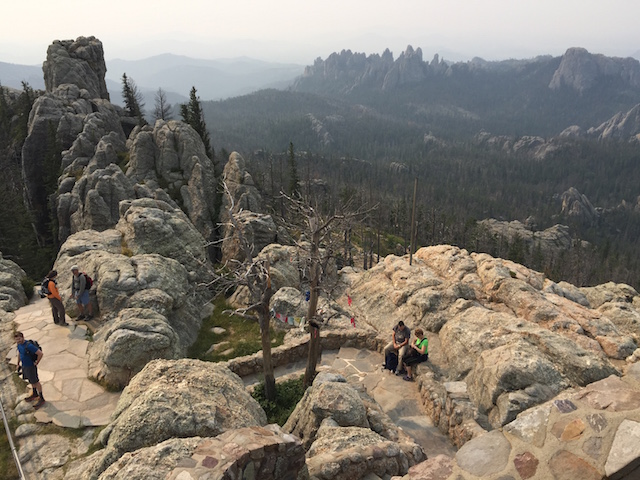
Cathedral Spires: This trail is also a one-way (out and back) deal, and families will see the trailhead right off the Needles Highway. It’s only 1.5 miles long, but strenuous and mostly open. Another to tackle in the first half of the day, the Spires rewards with amazing views and cool rock formations.

spires-of-Custer-State-Park

Centennial Trail: If you want to try the Centennial Trail, which actually winds 111 miles through the Black Hills from Bear Butte State Park in the north to Wind Cave National Park in the South, 22 miles of it is available within Custer State Park. The French Creek portion is 10 miles one-way, and moderate. It takes hikers through the Narrows, which requires either climbing a 60-foot embankment or wading 100 feet through the creek (way more fun). I recommend doing this trail with kids who are well-adapted to longer hikes and if you have two cars (so you can shuttle). You can do a shorter section of the trail at Badger Hole (approximately 4 miles, but it’s more strenuous).

Badger Clark Historic Trail: For those looking to get out of the car and stretch the legs with an easy loop, this one mile loop offers fun historical background in a pretty setting. The trail is located behind Badger Hole, home of Charles Badger Clark, South Dakota’s first Poet Laureate, and is mostly level, with some short climbs on an even trail.
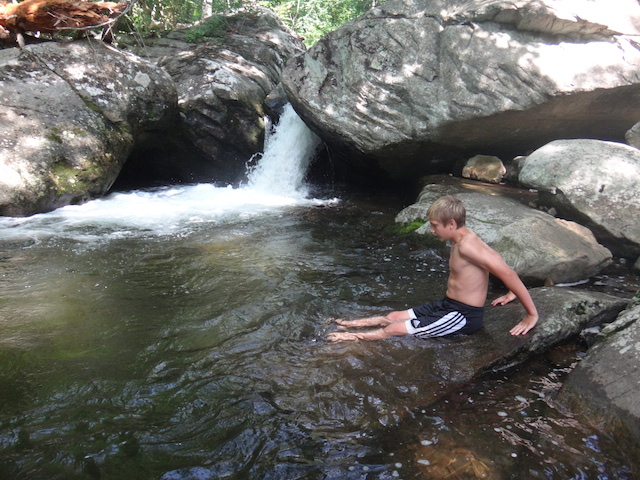
Go jump in a lake:

Custer State Park is dotted with lovely lakes, all of which offer swimming, canoeing, kayaking, and picnicking.

sylvan-lake


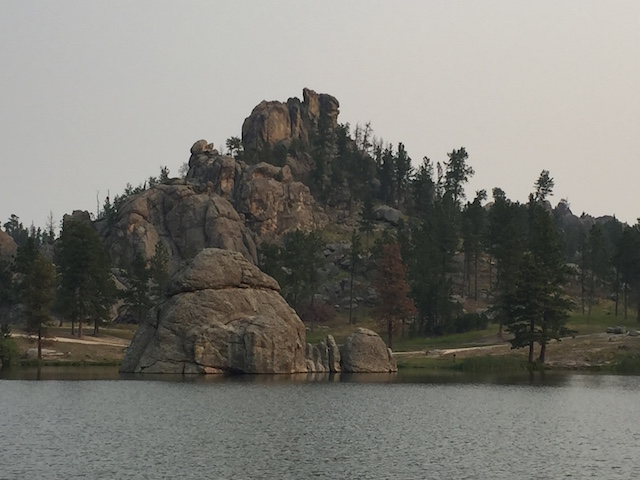
Sylvan Lake: Sylvan is located near the trailhead for Harney Peak, and has a small marina and a trail circling the lake. There’s a general store and lodging, and while it gets crowded in summer, it can be a great place to spend a warm afternoon after hiking. If Sylvan looks familiar, that may be because it was featured (along with Mt. Rushmore) in National Treasure 2.

Legion Lake: Located toward the center of the park, Legion Lake also has swimming, fishing, and picnicking, plus dining at the lodge. If it’s crowded, try Center Lake, to the north up Needles Highway (turn on South Playhouse Road).

See wildlife:

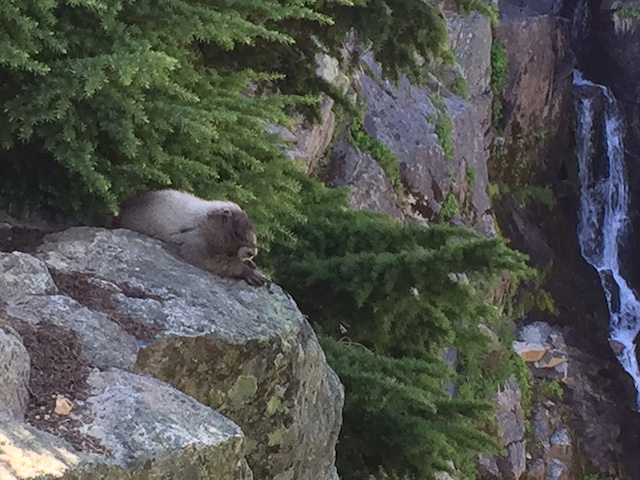
You may see bison just while driving around the park (in fact, it’s very likely), but there’s also the Buffalo Corrals in the south end of the park to visit, and the Prairie Dog Town. Take the Wildlife Loop Road to easily hit both spots, and whenever you stop to get out of your car to snap photos, keep your eye trained on the rocks for mountain goats. We saw several, thanks to some eagle eyes.

Where to stay:

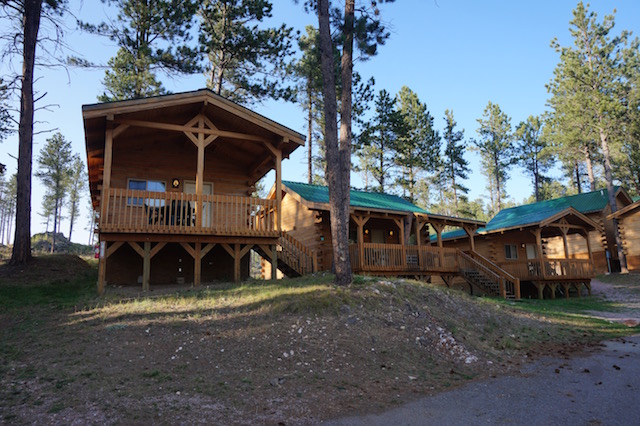
Custer State Park Resort, privately operated within the park, offers five lodges plus specialty cabins within the park. You can check them all out here, but they generally range from stately and elegant (yet still casual) Sylvan Lake to historic State Game Lodge, ranch-like Blue Bell, modern Creekside, and lake house Legion. All have the convenience of services like stores and casual dining.

rock-crest-cabins

If you plan to stay outside the park, I suggest staying in the town of Custer, near the west entrance to the park. I was very comfortable at Rock Crest Lodge. It was located on the highway, but close to town dining and had a nice playground and pool.

Have you been to Custer State Park? What do you recommend?

Mount Rainier National Park two-day itinerary

On the right day, Mount Rainier National Park can rival the scenery beheld at National Park greats such as Glacier and Canada’s Banff or Jasper.

mount-rainier

Often hidden in cloud, the mountain framed by blue skies is nothing short of breathtaking, and on clear days, the views from the Paradise end of the park reach from Mt. St. Helens to Mt. Hood to Mt. Baker. The day we arrived, looking from volcano to volcano across the Pacific Northwest, we felt awe and respect standing along the famed Ring of Fire.

Mount Rainier National Park is large, but 97% of the park is dedicated wilderness, which means families can reasonably see the best day hikes and visitors centers in two full days, or one full day and two half-days. The order in which you tackle these attractions will depend on how you enter and exit the park. We entered from the north (Seattle) through the White River Entrance, and exited to the south via the Stevens Canyon Entrance. Our lodging was located on the south end, so we toured what we could on the north end (Sunrise) after we arrived, then concentrated on the south end (Paradise and Longmire) for the remainder of our trip.

mount-rainier-national-park

Mount Rainier two-day itinerary suggestions:

Day 1:

Arrival through White River:

white-river

We enjoy entering the park at White River, as this milky-white river gives a good introduction to the volcanic activity on Mount Rainier. The river gets its name from the chalky powder that rubs off granite higher up due to glacial activity. Stop for a picnic at any one of the White River turnouts along Mather Memorial Parkway toward the Sunrise Road turn-off.

Sunrise area hike:

If you’re staying in the Sunrise area, skip the Sunrise Road for now, and head south to sample some Ohanapecosh or Paradise hikes, which will enable you to concentrate on Sunrise on Day 2. However, if you’re staying on the Paradise side, as we did, take the time to detour to the Sunrise Road now, to avoid needing to backtrack tomorrow.

The Sunrise Visitors Center is a good one to hit up for Junior Ranger booklets. Afterward, head to the Sourdough Ridge Nature Trail, which is an easy one-mile loop starting near the Sunrise complex parking lot. You’ll get nice views of Rainier and interpretive signs educating on the flora and fauna. As an alternative, Silver Forest is a two mile out-and-back hike, which starts with informative exhibits en route then moves through an area once-damaged by forest fire. What still stands are the ‘silver sentinels’; long-dead but erect trees that are surprisingly beautiful.

If you want a longer hike, the Naches Peak loop is about five miles, and offers small lakes, views of Rainier, and plenty of subalpine forests. Plus, it takes hikers on a portion of the Pacific Crest Trail, which can be fun.

Ohanapecosh-area hike:

silver-falls-hike

As you drive through the park toward the south, plan to stop for a short hike at either Grove of the Patriarchs or Silver Falls, near the Ohanapecosh Campground. The Grove of the Patriarchs is best if you’re short on time or have very young kids; it’s an easy one mile walk to see old-growth forest along the Ohanapecosh River.

For a longer and more satisfying hike, go into the Ohanapecosh Campground to the day-use/trailhead parking. Take the Silver Falls loop hike, which is about three miles. At the very start, you’ll be rewarded with hot springs activity. Feel the water temperature of the various springs as you go…they get progressively warmer as you get closer to the source of the hot springs. Be sure to detour onto the hot springs loop trail about a quarter mile into the Silver Falls loop, just to the bigger pool that’s jacuzzi-hot. Continue along the Silver Falls trail to the thundering falls along Ohanapecosh River; it’s absolutely worth the mileage! The loop will deposit you back at the campground.

silver-falls

Day 2:

Paradise Visitors Center:

For the Paradise portion of your visit, start early, as the Sunrise parking lots fill up fast in summer. (See below for best time of year to visit.) The Visitors Center offers a nice area of exhibits upstairs, and a 20 minute video that plays several times per hour. We always recommend watching videos to introduce visitors to new parks.

Skyline Trail hike:

skyline-hike-mount-rainier

Right outside the Visitors Center, a network of trails are on offer. The Skyline Trail is one of the most popular hikes in the park, and while we usually shy away from potentially crowded areas, this one is worth it. This loop is over five miles, and takes hikers up in elevation from the Paradise parking lots seemingly to the edge of Mount Rainier itself. The first two miles are steep, but the continuous views of Rainier make this workout less painful, and the crowds drop away the further you go. There are a number of turn-around options in these first few miles; hikers could detour onto the Dead Horse or Alta Vista Trail, and return to Paradise. Everything is well-marked, and rangers are often on-hand at junctions to explain options. Note: the beginning and end of this loop are paved trail, to accommodate shorter hikes for all visitors.

For those wanting to go the distance (recommended if possible), continue up Skyline to Panorama Point, where you can opt between the Low Skyline Trail or High Skyline Trail. Either will continue your loop, but in early season, only Low Skyline is open. When we hiked in June, Low Skyline offered lots of snow across the Nisqually Glacier, which the kids loved. Cramp-ons are not necessary for the Low Skyline Trail, but be prepared to walk through snow (trekking poles are useful).

marmots-mount-rainier

The Low and High Skyline trails merge again to start the long descent back toward Paradise, with an option to cut 1.5 miles off your loop by taking the more direct Golden Gate Trail down to Myrtle Falls, then the lodge area. We opted to stay on the Skyline loop, and were not sorry. The views continue to be spectacular, with creek crossings and wildflowers in the early season. At Myrtle Falls, the trail becomes crowded with visitors for the final few tenths of a mile. Look for marmots along the entire hike: we saw 4-5!

Rampart Ridge Trail Hike:

If you have time to venture further from Paradise to the Longmire section of the park, or if Skyline is simply too crowded on the day you’re visiting,  the Rampart Ridge Trail is a good alternative. This trail is often hiked in summer by the many visitors who do not receive Wonderland Trail permits, and in early season or fall, it’s blissfully empty. The 4.6 mile loop begins at the Trail of the Shadows trailhead, and takes hikers through both wetlands and old-growth forest. The climbs along the loop start out quite gentle, then progress to a series of switchbacks. The reward: views of the valley below and Tumtum Peak. Further along the trail, the views continue, offering sweeping vistas of Longmire and Eagle Peak. When families reach the junction with the Wonderland Trail, a steep descent returns them to Longmire.

Best time to go:

The best time to visit Mount Rainier National Park is mid-June, early July, or September. While coming in June is a gamble (not everything will be open yet, depending on snow pack), it’s far less crowded. Mid-July through August are peak season. Come in fall, and the park will be yours alone!

Where to stay:

Campgrounds:

The campground facilities in the park are fantastic. We really liked the relative isolation and quiet of Ohanapecosh Campground, which is set apart from any visitors centers. The White River Campground is one of the most popular, but with the river nearby, we understand why. Check the national park site for campground information, including which can be reserved ahead of time.

mount-rainier-with-kids

Paradise Lodge:

This national park lodge is beautiful, but located in the thick of things. You’ll get pristine views of Rainier, and have immediate access to some of the best trails (no parking worries!) but also be staying in the midst of the crowds.

Packwood area:

We opted to stay three miles outside the Stevens Canyon park entrance, in the Timberline community of seasonal cabins outside of the town of Packwood. We rented our cabin via VRBO, and were cozy in a retro cabin sleeping six. Renting in the Timberline community, we had access to a community outdoor pool and tennis courts, and enjoyed a nice deck and mountain views, plus a full kitchen for cooking our own meals. There are a few dining options in Packwood (we tried the Blue Spruce Cafe, which served traditional pub food like burgers, fish and chips, and pizza), but you’ll want to do some grocery shopping. Note: AT&T customers will have no cell service in this area.

Have you visited Mount Rainier? Where did you hike and stay?

Southwest Missouri pit stop: Fantastic Caverns

Southwest Missouri is filled with old-fashioned pit stops and slices of Americana. Case in point: Fantastic Caverns, ‘America’s only ride-through cave’.

fantastic-caverns

Fantastic Caverns is one of those natural wonders that probably should be protected by the US government, but is instead a privately-owned tourist attraction, making you worry a little bit. But go anyway (despite, or maybe because of, the many highway signs pointing you in its direction).

The fact is, Fantastic Caverns truly is pretty fantastic. And while yes, you do drive through this natural cave, care is now being taken to educate visitors about its protection, and attention is given to the area watershed that feeds it and the animals that inhabit it.

missouri-cavern

The cave tour is conducted via tram, driven by a tour guide. While it’s a shame that many years ago, narrow paths had been carved out of the cave to allow this, the benefit today is that the many visitors who see the cave cannot touch the delicate stalagmites and stalactites, which could cause damage. The cave, which was created from the area’s plentiful limestone, has an interesting history, which families learn about on the tour. In short, it was discovered in the Civil War era, first explored by a hardy group of teenage girls, enjoyed a lively period in which it housed a Prohibition Speak Easy, then held musical concerts.

fantastic-caverns

The large trams hold approximately 20 or more, by my estimation, and the tour takes about 45 minutes. The cave is quite long and deep, and the guide stops along the way to impart scientific or historical facts. I appreciated that our guide took the time to really help us grasp what the early explorers of the cave would have seen, compared to what we are able to see today, thanks to modern lighting. With all lights out, she lit a candle in a homemade metal can lantern and cast the light into the pitch black cavern: the dim light paled to the the spotlights now available for illumination.

The cavern is always 60 degrees, which can mean bringing a sweatshirt or sweater to wear in spring or fall, shedding a jacket to only a sweatshirt in winter, or enjoying a cool temperature without sleeves in the muggy summer months. Tours depart every 20-30 minutes, and there is a gift shop, of course, to browse while you’re waiting. Better yet, there’s a nice Ozarks nature trail that winds around the grounds. It’s only about one mile long, and perfect for parents with impatient kids.

Tour prices:

$23 for adults, $15 for kids 6-12. Kids 5 and under are free. At this price, the tour is worth it, but in our opinion, just barely.

Hours of operation:

I love that Fantastic Caverns is open right at 8 am. It closes at dusk. If you want a near-private tour, get there right at 8 am.

Directions:

The cavern is located at 4872 North Farm Road 125, Springfield Missouri. It’s located along a beautiful stretch of countryside, on windy, hilly roads, but is easily found thanks to all the handmade (looking) signposts en route.

As I disclose whenever applicable, I experienced Fantastic Caverns as a guest of the operation, for the purpose of review. All opinions are my own.

Springfield Botanical Gardens

Driving through Springfield, Missouri? The Springfield Botanical Gardens at Nathanael Green/Close Memorial Park are free to the public, and extremely kid-friendly. Families can get a full afternoon of entertainment from this 114 acre park, or just stop in at a smaller section that appeal to them for a quicker stop. I definitely recommend picking up a lunch along Springfield’s Commercial Street (try Sister in Thyme deli) and eating it garden-side.

springfield-botanical

The park is centered around a new and modern visitors center, but unless you need bathrooms or would like to take the free tram tour around the park, there’s no need to stop here first. In this vicinity, you’ll see the Master Gardener Demonstration Gardens and the Mizumoto Japanese Stroll Garden, both of which are worth a peaceful walk-through. When touring the Japanese garden, explain to kids that the zig-zag bridge and moon bridge are curved and cornered to encourage a slower pace; challenge them to step slowly across, or to sit and study the uniform pebbles in the meditation garden…they will enjoy this more than you think!

japanese-garden

Near the Japanese garden is the Gray-Campbell Farmstead, which shows kids a taste of pioneering history in Southern Missouri. The home was actually moved to this site from just a few miles away. Next to it is the Liberty Schoolhouse, which depicts a one-room schoolhouse.

schoolhouse

Dozens of additional specialty gardens dot the acreage, including an English garden, winter garden, and lush shade gardens. Families can certainly get exercise walking the paths, especially around the lake, and throughout the park, kids will find specialty ‘play pods’ that educate as well as entertain with climbing structures, one of the best aspect of the park for children. There’s also a main playground by the visitor center.

close-memorial-park

Toward the center of the park, a seasonal butterfly house is enclosed in screen mesh. It is open during the natural lifecycle of native butterflies, as opposed to being a tropical butterfly house, so families can expect to see it open from mid-May through the end of summer.

Distance from the interstate:

Just minutes from I-44 and historic Route 66

Hours of operation:

Sunrise to sunset. Bathrooms and other facilities open 8 am to 5 pm in winter, 8 am to 8 pm in summer. 11 am to 5 pm or 6 pm on Sundays.

Directions:

The park and botanical gardens are located at 2400 South Scenic, Springfield, Missouri

Adventures for Kids in Costa Rican National Parks

Costa Rica has a landscape brimming with opportunities for active adventure. National parks provide safe and pristine environments for rambunctious children to explore. If your youngsters have exhibited interest in climbing, jumping, gliding, or bouncing, make sure to fit some of these activities into your Costa Rica itinerary.

costa-rica

You can usually find a tour that offers some combination of the following activities, and your tour guide can provide you with all the equipment you need.

Of course, family vacations in Costa Rica don’t only cater to visitors with boundless energy. If you get a moment to yourself, take a tour of a coffee plantation, or unwind on the beach, or go for a holistic soak in a volcanic hot spring.

But while you’ve got your kids along for the ride, take them on expeditions that will leave an indelible impression. For most kids, that means experiences that send them into totally new environments. Costa Rica’s National parks will invite them to explore their appetite for outdoor excitement.

Suspension Bridges

Look for hikes that will take you high up in the jungle canopy. Walking over a suspension bridge will add excitement to your hike, and offer spectacular views of the surrounding landscape. In Arenal National Park, the view will include the ancient, snow-capped Arenal Volcano.

Visit suspension bridges in Monteverde National Park to voyage into the heart of the park’s cloud forest – a rare environment that develops when high humidity combines with a high elevation. Cloud forests create a habitat for some of the world’s rarest plants and animals.

costa-rica

Tubing and Rafting

Tubing down a river in Costa Rica will let you see the lush landscape from your own tubular oasis. This is an especially good way to see the jungle – you’ll get to observe the wildlife on the banks of the jungle while you move at a leisurely pace.

Older kids can try something a little more advanced with a white water rafting trip. Your guide will make sure everyone has taken all the necessary safety precautions before you begin your rollercoaster ride down the white water rapids of the Naranjo, Pacuare, or Sarapiquí River.

Kayaking and Surfing

Kayaking allows you to get up-close to the twisted trees that make up Costa Rica’s exceedingly rare mangrove forests. You’ll see marine birds, like spoonbills and pelicans, as well as monkeys. There’s even a chance you could catch a glimpse of a crocodile. Guanacaste National Park and Marino Las Baulas National Park are both good destinations for kayaking around mangrove forests. Manuel Antonio National Park has mangrove forests as well as opportunities for ocean kayaking.

While you’re visiting Manuel Antonio National Park, sign up for surfing lessons. Beaches here offer easy-going waves and plenty of qualified surfing instructors. Even if your kids have never tried it before, they’ll be excited to get into the clear, blue waters of Costa Rica’s Pacific coat.

Rock-climbing

In the midst of the dense Costa Rican jungle, visitors can make an afternoon of rock climbing in a canyon. Surrounded by deep green vegetation, these rocky destinations serve as a habitat for colorful birds and plants. Gorgeous jungle canyons are the perfect place for your kids to push themselves to get to the top.

And as you scramble up the side of the rock face, you’ll have the noisy jungle to serve as the soundtrack to your expedition.

Rappelling in a Waterfall

Waterfalls are easily the most refreshing natural formations. And rappelling down a waterfall is, without a doubt, the best way to recover from a steamy hike through the jungle. Have your kids wear quick-drying clothing so they’ll be ready to spend part of their day conquering the cascade.

Zip-lining

No trip to the jungle canopy is complete without a zip-line ride through the treetops. After admiring the plumage of Costa Rica’s tropical birds, you can join your feathery friends on a flight of your own. This is a thrilling activity, and a good source of motivation for a youngster on a hike.

Molly Kendrick is a part-time traveler and freelance writer for Anywhere Travel. Anywhere can help you discover destinations in Costa Rica, Panama, Peru, and Guatemala, and will create your customized travel plan for free. 

Hometown ski resort: Badger Pass Ski Area

Ever wanted to downhill or nordic ski in Yosemite National Park? How about a morning of skiing followed by an afternoon of hiking on the valley floor? I spent a day at Badger Pass Ski Area, located in the center of Yosemite National Park, to see what it was like. What I found: wonderful ski culture, local enthusiasm, and lots of love for the outdoors. I guess that should come as no surprise!

badger-pass-ski-area

Badger Pass boasts just 10 runs and four lifts (plus one rope tow). It features one lodge (two stories), a rental shop, and a nordic center. All the downhill runs funnel down to the same general base area by the lodge, and the entire feel is friendly, welcoming, and relaxed. This is hometown skiing at its best: just like at the tiny ski resort I grew up skiing in the Sierras, Badger Pass is all about the outdoor experience. Kids were skiing solo the day I visited, their parents content with the knowledge they really couldn’t get lost. Newbies were trying out the sport in first-timer lessons, and telemark skiers were almost as ample as downhill skiers.

badger-pass-yosemite

The nordic center was bustling: with over 350 miles of cross-country trail in the park, most of which starts at Badger Pass, this is a hot sport! The nordic center staff will get you completely outfitted (downhill and snowboard rentals are available as well, in the adjacent downhill rental shop). Grab a trail map, and decide how far and fast you want to go.

Badger Pass offers one small terrain park, and the majority of the runs are intermediate, with a few black diamond runs. I was told tree skiing and backcountry skiing was abundant, given the correct snow conditions. In the lodge, visitors will find lots of lounge space, a nice big sun deck on both levels, and friendly food service where you can order standard ski fare: burgers, wraps, and a burrito bar. I recommend the homemade veggie burger and fries.

badger-pass-deck

Lift ticket costs:

Downhill lift tickets are currently $48 for adults, $43 for youth, and $25 for kids (all day). XC ski rentals are available, as stated, as are Pulk sleds if you want to bring the younger kids along for the ride.  Ski rental pricing. 

badger-pass-nordic-ski

Directions:

Badger Pass is easy to find from Highway 41 by the South Entrance to the park, or from the Valley Floor. From Wawona Road, take Glacier Point Road.

As I disclose whenever applicable, I experienced Badger Pass Ski Area as a guest of the resort, for the purpose of review. I hope my firsthand knowledge helps you plan a better trip!

Exploring Port Townsend with kids

Located at the very tip of Washington State’s Olympic Peninsula, Port Townsend has a lot to offer families. From the quaint waterfront town with its lively history to a storied military presence, exploring Port Townsend with kids includes hiking trails, fort batteries, ice cream shops, and touch tanks! Here’s what’s in store (and where to stay):

port-townsend

Downtown Port Townsend:

It’s easy to see the charm of this small town as soon as you enter, whether via road from elsewhere on the peninsula or by boat (more on that later). The shipyards are open to the public, which means boat-loving kids can see dry-docked vessels up close and personal, and Union Wharf offers great views of the ferry.

Start on Water Street, where kids will want to view the wooden boat outside the NW Maritime Center, then head across the street to City Hall Museum run by the Jefferson County Historical Society. We would have overlooked this museum had I not been taken there by a local: inside the historic courtroom, visitors can get an overview of the town’s history, then go downstairs to see old jail cells (Jack London is rumored to have spent a night inside) and exhibits on the region’s pioneering, Japanese, and native cultures.

port-townsend-history


Right nearby is Dogs-a-Foot, a hot dog stand with every type of hot dog desired. It’s a perfect lunch pit stop, with tables outside. Afterward, continue your stroll down Water Street for a stop at Elevated Ice Cream. This locally-owned and operated ice cream shop offers unique, locally-sourced flavors, and has a chocolate shop and candy store located next door.

Stop into any other shops that interest you; you’ll find a great local bookstore and numerous galleries. Note the historic architecture; Port Townsend has some of the best preserved buildings in the NW. If you have your car with you, don’t forget about ‘uptown’: historic Port Townsend built on both the wharf and in the hills, and families will find the best Victorian architecture overlooking the downtown region. This area features a lot of the town’s B&Bs, but you’ll also find wonderful bakeries, diners, and shops.

elevated-creamery

Note: If you’re in the downtown/shipyard area for breakfast, you’ll want to head to the Blue Moose Cafe on Haines for an authentic home-cooked meal. This local hangout is right in the shipyards, and has been overseen by the current cook (not chef!) for decades.

Fort Worden State Park:

fort-worden

We’re pretty sure Fort Worden State Park is the heart of Port Townsend as far as kids are concerned. This sprawling park is located just outside of downtown on the coast, with beach access, hiking trails, and picnic grounds. The central feature of Fort Worden is the fort, which served as defense against invasion during WWI. The invasion never came, but the many fort batteries remain, with platforms for artillery, ammunition storage rooms, and many more intriguing spaces for kids to explore. The batteries are open to the public, which is a very welcome feature in a world that has increasingly shut doors on historical sites. Kids will love climbing on them, running through their creepy, dark tunnels and hallways, and generally playing soldier. Parental supervision is absolutely needed, of course; small children could fall or get lost. Don’t worry, you’ll want to explore the batteries just as much! Prepare to spend hours here!

marine-science-center

In addition to the batteries, Fort Worden is home to the Marine Science Centerlocated right on Battery Way. It’s open from April through October, with innovative saltwater touch tanks. The center staff bring sea life into the tanks in the spring, and release all the creatures in the fall. Daily, fresh salt water from the ocean adjacent is flushed into the tanks. Kids can touch many marine animals, and see more in additional aquariums. Across the street, the education building houses a whale skeleton and other educational exhibits with a conservation theme.

marine-conservation

There are numerous walking trails through Fort Worden (grab a trail map when you enter) and some take kids to additional batteries (less crowded than the one near the beach). There are several campgrounds, and yes, the beach has swimming access. The Point Wilson lighthouse makes for a great backdrop to your Olympic Peninsula beach day!

Inland from the beach, the campus of Fort Worden remains, though quieter than in its active days. Currently, buildings and rooms can be rented for vacation stays, allowing families to further immerse themselves in the area’s history.

Yes, you can stay the night in Fort Worden!

fort-worden

Rentals include full homes on Officers’ Row, units in the Non-Commissioned Officers’ Row, or dormitory rooms. I checked out an Officer’s Row house, where I stayed the night overlooking the campus and ocean. Officers’ Row houses include 1 and 1/2 bathrooms, four bedrooms, a parlor and a dining room, and a full kitchen. It’s fun to see firsthand how officers and their families lived during WWI. These houses are not newly renovated, but are comfortable and very spacious. Kids can play outside, and everyone can walk to the beach, the light house, and the batteries. There is no wifi, but in the check-in building (which is newer), there is a sitting room and a coffee counter where your java and wifi needs can be met.

fort-worden

Beyond Port Townsend proper, the Olympic Discovery Trail weaves 120 miles between the town and La Push, on the western coast, and of course, the rest of the Olympic Peninsula beckons with Olympic National Park and numerous additional hiking trails and beaches. Read more about Olympic National Park with kids!

How to get here:

puget-sound-express

Port Townsend and Fort Worden are located on Highway 20, which connects with Highway 101. Families can also take Washington State ferries directly to town from Whidbey Island (Coupeville) or take the Puget Sound Express from the San Juan Islands. We recommend booking a whale watching trip with this company, even if you don’t need them for transportation to the peninsula. On our trip with Puget Sound Express, we saw humpback whales, porpoises, and harbor seals.

Port Townsend

Shenandoah National Park: Nicholson Hollow hike

Shenandoah National Park is massive, and popular Skyline Drive necessities many hours in and out of the car. Everyone knows Old Rag Mountain offers one of the best day hikes on the East Coast, but it takes most of a day and is very strenuous…not the right fit for every itinerary or every family. However, few people know about the much shorter, much more kid-friendly hike of Nicholson Hollow, accessed right from Old Rag Mountain parking lot.

nicholson-hollow-hike

We got the inside scoop on Nicholson Hollow from the staff at Belle Meade Farm in nearby Sperryville. Instead of the tough uphill mileage of Old Rag Mountain, Nicholson Hollow follows a wide creek through the woods at a modest incline. It’s in shade, and during our June visit, the bugs weren’t bad. The trail starts 1/2 mile from the Old Rag Mountain parking lot (you follow the paved road to the sign post), then at 1.5 miles, you see a large boulder by the creek. Here, a great swimming hole spills from a short waterfall. The depth during our visit was enough for jumping off the big rock and others in the vicinity. If you continue up the trail, it leaves the creek and continues to a Y, where more trails convene. Go as far (or short) as you like.

old-rag-mountain

The first half mile of the trail is on private property; it’s fine to hike it, but remember there is no fishing allowed in this section. After that, you enter Shenandoah National Park.

Where to stay: Shenandoah National Park cuts a long path through Virginia. In order to be centrally located, it’s good to have a home base in the countryside surrounding it. Check out these options from VacationRoost.

Entrance Fee:

You will need to pay the national park entrance fee at the kiosk at the parking lot. The fee is $14 per car, or $8 per adult (kids are free).

Directions:

The Old Rag Mountain parking lot can be accessed from the Thorton Gap park entrance of Shenandoah National Park, or from the county road access off F.T. Valley Road outside Sperryville (follow signage). From the parking lot, walk up the paved road 1/2 mile to the Nicholson Hollow sign.

Disclosure: this post written in conjunction with partner VacationRoost.com.

Philly with kids: how to plan for a two-day historical itinerary


Philadelphia has so much history in their many museums, exhibits, and attractions, families could easily be here 3-4 days. We only had two, so we had to make some tough decisions. We did manage to tour all the following Old City attractions in Philadelphia over the course of a day and a half, plus visited the Philadelphia Museum of Art and enjoyed some good eats

Independence Hall:

There’s no cost to tour Independence Hall, the site of the meeting of the first congregational congress and signing of the Declaration of Independence. You do, however, need to reserved timed tickets for entry. This can be done day-of at the Visitor’s Center one block away, but on busy summer days, we highly recommend doing this ahead of time online (there’s a small service fee of $1.50 per ticket). Arrive at the hall 30 minutes before your tour time to go through security (you can bring bags in) and then queue up in the back courtyard. The tour is only 30 minutes long, but is fantastic: our National Park guide kept all the kids’ attention and conveyed her obvious passion for history with all the adults. The whole process will take an hour. Tip: Remember, many sites, such as Independence Hall, are run by the National Parks service. Kids can earn Junior Ranger badges here. Get a booklet at the Visitor’s Center.

philly-with-kids

Visitor’s Center and Liberty Bell:

I’m lumping these two attractions together because of their proximity to each other. Start at the Liberty Bell first thing in the morning, as the line does get crazy long, crazy fast. Tip: if you just can’t wait in the line, there is a glass window at the very front where people can glance in at the bell (and you’re not cutting in front of anyone). What you miss: the exhibits explaining the significance of the bell that unfold as the line continues). Head to the Visitor’s Center next and see one of two 20-30 minute movies continuously running in the theater. This is the time to grab those Junior Ranger booklets. There is no cost for either attraction.

independence-hall

Betsy Ross House:

We really enjoyed touring Betsy Ross’ house. Before the self-guided tour through her little home, I had no idea what her life had been like, other than the fact that she sewed the first flag. The tour gives you a great overview of what life was like for average citizens in the late 18th century, but also gives more details of Betsy’s life. Tickets are $5 for adults and $4 for kids, and there’s an audio tour option. Definitely worth the cost of admission.

Christ Church and church graveyard:

philly-with-kids

Christ Church is stunning, and there’s a particular wow factor to sitting in George Washington’s pew. This is a living, working church (with a congregation today) so entry is free, and docents are on-hand to point out where Betsy Ross sat, Washington sat, and more. The church graveyard is located a few blocks away, and costs $2 to get in. Inside, most of the signers of the Declaration of Independence are buried here, including Ben Franklin. It’s possible to see Franklin’s grave from outside the gates through an opening in the fence, if you don’t want to go all the way in. We really enjoyed touring through the old gravestones.

Elfreth’s Alley:

philly-with-kids

Near Christ Church is Elfeth’s Alley, the oldest neighborhood in the US that has been continuously occupied by residents. Walking down the narrow alley is free, but remember that people live here…it’s not ok to look in windows, etc. A small museum is open part-time. Be sure to walk all the way down and turn left though another small alley to the end: there’s an interesting board that tells about the residents from the 18th century.

National Constitution Center:

The National Constitution Center is a larger museum on Arch Street and houses the Museum of We the People, plus America’s Town Hall and many civic exhibits. Kids can vote in a voter’s booth, see a replica of the signing of the Declaration of Independence, take the oath of office as President of the US, and learn about the Constitution. There’s a lot of reading in here, so we recommend skipping it if your kids are all under age five. Definitely start with the multi-media theater production; it’s fantastic.

Franklin Court:

This small court behind the row of Market Street buildings Franklin once owned features the Franklin Museum and the site of Franklin’s house. The house has long since been torn down, so a metal frame has been erected in its place, marking where it once stood. Exhibits talk about the house and show original bricks and the original basement. We didn’t get a chance to see the main museum; tickets had been sold out for the day. Hit this spot by at least lunchtime and you should be ok. The courtyard is quiet and cool, which is another plus.

Franklin Square:

philly-with-kids

Not to be confused with Franklin Court, Franklin Square is located at the end of the Old City district and features a working carousel, playground, and miniature golf course. The golf course’s features are all replicas of Philly historical landmarks. Play a game for about $25 for a family of four. This area is nice for a break from historical touring, but would be the first thing we omitted from the itinerary if time were an issue.

Philly Duck Tours:

philly-with-kids

A fun way to get an overview of any city is through a Duck Tour with Ride the Ducks! We take advantage of these in any city in which it’s offered: the amphibious ‘duck’ vehicle is operated by a funny, entertaining tour guide and takes guests over the land and water of Philly. The tour is 90 minutes, and by the end, adults are oriented to the city and kids have a grasp on what they’ll be seeing later that day. We book our Duck Tour for morning of our first day.

Where to find all the above attractions: Maps are available at the Visitor’s Center. Definitely pick one up. All the above attractions are within walking distance of each other.

CityPASS

What you need to know about touring Philly with kids

Mount Tom Reservation and Ice Cream

Ready for the perfect summer outing in Western Massachusetts? Mount Tom Reservation is located between EastHampton and Mt. Holyoke, and offers fishing, hiking, picnicking, and a play area, plus skating and cross-country skiing in winter.

mt-tom-reservation

Mt. Tom:

Mt. Tom offers the best view of the Connecticut Valley, the Berkshire mountains, and the Pelham hills. It meanders over 2,161 acres at the top of Mt. Tom (rumored to be the inspiration behind Seuss’ Grinch mountain) and features 22 miles of trails.

We enjoyed the new, creative play area located in the center of the park. (Eying the tree canopy, we wouldn’t mind coming back in autumn  someday, too!) The play area includes manmade ‘cliff’ and rock formations that lead to slides, swings, and the like. There’s also a large grass area adjacent and picnic areas nearby. Port-a-potties and a drinking fountain are on-site, as is a covered group area.

Mt. Tom is one of a network of Massachusetts reservations; you can pay $2 per car at the entrance, or buy a pass for all the state reservation properties.

Directions:

Head east on I-90 E. Take exit 4 for I-91 toward Holyoke/Springfield – 0.6 mi. Keep left at the fork, follow signs for I-91 and merge onto I-91 N – 3.9 mi. Take exit 17A to merge onto Easthampton Rd toward Holyoke – 0.5 mi. Turn left at Northampton St/US-5N – 4.0 mi. Turn left at Reservation Rd.  Park will be on the left 0.7 mi.

Mt. Tom’s Ice Cream:

mt-toms-ice-cream

Mt. Tom’s Ice Cream offers homemade ice cream in a dizzying array of creative flavors, plus an old-fashioned candy shop (where candy can be purchased by the 1/4th pound). Located at at the base of Mt. Tom in EastHampton, this shop seems to be equally popular with families and singles, offering free wifi and located next to a trendy record/music store. It’s a definite stop before or after a trip to Mt. Tom to hike or play.

candy-at-mt-tom

We opted for the salted caramel and Mexican chocolate varieties (it’s got a kick to it!) and they do offer ‘kiddie’ sized cones in addition to regular and large. Also on offer: gourmet coffees, shakes, malts, and sundaes. There is limited seating inside, but several small tables are also available outside, plus families can always take their ice cream across the way to sit by the pond.

Directions:

The shop is located on the edge of Nashawannuck Pond in EastHampton. The address is 34 Cottage Street (Rt 141), in the heart of town.