How to plan your Disney Vacation with FastPass+

We have written extensively about enjoying Disney parks using FastPass. Is all this advice out the window now that Disney has introduced FastPass+ and Disney Magic Bands? The short answer: maybe. The game certainly has changed.

How to plan your Disney vacation using FastPass+ and why it will make touring Disney parks easier than ever for those who dislike planning (but harder for those who do):

fastpass-+-in-Disney-parks

Step 1: Know what’s included in your FastPass+ options

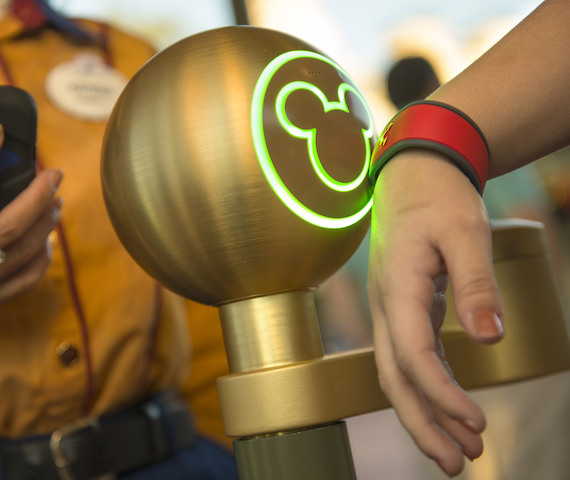
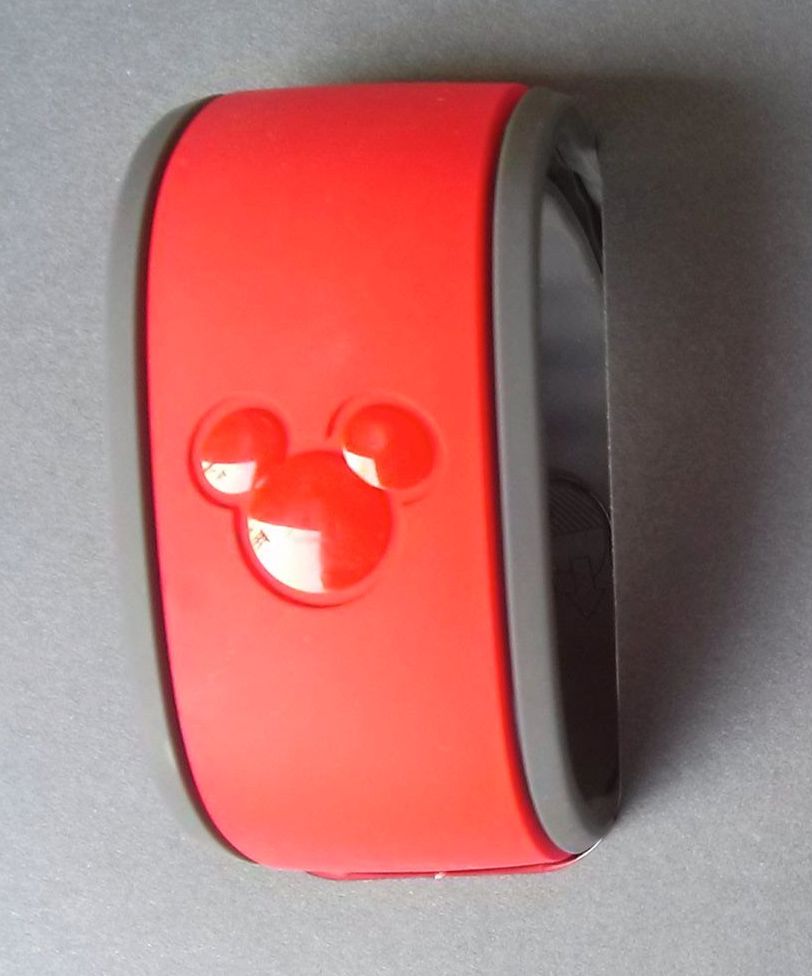
If you’ve been in a Disney park in the last year and have paid attention, you’ll have seen gradual changes to the current FastPass system, starting with FastPass options to nighttime entertainment, and the arrival of new Mickey ear-sporting Magic Band kiosks. The new Magic Bands utilized by Disney use RFID technology, and hold your park ticket, room key, dining plan, dining reservations, Fastpass + reservations and much more. Say goodbye to Key to the World (KTTW) cards. The band ‘holds’ your FastPass reservations (up to three per day, per park, per user).

More than double the current FastPass attractions are offered with FastPass+, as well as reserved seating for shows, parades, and dining reservations. FastPass+ is available for ALL Disney guests, not just those staying on-site. (Disney hotel guests can make FastPass+ reservations up to 60 days in advance, however.) What does this mean for your park touring strategy? You may want to consider making FastPass+ reservations for several attractions that have not previously been included in the traditional FastPass list. Then, hit the traditionally popular rides at the very start of your day, knowing you have reservations for those rides that fill up after park-goers cross the ‘top’ experiences off their lists.

disney-magic-band

The number of FastPass+ reservations per guest per day per park varies slightly depending on crowds and season, but is generally 3-4. While this number might mirror the number of traditional FASTPASS tickets an average guest might secure during a day, it’s less than that which a savvy guest (willing to do the legwork across the park) has gotten in the past. That said, the new FastPass+ reservations do include evening entertainment options and meet-and-greets not previously available.

Step 2: Make your FastPass reservations online before you arrive

As a Type A Disney planner, I’m giddy about the ability to pre-reserve FastPasses! If you’re not a planner, and now groaning about this development, take heart: Disney makes it easy to make FastPass+ reservations, even if you don’t like to ‘map out’ your day. When you get your park tickets (or hotel reservations), you’ll be prompted to select your Magic Bands (and colors), assign them to your family members, and start making FastPass+ reservations. As soon as you designate a park and select your attractions, the site will automatically suggest the best order in which to schedule your FastPasses, utilizing a park map and known parade and entertainment schedules. A planning nut like me would have done this anyway, but I realize I’m in the vast minority!

And if you decide to change your plans on the fly while at Disney, it’s easy to alter your FastPass+ reservations from the My Disney Experience App. You can make new reservations, opting for the ‘earliest time available’ feature, or skip it altogether. Even I realize that plans do change!

Step 3: Make sure you have the FastPass+ app downloaded on your smart phone

disney-magic-bandsThis is the easiest step, but crucial. Download the My Disney Experience App, so you’re ready to make any necessary changes to your FastPass+ schedule. If you don’t make changes, no need to check the app every time you arrive at a FastPass line: the new kiosks allow you to simply touch your Mickey ears on your Magic Band to the Mickey ears on the kiosk. Yep, it’s pretty cute.

So, how will this change the way you currently plan your Disney park day?

Here’s how I see it: extensive advanced planning will only make you more efficient in the parks and more prepared for your day. The bad news: mega planners who used to secure 6-8 FASTPASSES per day will now be limited. The good news: My old strategies for obtaining FASTPASSES throughout the day included a lot of trekking back and forth through the parks, which will now be eliminated. Families will be able to arrive at the park of their choice and virtually have three passes in their pockets, instead of the traditional none.

Because families are currently limited to three FastPass+ reservations per person (and times cannot overlap), here’s my strategy in a nutshell: 1. get to the park early, 2. ride stand-by before the park fills up, 3. have FastPass+ reservations for the afternoon, allowing for a relaxed day. Now you can use the rest of your time discovering unique things to do at DisneyWorld.

For a full play-by-play of the FastPass+ reservation process, including screen captures to illustrate the process, check out this post.

Ready to travel? Sign up for our FREE subscription list and receive an air travel and road trip ‘cheat sheet’

Questions I have been asked:

Can I still use traditional FastPass kiosks using my Key to the World card? 

The answer is, sometimes. Traditional FastPass kiosks are being phased out, and Magic Bands are replacing KTTW cards. If your Disney hotel still issues you a KTTW card (as I’ve heard some are still doing), you may have the option of using both FastPass methods. However, since the vast majority of users get 3 or fewer FastPass tickets per person per park, you’re not likely to ‘need’ both. Better to get used to the new system. If you really, really want a card or ticket to put into the kiosks, you can obtain the paper ticket type by buying admission to the parks at Downtown Disney locations or online.

Can individual members of my family reserve FastPasses to different attractions?

Of course! Just like with traditional FastPass, each Magic Band is entitled to three reservations per park, and is not tied to family members. In your park touring plan, take into account instances in which kids of various ages will want to tour separate attractions, and reserve FastPasses accordingly.

What if we’re park hopping?

Well, my answer to families wanting to park hop is usually, ‘don’t’. I advice not park hopping in most instances, the exceptions being to see a show or dine in a different park in the evening. If this is your situation, my advice is to arrive at your first park early, ride stand-by, and make your FastPass+ reservations (including the one for your entertainment or dinner) at the second park. FastPasses are at their most valuable in the afternoon, anyway.

Learn more about FastPass+ and My Magic here! And then get more DisneyWorld secrets!

How to plan your Disney vacation with FastPass+

Photo credit: Amy Whitley and Walt Disney World Resorts.


Why Reno, Nevada should be on your family travel radar

Never considered spending family vacation time in the Biggest Little City in the World? I get it: Reno, Nevada is usually a stop-over for road tripping families, a pit stop en route to Tahoe, Vegas, or the San Francisco Bay Area. However, Reno has grown in both population and stature, helping this ‘little city’ deliver big on family-friendly attractions. The city is affordable (hello, casino-hotel deals), close to outdoor recreation, and its calendar is packed with kid-friendly events. Here’s why a Reno family vacation is worth considering:

reno-balloon-race

1. Mt. Rose hiking and skiing:

Yes, Lake Tahoe skiing is adjacent to Reno, and yes, we love Tahoe skiing. But for families who want to save vacation cash by staying in Reno and don’t relish the idea of a commute, Mt. Rose Ski Tahoe provides the absolute fastest access to slopes. And Mt. Rose is a four-season destination: in summer, hikes on Mt. Rose range from half-mile nature walks to full day adventures. Mt. Rose is the second tallest peak in the Lake Tahoe Basin and the highest in Nevada. Mountain biking reigns here as well.

2. Virginia City:

Located only 30 minutes outside of downtown Reno, Virginia City offers a true glimpse at Old West mining history and a genuine feel for Northern Nevada. Tour museums, walk the boardwalks of the historic streets, take part in living history exhibits, enter crumbling mines (not for the feint of heart!) and check out saloons with sordid pasts (yes, there are more than a few). En route to Virginia City,  look for the wild horse herds that still run free in this part of the country.

3. Scheel’s Sporting Goods Store:

Scheel’s is more than just your average sporting goods store. In fact, it’s starting to get a bit of a cult following in travel  circles, aka Wall Drug in South Dakota. But intend of kitchy goodness, Scheel’s offers 248,000 square feet of retail space, earning it the title of World’s Largest Sporting Goods Store. Scheel’s features a 65-foot tall ferris wheel, two 16,000 gallon aquariums, 32+ flavors of fudge in the Fudge Factory, 14 presidents in the Walk of Presidents (random!), a NASCAR Simulator, and a 35-foot tall Wildlife Mountain in addition to 85+ specialty shops that feature the hottest brands in clothing, footwear and sports equipment.

4. Great Reno Balloon Race:

Every September, Reno becomes a premiere destination for balloon enthusiasts. The Great Reno Balloon Race is the largest free ballooning event in the world. Bring the kids, enjoy free entertainment, and take in a truly spectacular sight. There are fly-overs, tethered rides, glowing balloons, pre-dawn events, and more.

5. Pyramid Lake:

Thirty miles northeast of Reno, prehistoric Pyramid Lake is perhaps the most unusual natural landscapes you’ll ever encounter. Intrigued? This vast, pure jewel in the heart of the Northern Nevada desert mountains stands out like a eye…and is filled with trout. Plus, we hear it’s the default photo on the iPad. If it’s good enough for Apple, I’ve got to check it out.

Photo credit.

ATV adventures and snorkeling with Punta Venado

There are as many Riviera Maya eco-tours as there are amazing natural wonders along this part of the Caribbean, and each offer something a little bit different. We’ve reviewed the fast-action activities with Alltournative, but for a change of pace, a day with Punta Venado offers both ATV adventures and snorkeling, plus relaxation.

blue venado beach club

Don’t worry: the kids will still be highly entertained with Punta Venado, located on almost 2000 acres and along 2.5 miles of pristine private beach. But you’ll enjoy some downtime as well. The eco-park is comprised of two sections: the Punta Venado ranch, with activities ranging from horseback riding, ATV-riding, and snorkeling, to the Blue Venado Beach Club, which sits on pristine white sand and offers a lovely open-air restaurant, cabanas, and miles of coastline. Families looking to get the most of their stay will take advantage of both.

punta venado

We started our day at Punta Venado with an ATV tour through the jungle. Since we experienced a brief downpour during our tour, the dirt paths were nice and muddy…perfect for some messy fun! The ATVs seat two, and adults must drive (age 16 and up). A guide takes your through the jungle to a dry cenote cave, where you get off the ATVs to explore a bit. If you’ve been swimming in cenotes earlier in your trip, this field trip isn’t too big of a thrill, but still fun. We then continued on ATVs to a cenote pool, where we jumped into the fresh water to cool off and wash the mud off our legs from the drive. This pool was very fun for the kids to explore, as it included a small creek-like waterway at one end, surrounded by jungle.

We rode on to Punta Venado’s private beach (as pretty as any along the Riviera Maya) where their snorkel and dive shop team outfitted us to snorkel on the Mayan Reef. The reef sits only feet off the shore at this location, making Punta Venado the only place we knew of in the Riviera Maya to snorkel the reef directly from shore. Even though the water was choppy after the morning storm, we were able to reach the reef area fairly easily (we were given fins and life jackets in addition to snorkels and masks), and our guide offered recycled water bottles filled with soggy tortillas…perfect fish food! The tropical fish surrounded us to access the food (which is squeezed from the bottle), making for a very impressive showing.

punta venado

On a calmer day, we could have accessed more of the reef, but even in not-ideal conditions, we saw hundreds of fish. We swam back to shore to ride the ATVs back to the ranch area.

When booking a Punta Venado tour, families can choose between a menu of options: in addition to ATVing and snorkeling, we opted for lunch at the Blue Venado Beach Club, a short dirt road drive away. This private beach club is directly on the water, offers bathrooms, showers, a restaurant, a bar, and beach cabanas. After lunch, you’re invited to stay as long as you’d like. If you have your own snorkel gear, you could certainly snorkel off the shore here as well, and if not, the body surfing is great.

Tip: Eco-tours are expensive: if you want a more economical day, opt for the beach club only. Access is free: we were told the only requirement is to buy $20 worth of food or drinks per person from the restaurant. At $20/person, this is the cheapest excursion in Riviera Maya. If you have a car or rent a taxi, access to the beach club is directly off the coastal highway linking Cancun to Tulum.

Date last visited:

August 2013

Cost:

Punta Venado ATV tours are $83/per person. They also have an option called All In, which includes everything on offer for $150/per person.

Directions:

Look for the Punta Venado and Blue Venado Beach Club sign right after Calica on the Riviera Maya.

Disclaimer: we experienced Punta Venado as guests of the tour company, for the purpose of review. All opinions are our own.

Whale watching in Southern CA with Dana Wharf Sportfishing & Whale Watching

Luck was with us the late December day we boarded the whale watching boat out of Dana Wharf. Winter is prime time for whale watching in Southern CA, and the ocean was as calm as glass and the sun was shining warmly. I grinned at the many passengers wearing green and sporting Michigan State gear in prep for the Rose Bowl to be held several days later. I was sure they were basking in the warmth of the SoCal sun and 75 degree temps.

whale-watching-in-southern-ca

The captain of the Dana Pride coasted the vessel north along the shore and we enjoyed seeing the beaches that we love to visit. He stopped at a buoy with sun bathing sea lions that barked and swam in the water next to our boat. It was another 30 minutes or so of smooth cruising as we listened to the captain tell us the pattern of the grey whales we were searching for. Between the months of November and April, they make their migrations north and south from the feeding grounds of Alaska to the warm lagoons where they give birth in Mexico. Typically they swim close to shore and thus we were looking for them there.

family-whale-watching

The water was so calm that day and the inversion layer so unique that suddenly the captain turned the ship out to sea. He had spotted a whale spout far off the coast. We spent the next 30 minutes speeding out the 5 miles to follow the grey whale swimming south. The boat pulled up alongside the whale and we watched with fascination as it spouted, surfaced several times, then fluked (showed it’s tail), and dove to the bottom to eat. Captain Todd is one of the cofounders of the Grey Whale Foundation and he shared lots of great information with us about their migration, speed, breeding, eating, and more. School groups have the opportunity through the Foundation to get classroom experience and to take field trips with Dana Wharf Whale Watching to see the grey whales in person.

Spotting the whale spout 5 miles off the coast was a truly magical opportunity. We might not have seen a whale that day if it hadn’t been for such calm water. Regardless of the luck of future trips, whale spotting is guaranteed. If a whale isn’t found on a trip, passengers receive free passes for a return trip to spot a whale. As luck would have it, Michigan State won the Rose Bowl on New Year’s Day. Must have been partly due to the luck of the whale!

dana-point-whale-watching

Taking kids on a whale watching cruise is a fun experience, but planning ahead can ensure a good trip without some of the difficulties that can arise. It is great for kids at least 3 years or older. It’s helpful if you don’t have to worry about your child running around on a bumpy ship, falling down, or not being interested in seeing a whale (which can be far off and with only the top of it visible).

  • Wear layers. No matter the weather or sun, speeding along the ocean can feel very cold. Bring beanies to keep their heads warm and tuck long hair into pony tails or braids.
  • Bring sunscreen, sunglasses, binoculars, chapstick, and snacks. Drinks, snacks, and burgers are available for sale in the small galley. Salty snacks and full tummies can help prevent seasickness.
  • Most trips are calm and short enough that seasickness isn’t a problem. We prefer using SeaBands because they can relieve and prevent symptoms without the drowsiness of medications.
  • Plan on needing to hold your kid’s hand and have your own hand free to hold a rail. It can get bumpy and you will need to walk around (to go inside if it’s too windy and cold, go to the restroom, etc.) Carry a backpack or bag that is hands-free.
  • Take a few pictures but don’t hold your iPhone over the railing to take a picture. Need I say why? (No, it didn’t happen to me but my heart stopped when I saw other people doing it!)
  • Don’t stress about getting to the front of the boat. There were way too many people up there for us to get to see anything. Ask a crew member which side of the ship to stand on. They know which side of the whale the captain will pull the ship up alongside.

Grey whale watching season is from November to April but going whale watching is a great experience all year long. Blue whales, humpback whales, fin whales and more can be spotted during different seasons. Dolphins typically are found daily and seeing them swim, jump, and play in the boats wake is a thrilling experience. It’s like a front row seat at a SeaWorld dolphin show.

Dana Wharf Sportfishing & Whale Watching is one of the first outfitters taking guests whale watching since the 70s. Call (888) 224-0603 or book online for future dates.

Date last visited:

December 2013

Distance from the interstate:

Dana Point is located right on the Pacific Coast Highway (Highway 1).

Rate:

$45/person. Call Dana Wharf for tour times and departures, or check the schedule here.

Michelle McCoy lives in sunny SoCal with her husband and four kids. They love finding all the quiet corners in Orange County when they have time after school, work, and church. Michelle is the SoCal Destination Guroo for Trekaroo and loves sharing her findings with other families. 

Disclosure: Michelle and family experienced whale watching as guests of Dana Wharf, for the purpose of review. All opinions are her own.

A day with Alltournative tours: Tulum and Jungle Maya adventure with tweens and teens

Mexico’s Riviera Maya is rich with geological and cultural excursions for active families. It’s system of cenotes (underground rivers) and abundance of Mayan ruins are accessed by many tour operators, but which one to pick? We spent the day with Alltournative Tours, a leading eco-archaeological guide service specializing in active, adventurous tours.

Like most local tour companies, Alltournative works with Mayan property owners and archaeological sites to gain access to some of the most impressive (and most fun) sites along the Yucatan peninsula. We opted for their Tulum and Jungle Maya tour, which offers a history lesson at ancient Tulum and explorative fun in the jungle in their Mayan eco park.

We started the day at Tulum, the beautiful Mayan ruins on a cliff overlooking the Caribbean Sea. (Alltournative will pick up from most Cancun and Riviera Maya hotels.) Right away, we knew our bilingual guide, Robbie, would be fantastic: a native of Mexico City who is part-Mayan himself, Robbie was passionate about the Mayan culture, knowledgeable about their history, and great about tailoring the educational content to kids. Tulum is open to the public and easy to access on your own, but once on-site, we saw the value of a guide: many of the sites have little information in English to explain their significance. Without Robbie, we wouldn’t have known what we were looking at most of the time. We toured the sites for approximately 45 minutes, then Robbie left us to explore on our own for another hour. We opted to take a much-needed dip in the ocean at the beach on-site (voted by National Geographic as one of the most beautiful in the world!) then took advantage of some photo ops.

Tulum

We rejoined Robbie and the Alltourative transportation and drove the short distance to the Sac-Actun xenote cave system. Located on Mayan property at a small eco park run by Alltournative, we were given lockers, took showers to rinse off, then met the Mayan family who owns the property for a short purifying ceremony in the Mayan language. (The cenotes are spiritual to the Mayans, and treated with upmost respect.)

rappel into cenote


We were then led to an opening in the underground xenote system, where we rappelled down to swim in the cool, fresh water. Popping out through a cave entrance a few meters away, we climbed into the back of a Mercedes Benz all-terrain truck called an Unimog and enjoyed a bumpy ride through the jungle to Alltournative’s series of zip lines.

cenote

I expected this jungle ride to be merely a means to an end (the park is divided into two sections), but instead, it was one of the kids’ favorite parts, due to driver Willi’s sense of fun. Willi took the Unimog along the pot-holed dirt road at a rolling pace, to the delight of the boys.

Once we’d departed the vehicle, we were outfitted for zip-lining (still with our faithful guide Robbie) and shown how to climb the steep ramps to the zip line towers. We took two lines across the jungle, then were surprised by an entirely new-to-us zip-line experience: zipping into water. The last line concluded in the cool water of an open xenote, which was all kinds of fun. We swam to the shore, then grabbed snorkels and masks for a swim through the Nohoch Nah Chiich cenote cavern. Note: If this itinerary seems whirlwind, that’s because it is! We recommend Alltournative to families who have active kids looking for fast-paced outdoor fun.

alltournative activities

The Nohoch Nah Chiich is renown to divers (scuba is offered at this location for cave-certified divers), but for snorkelers, it’s a pretty easy swim through open-air caves with the guide. The swim takes about 15 minutes, and stalactites and stalagmites are pointed out along the way, in addition to hanging bats. Using your mask, it’s an unique experience to see the cave bottom as well as look up at the ceiling.

By this time in our day, we’d worked up quite an appetite. Last but not least, we were shown to the Mayan dining area and kitchen on-site, where the family owning the land prepares authentic Mayan cuisine. Tables as communal, and food is buffet-style, with a traditional Mayan soup, empanadas, beans, rice, chicken, and tortillas. Beware the hot sauce…it’s truly hot!

zip line with alltournative

After the meal, guests are returned to the first section of the park to retrieve the items in their locker, offered a MAYArita (their version of a margarita), and invited to rest a while in the many hanging hammocks and lounge chairs dotting the landscaped jungle space.

Alltournative has photographers who shadow you during your tour, and they ask you to view your photos on computer stations before leaving. The photo packages are expensive, but if you don’t have your own underwater camera or video camera to capture the action, they may well be worth it. (You can always take your own photos.)

A word about sustainability and ecotourism: We were impressed by how well the flora and fauna were cared for at the Alltournative eco park site, and liked hearing how our ecotourism aided the Mayan people who owned the land. The xenotes here are spotless, and while they don’t have a completely ‘wild’ feel due to being part of a tour, they are clearly authentic (as opposed to aided by human construction at the large eco parks along the coast). If you have dive experience, you can certainly seek out more isolated xenotes on your own, but for an introductory family experience in a safe environment, Alltournative will fit the bill nicely.

A note about Coba: Alltournative also offers a tour of Coba, the Mayan ruins further inland. This tour does take longer, with a longer drive, which is why we opted to tour Tulum instead. However, it is still possible to climb the ruins in Coba, which can be a draw to families.

Date last visited:

August 2013

Cost:

the Tulum and Jungle Maya tour we experienced runs $129 for adults and $99 for kids. Alternatively, families can book the Jungle Maya only for less, but we don’t recommend skipping Tulum.

Directions:

It’s not possible to drive to Alltournative’s eco park on your own, so leave the rental car at your hotel and let them pick you up.

Disclaimer: we experienced Alltournative as guests of the tour company, for the purpose of review. All opinions are our own.

Using the Lake Placid Olympic Region Passport with kids

On a recent trip to Lake Placid, NY, we got to check out a piece of Olympic history with the Olympic Sites Passport. Our group included some pretty little kids (2 and 4), but there was still plenty for them to do and see  using the Lake Placid Olympic Region Passport. I’m a huge fan of the Olympics (any season, any sport!), so it was fun to pass some of that excitement on to my kids. Even off-season, and well after hosting the games, the Olympic facilities at Lake Placid are impressive.

Whiteface:

whiteface

We started out at Whiteface, the ski resort just outside of Lake Placid. We drove up the Veterans Memorial Highway, which goes to the summit of Whiteface Mountain. It’s a beautiful drive, and at the top you walk through a tunnel to get to an elevator to the summit. At the top, there are lots of places to explore, take in the view, and even rock scramble (obviously, this was a big hit with the kids!).

After driving back down to the base of the Whiteface ski area, we rode the Cloudsplitter Gondola to the top of the ski hill. There are some beautiful views at the top, but unfortunately for us, a thundershower chased us back into the gondola just after arriving!

Olympic Jumping Complex:

Lake Placid olympic region

Our next stop was the Olympic Jumping Complex. If you only make one Olympic stop during your Lake Placid trip, this should be it. I had only seen the jumping towers on TV, and to see it on site was truly impressive. To tour the jumps, you take a chairlift to the base of the tower (our two-year-old’s favorite part by far!), then a 26-story elevator to the top. Once you’re up there, you can go outside to the top of the jump to get the ski jumper’s perspective. The kids were amazed that someone could really do that (especially our 4 year old, who has some skiing experience). Our two year old volunteered on the spot to strap on some skis and go…maybe next year!

After touring the jumps, you’ll want to check out the freestyle pool. We lucked out on our visit, and got to watch some jumpers practicing all sorts of flips and twists. Check their calendar for the Summer Jumping Series when planning your visit, and you’ll get to see some of the best jumpers in the world, and maybe even meet the athletes.

The Olympic Sites Passport also gets you into the Olympic Sports Complex, where the sliding (bobsled, skeleton, etc.) facilities are located, and the Olympic Center, where you can tour the Olympic museum and the skating rink (site of the 1980 Miracle on Ice). Ours were a little young for these activities, but if you have any winter sports fanatics in your group, it’s a can’t-miss!

The Olympic Sites Passport is also a great deal. It’s only $32 per person (kids 6 and under are free), and gets you in to all the sites listed above (Whiteface, Olympic Jumping Complex, Olympic Sports Complex, and Olympic Center). There are all sorts of additional activities (at additional cost, but at a discount with the Olympic Sites Passport), including nature treks, mountain biking at Whiteface, and bobsled rides. The ORDA (Olympic Regional Development Authority, the organization that manages the Olympic facilities) website isn’t terribly helpful, but all information can be found on the Whiteface site.

Date last visited: August 29-30, 2013

Distance from the interstate:

Lake Placid is pretty remote, and is not really on the way to anything, but it’s still worth a visit! It’s about a 2 or 2 ¼ hour drive from Albany, about 30 miles off Interstate 87. Wondering where to stay? Our pick is Golden Arrow Lakeside Resort.

Directions / Contact:

Site locations can be found on the Whiteface website. Tickets can be bought at the ORDA store at 2426 Main Street, Lake Placid, NY 12946; tel. (518) 523-1420.

As I disclose whenever applicable, our family experienced the Olympic Region as guests of ORDA for the purpose of review.

Outdoor exploration with kids: Eastern Mountain Sports Schools

EMS rock climbing

 EMS is one of my favorite outdoor gear stores, and I look to them whenever we need something new for backpacking, hiking, or climbing. But did you know that they have special “schools” for climbing (rock and ice), skiing (avalanche training, back country, telemark), kayaking, and biking? These EMS schools are located throughout New England and New York and are available to everyone from experts to newcomers. When you join a class, all equipment is provided (except personal clothing, jackets, raingear, etc.) so it’s a great way to get started in a sport without making a big investment. Half day, full day, and even overnight classes are offered. So whether you live in the area, or are spending some time here on vacation, check out the EMS website to see what’s available near you!

We recently took a half-day beginner rock climbing class in Lake Placid, NY after introducing our five-year-old to the sport at the local climbing gym. (Tip: we paired our EMS schools class with a stay at Lake Placid’s Golden Arrow Lakeside Resort.) Our instructor was friendly and great with kids, and was able to give instructions without skimping on fun. He knew of a great beginner site that was just a short hike off the road, and Homer got to try out a number of different ascents, ranging in difficulty. He must have climbed that cliff 15 times before he asked for a break!

An EMS climbing class may seem expensive ($350 for a family of 4 or 5 people, full day), but when you consider the cost of equipment, and the importance of an instructor who is going to do a lot of the grunt work for you (think of all the ropes that need to be fixed at the top before you even start!), the price sounds pretty reasonable. Overall, it was a great experience, and I’ll definitely check out what is offered by EMS schools before my next New England/New York getaway!

Check out their website to see what’s on offer near you. Classes are located in Massachusetts, New Hampshire, Connecticut, Rhode Island, Vermont, and New York.

EMS rock climbingDate last visited: August 29, 2013

Distance from the interstate: Lake Placid is pretty remote, and is not really on the way to anything, but it’s still worth a visit! It’s about a 2 or 2 ¼ hour drive from Albany, about 30 miles off Interstate 87.

Where to stay: Read our review of Golden Arrow Lakeside Resort!

Directions / Contact:

See the EMS website for information on an activity near you. The Lake Placid store is located at 2453 Main Street, Lake Placid, NY 12946; tel: (518) 523-2505

As we disclose whenever applicable, we experienced EMS Schools as guests of EMS, for the purpose of review. 

Mississippi Gulf Coast with kids: three family friendly outdoor activities

The Mississippi Gulf Coast is often overlooked by families heading South to warm waters and a warm climate, but like its neighbors Alabama and Florida, the coastline of Mississippi plays host to temperate weather, sandy beaches, and family-friendly hospitality. While a trip to the beach is definitely an option during a trip to the Mississippi Gulf Coast with kids, there’s more to do outdoors than work on your tan. Our top activities to pursue on family vacations in the region:

mississippi gulf coast

1. Go fishing:

Mississippi offers year-round fishing adventures for families, ranging from full or half days on chartered boats or family afternoons along the pier. And fishing trips in Mississippi aren’t just about catching fish: twelve miles off the coast lay the barrier islands, a natural area protected from commercial development. Families can enjoy untouched beaches and fish from the shore. Find top picks for  Gulf Coast fishing expeditions.

2. Ride a bike:

One of the best ways to explore the coast of Mississippi is by bicycle. Try the 15.5 mile (round-trip) ride along the Live Oak  Bicycle Route, taking families along the seashore and across the new Biloxi Bay Bridge. Stop here for a photo op; the bridge offers one of the best views of the Gulf of Mexico. After working up a sweat, hit a local beach to cool off. We recommend taking your pick of beaches along  Highway 90’s twenty-six miles of white sand beaches.

3. Take a swamp tour:

An iconic adventure of the South, a swamp tour in Mississippi combines a lesson in ecosystems and terrain with a fun ride for the kids. Families will see wildlife (yes, that means alligators!) and explore over 100 acres of pristine swamp land near the Grand Bay Estuary in Moss Point or along the Pascagoula River. Explore via boat or closer to the water by kayak. Find top picks for Mississippi river tours. 

Photo credit.

Educational Travel: Is Temple Square Salt Lake City for everyone?

On a recent drive through Salt Lake City, we decided to stop (for the first time) at the city’s famed Temple Squareand it made me wonder: is Temple Square Salt Lake City for everyone? I’ll start with a disclaimer: we’re not of the LDS faith. Because of this, the site does not hold any symbolic or sentimental meaning to us, other than as a significant player in Utah’s rich history. We visited for the purpose of touring the grounds, enjoying the gardens, and glimpsing the beauty of the temple from the outside.

Temple Square salt lake city

That said, we were underwhelmed. We absolutely missed some sites (and if any were must-see’s, please inform us in the comments) but we did hit the visitors centers, the home of the Tabernacle Choir, the Museum of Mormon History, and the meetinghouse adjacent to the Temple. I’d describe myself as quite informed about the Mormon religion, so the information in the visitors centers did not provide me with any significant new information, and overall, I expected the museum to feel more educational (in an historical way) than promotional. I was disappointed in this regard, as I hoped to inform my kids about Mormon history more so than Mormon theology. Perhaps this was an unrealistic expectation, as I certainly assumed religious content would play a big role.

The garden grounds were pretty and peaceful, but not inspiringly so, and while the temple itself is pretty, it simply didn’t hold the interest of my kids (who, again, have no emotional connection to it). I can see how a visit to Temple Square could be quite meaningful to an LDS family, and to anyone at special times of year (such as Christmas, when I hear it really shines), or if we’d had the chance to hear the choir, but on an average weekday, the detour to see the square fell flat.

Temple Square Salt Lake City

Based on this experience alone, I suggest going to Temple Square Salt Lake City during the following times or under the following circumstances:

1. If it holds emotional, spiritual, or historical significance for your family.

2. During a special event, or to catch a musical performance. The Tabernacle Choir rehearses every Thursday at 7:30 pm and Sundays at 9:30 am. There is an organ concert three times daily.  Seasonal events would also be well worth the visit.

3. If you plan to spend some time researching your family history (we did not delve into this aspect of the square).

If you do go, you’ll enjoy the following family-friendly amenities:

1. Plenty of space for your kids to stretch their legs and play quietly (within reason).

2. Clean and ample bathroom facilities and drinking fountains.

3. Good dining options.

Date last visited:

June 2013

Distance from the interstate:

Five minutes from I-80

Admission cost:

Free.

Hours of operation:

Check website.

Directions:

From I-80, take 600 So (I-80 exit), following the downtown Salt Lake City/Temple Square signs.

What to do in Ketchikan Alaska with kids

There’s plenty to do in Ketchikan Alaska with kids! Whether in Ketchikan a day or two before or after a cruise or in the city for an extended time, there are a few must-sees.

Creek street ketchikan

SE Alaska Discovery Center

One of the best museums we viewed in Alaska, the SE Alaska Discovery Center is located in the heart of downtown Ketchikan, in easy walking distance of the cruise ship terminals. Start by viewing the 28 minute film, then tour through various ecosystems of Alaska, including rain forest, intertidal, and more. There are also exhibits on the fishing and crabbing industry, Alaskan Native populations and customs, and Alaskan wildlife. The museum exhibits don’t replace going out to see the ‘real thing’, but does give a great overview of the area. This stop would be best at the start of an Alaska vacation.

The museum is located at 50 Main Street. Admission is $5 per person.

SE Alaska Discovery Center

Historic Creek Street

Ketchikan is known for its role as a gateway to the Klondike gold fields, and has a somewhat sordid past to reflect this pioneering history. Creek Street houses rows of historic buildings built along the pier over a large creek, most of which are now tourist shops. It’s worth a stroll along the boardwalk to catch glimpses of spawning salmon in the creek in summer and imagine what the town used to look like. A word of caution: Dolly’s, a one-time brothel, has been restored to its former glory for tours. Contrary to what the tour guides will tell you, the vast majority of parents would not consider the tour appropriate for children. The content discussed and some of the artifacts within the house are graphic. Learn from our mistake!

Misty Fjords national monument

Misty Fjords National Monument

The best way to experience Misty Fjords National Monument is by boat. If you’re lucky enough to be cruising via small ship, you will have likely cruised through Misty Fjords, but if not, definitely include it in your day excursions. The best tour of the region: Misty Fjords and Wilderness Explorer, a 4.5 hour boat tour of the national monument run by longtime Alaskan-owned company Allen Marine. It’s easy to see wildlife aboard this two-story vessel, such as bald eagles and seals. There’s a natural onboard to point things out and answer questions, and snacks and tea and coffee are provided. We were most impressed by the 3,000 foot granite cliffs on either side of the boat, the numerous waterfalls, and New Eddystone Rock sticking out of the green-blue water.

Tip: If souvenir shopping, Ketchikan has ample opportunity to buy made-in-Alaska wares, such as Alaskan Native art or beadwork made locally. Ask shop owners whether their products are made in the state; you’d be surprised how much comes from oversees.