Grown-Up Getaway: Sonoma County without the kids

Sonoma County is certainly a kid-friendly destination, but to best enjoy the relaxed atmosphere, fine dining, and wine tasting opportunities of this region of Northern California, we suggest planning a getaway to Sonoma County without the kids. Here’s how we went about it, including our favorite wineries, dining opportunities and hotel options.

Grown-up Getaway: Sonoma County without the kids

Sonoma County runs parallel on the east with Napa County, and as such, all the wineries and tasting rooms of both counties are easily accessible to you. We think it’s best to break up the county into sections by city, then decide where to stay and what attractions you most want to visit. We drove from Southern Oregon and filled our days with wineries, quaint shopping districts, and restaurants.

Healdsburg:

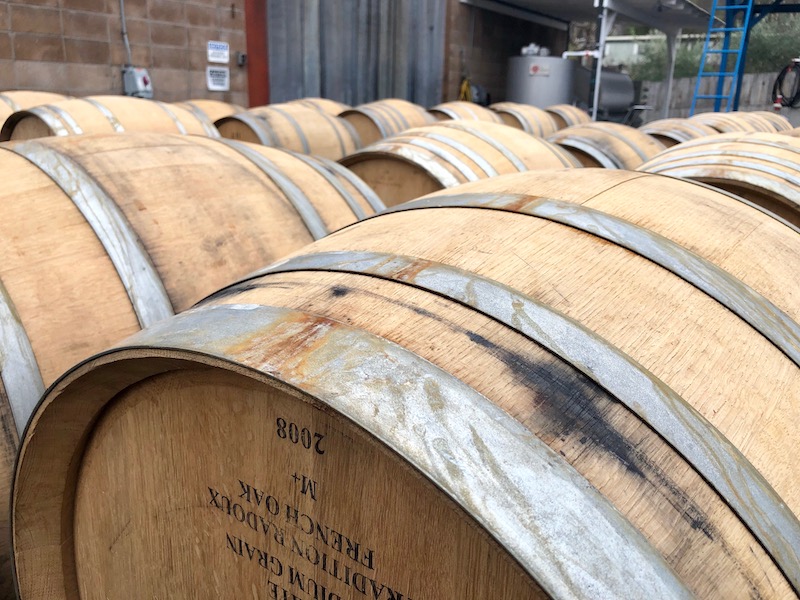
This town represents some of the best of Sonoma County, with a pretty downtown shopping and wine tasting district and nearby wineries that will wow you. We came in on scenic Highway 128, so we could take in the rolling hills lined with wine grapes to immerse ourselves in our location. Along the way to Healdsburg, we stopped at Silver Oak winery, which has recently built a very impressive LEED-certified facility in the Alexander Valley, and at adjacent Hawkes, both of which produce big, bold Cabernet Sauvignon.

Tip: To enjoy popular Sonoma and Napa wineries without crowds and the need for reservations, consider visiting in the off-season, as we did. We had our share of rain during our January visit, but we also got the full attention of staff at wineries and felt completely relaxed.

Once in Healdsburg, we shopped along the central square where we found a lot of fun boutiques and fair trade stores that we doubt the kids would have had the patience to peruse. If you want to stay the night in Healdsburg, you have a wide array of options, from AirBnb rentals to traditional B&Bs and inns. Try The Girl and the Fig for lunch, if you want to linger over a meal here.

Santa Rosa:

We continued to Santa Rosa, where we settled in at The Sandman. Recently renovated in 2017, The Sandman has been elevated from roadside motel to an up-market boutique feel. The value is definitely there, especially in the off-season, as you get a heated outdoor pool and hot tub, free parking and WiFi, included basic breakfast, and a staffed poolhouse bar (during the weekends). During the summer months, look for weekend pool parties with food trucks and live music! The Sandman is pet-friendly and the rooms have been upgraded to have a chic, modern feel. We were within easy access to downtown Santa Rosa, where we ate a fun meal at Gerard’s Paella, and within just minutes of Healdsburg wineries.

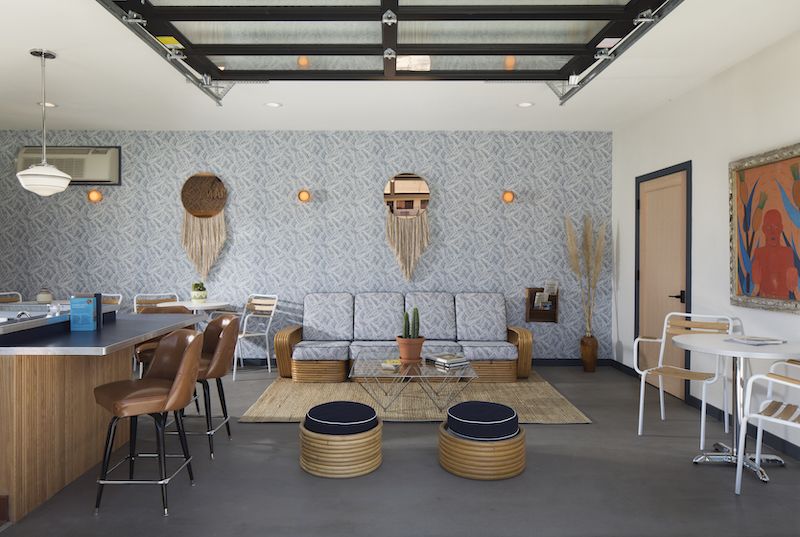
Poolhouse at The Sandman

Sonoma:

From Santa Rosa, we drove about 45 minutes to downtown Sonoma the next day, where we once again browsed boutiques and bookshops, stopped in at Basque Bakery, and had our pick of dozens of tasting rooms. This is a great way to taste area wines more efficiently if you don’t have time to visit the wineries themselves. We spent the better part of a day here, before heading just outside of town to visit Cline Cellars, which we found delightfully down-to-earth (the most affordable wine we found in the valley, but also simply very friendly) and the adjacent Jacuzzi Winery, owned by the same family.

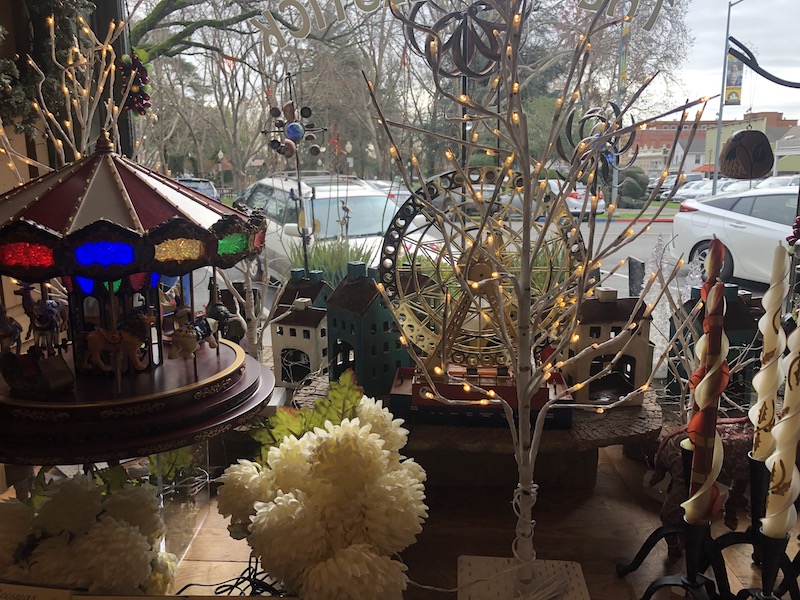
Shop window in Sonoma


Sonoma coast:

From the town of Sonoma, it’s easy to head out to the Sonoma coast on Highway 1. After a scenic hour drive, you’ll hit the coast at Bodega Bay. From here, we drove north up the beautiful California coastline to Jenner, where we were warmly welcomed for the night at the gorgeous and cozy Timber Cove Resort.  Built in the 1960s and modernized and updated beautifully since, I cannot recommend Timber Cove enough. After our drive, we were welcomed with a complimentary non-alcoholic beverage from their bar called The Remedy (made with ginger beer to ease any rolling tummies after curvy Highway 1). The spacious lobby had a warm fire roaring, and even in the off-season, the bar was well-populated. We settled into our room, which featured a record player (with a full library of records available to us!) and other retro touches, plus a fireplace (gas burning) and balcony overlooking the stormy sea.

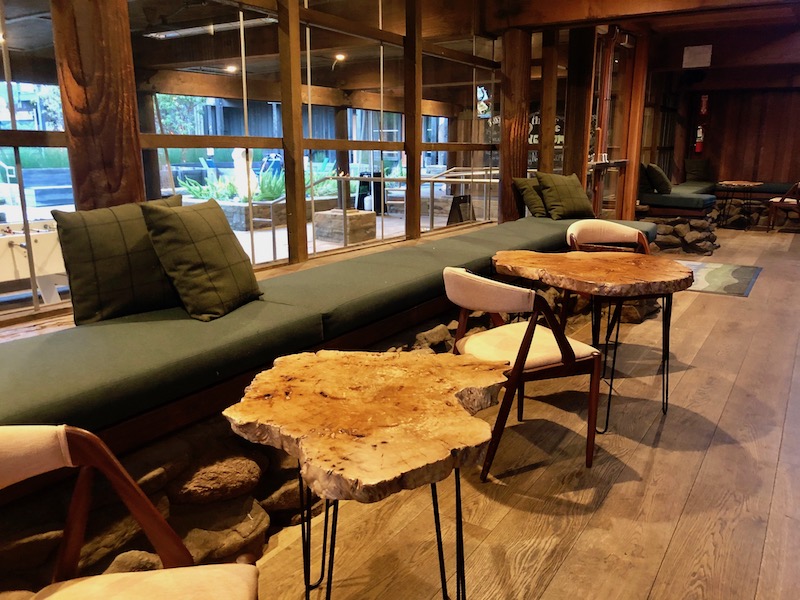
We half-wanted to get right into our cozy robes and curl up with a record, but instead we made it back to the lobby to dine at Coast Kitchen, Timber Cove Resort’s restaurant. The oysters were among the best we’ve ever tasted, and the wine list, as you might imagine, was impressive. Definitely, plan to spend at least one meal here.

Tip: Timber Cove Resort’s WiFi is spotty at best, but that’s okay! There are plenty of board games in the lobby, you have music to listen to, and out on the patio outside the main building, ping-pong and pool tables await, as well as a nice paperback book and many seating options overlooking the ocean.

Timber Cove boosts 25 acres, dotted with benches, nature paths and hiking trails. Consider getting the lay of the land with a personal tour of area hiking options with Unbeaten Path Tours, a local business that introduce guests to nearby Salt Point State Park, Sea Ranch architecture, and the Point Arena Lighthouse and Stornetta Lands National Monument. Timber Cove guests on the Seascapes tour will get an on-site tutorial of our trails, the Bufano Peace Obelisk and the Yakutia Totem (called a Serge).

Fort Ross is also only a mile or so away, a California State Historic Park showcasing a Russian-era church and compound with a National Historic Landmark designation. Fort Ross is surrounded by sandy beaches, panoramic coves, and redwood forests. 

After a 1-2 night stay in Timber Cove Resort, we recommend heading back to Sonoma to round out your trip with a few more wineries, or heading north up Highway 1 to explore the Mendocino coast next!

Disclosure: We explored Sonoma County as guests of Timber Cove Resort and The Sandman. All opinions remain our own.

Best Ski Towns: Big Bear California with kids

An easy drive from San Bernardino, California, Big Bear is a legit mountain destination for Southern California families, with pine forests, wildlife, and plenty of hiking and biking in summer and skiing in the winter months. We teamed up with Expedia to give you a breakdown of this prime Southern California getaway. A long weekend or day trip is perfect during the winter months for some snow play. Fortunately, if you choose the former, Big Bear offers plenty of hotel options to keep you rested and ready to make the most of it. Here’s what you need to know to explore Big Bear California with kids:

Skiing at Big Bear Mountain Resort:

Lift tickets at Big Bear Mountain Resort are still well under $100 for adults, which makes for a refreshing change from larger resorts dotting California. And that price is with 11 chairs and five carpets! Snow conditions are not quite as steady here as they are in higher elevations, so you do gamble a bit on snowpack, but Big Bear’s beginning terrain is hard to beat, making this mountain ideal for learning, given its easy distance from San Bernardino.

If you like terrain parks, especially for learners, Big Bear is an excellent location. Ditto if you want manageable groomers. Many people have ‘I learned to ski at Big Bear’ stories, and it’s easy to see why. For the best family skiing, stick with Snow Summit, the area with plenty of park features for kids (all lift accessible). There are also nice picnic areas here (it’s Southern California, after all, and the sun is often shining).

Sledding at Big Bear:

Yes, you can hunt down your own sledding hill, but why? Big Bear has three ready-made snow tubing areas: the Alpine Slide at Magic Mountain, just west of Big Bear Village; Big Bear Snow Play, which is located on the east end of Big Bear Blvd., and Grizzly Ridge in the Basecamp area at Snow Summit Ski Resort. At the latter, because you can easily tack it onto a ski day or have little ones tubing while older kids take ski lessons.

Or, head out after dark and try some glow-in-the-dark sledding! Snow Play offers glow tubing, where more than 1,500 multi-colored LED fluorescent lights lead the way up the Magic Carpet to the top of the hill, which is awash in color. Big Bear Snow Play is open daily for daytime snow tubing from 10 a.m.- 4 pm, with glow tubing every Friday, Saturday, and holiday nights from 5-9 pm. Bear in mind: tubing participants must be at least 36” tall.

At each snow tubing location, kids will be pampered: each snow tubing area has covered Magic Carpet with clear tunnels that transport riders with their tubes to the top of the slope, so you can escape the cold and any wet weather. There’s a snack bar with hot cocoa and bathrooms, too.

Winter at the Discovery Center:

A favorite for my family during the summer months, winter at the Discovery Center in Big Bear is a special season, too. Animal tracks are easier to spot in the snow, after all! The trails are often covered in powder, making them ideal for snowshoeing as a family (this sport is almost as easy as walking!) and The Big Bear Discovery Center still offers weekend programs, teaching kids how to recognize different wildlife prints in the snow.

Tip: We rented snowshoes at Goldsmiths Sports. Be sure to get poles, too! You can get trail maps at Goldsmiths too, or at the Discovery Center.

Where to stay: The Lodge at Big Bear Lake

The Lodge at Big Bear Lake is in a prime location right on the edge of downtown (within easy walking distance of shops and dining) and has family-friendly amenities galore, such as a heated pool and plenty of space for your winter gear. The rooms are spacious, though nothing to write home about, but where the Lodge truly shines: its excellent made-to-order breakfasts. There’s a fitness center, and the spa in the outdoor pool deck area feels great after a day on the slopes. Tip: if you don’t want a hotel experience, there are an abundance of home rentals in Big Bear, both associated with the ski resort and separate.

Tip: if you’re not a winter person, return to Big Bear in the summer!

Have you been to Big Bear in the winter? What do you recommend?

Northstar California Resort with kids: what you need to know for a great ski vacation

Between the expense, the equipment, and the logistics of getting everyone where they need to be (preferably with both gloves), skiing with kids can be daunting. Northstar California makes it easier by continuing to be one of the friendliest and most family-oriented mountains my family and I have ever skied. With a fun, centralized ski village, luxury accommodation options, and multiple ski school programs, Northstar offers everything your family needs to have a successful, memorable Tahoe ski vacation. Here’s how to get the most out of a trip to Northstar California Resort with kids:

Northstar

Plan to stay a minimum of three days.

With 170 acres of newly skiable side-terrain, a new express quad chairlift doubling the capacity on the backside, and one of the best terrain parks (including the new 22′ Shaun White super pipe), families simply can’t full experience Northstar in only a day, especially if they plan to spend even half a day in group or private lessons. Renting equipment, buying tickets, and registering for ski and board school all take time: you only want to have to do it once per ski vacation. Staying at Northstar more than one day saves you money too: buying 3, 5, or 7 day passes is much cheaper than day-of ticket window pricing. If you plan to ski more than seven days, consider purchasing a local Epic Pass instead, which allows entry to both Northstar and Heavenly.

Immerse yourself in ‘village life’.

We loved staying in the heart of the Northstar Village at Tahoe Mountain Lodging’s Big Horn Lodge. Of course, it’s convenient to be steps away from the slopes, ice skating rink, equipment rentals, restaurants, shops, and hot tubs, but what we hadn’t counted on was how much enjoyment we’d gain from staying in the heart of such a contagious ‘ski town’ atmosphere. The Northstar-at-Tahoe Village truly is the heart of the resort; we loved the cheery bonfires lining the village streets (bring marshmallows!), the live music in the evenings, and the view from our balcony of the Northstar gondola whisking guests up and over the snow-blanketed slopes.

northstar

Take advantage of private family lessons.

Like many resorts, Northstar-at-Tahoe offers a wide variety of ski and board lessons, from group classes for kids as young as three to adventure and ‘guided’ sessions for advanced skiers and riders. At first glance, springing for a private lesson may seem like an extravagance, but because families can add up to six people to one private lesson, the cost can become equal or even less than a group lesson. Your children will get far more personalized instruction, and if you join in as well, you’ll learn how to help your kids learn! Our kids (ages 7, 10, and 12) had a great time with their private instructor, Jon, who served as not only a teacher, but a guide, familiarizing the kids with the mountain as they zipped around, enjoying twice as many runs in as most guests (by utilizing private lesson lines). Time is money, and dedicating half a day or one full day to a family private lesson can not only jump start your ski instruction, but get your group familiarized with Northstar like nothing else!

Northstar

Utilize EpicMix.

A brand new social networking and tracking service offered by all Vail Resorts (of which Northstar is a part), EpicMix is touted everywhere you go at Northstar, and for good reason: you should be using this fun and free tool! In fact, if you have a ski pass, you already are: every time you enter a lift line, an EpicMix sensor scans your pass, recording your lift habits, total vertical feet, and lots of other fun stats throughout your day. After skiing, families can log into their account (kids are securely added by you to yours), select avatars, compare stats and achievement ‘buttons’, and view photos taken by the equally free EpicMix photographers (which work just like Disney’s PhotoPass photographers). And if your tween or teen is skiing without you (or your kids are in lessons while you’re in the lodge), you can log onto EpicMix from any smart phone to find out where on the mountain they’d last ‘checked in’.

Save time for all the extras.

Northstar offers so much more than skiing: in the village, families can take in a first-run movie, ice skate on the public rink (skating is free; if you need skates, rentals are $10/person), roast marshmallows over the open fire pits, and tube at mid-mountain.

Much thanks to Northstar-at-Tahoe for hosting our stay. This compensation came with no expectation of a positive review.

Summer in Big Bear with kids

The town of Big Bear Lake may be Southern California’s favorite snow destination in winter, but this small community has a lot going on in summer, too. An easy drive from San Bernardino, CA, Big Bear is at a respectable 6752 feet in elevation, making it a legit mountain destination for families, with pine forests, wildlife, and plenty of hiking and biking. Here’s what to do and where to stay in summer in Big Bear with kids.

big-bear-in-summer

Spend time on the lake with a local:

Big Bear may be a tourist town, but it’s also a thriving year-round community that draws unique individuals to the mountain lifestyle. You can often find these residents at local watering holes (read on for a list), but the best way to tap into this great resource if you have kids in tow is to get out on the lake with Captain John. Captain John’s marina is located on the ‘quiet’ side of the lake in Fawnskin, right on North Shore Drive. He offers paddle boarding and boat rentals, but also guided tours of the lake in his own Duffy boat, which I highly recommend. Yes, you can sail with John himself, who has lived in Big Bear for decades. John is a wealth of knowledge about the area, and gives a great overview of the lake’s history in a way that will entertain everyone. Boat tours are approximately $20 per person, which is a great deal for what you get. Bonus: after or before your boat trip, play a round of frisbee golf on-site, for free!

captain-johns

Play on Snow Summit:

During winter, Snow Summit and Bear Mountain (now under the umbrella of Mammoth Mountain) provide a great place to teach kids how to ski. In summer, Snow Summit is the place for hiking, mountain biking, and chair lift rides. Lift tickets are available for single trips (for hiking down or simply eating a meal at the on-mountain restaurant), or available per day, for lift-served mountain biking.

Snow Summit has a full-service bike rental shop with Trek bikes designed specifically for single track mountain biking trails, which also rents out helmets and pads. Once on the lift, there are several gravity-based single track trails to choose from. Coming down the face of the mountain, the trails are intermediate and advanced (blue and black), but a green to blue option is available along Skyline (turning left at the top). If you’re a beginning mountain biker, get a lesson and ask about the skill builder park, a smaller track set up near the base area for practicing on terrain and features. Freeride and downhill bike rentals start at $68 for three hours for kids and $93 for adults (all day rentals also available), and lift tickets are $44 and $27 (child).

big-bear-lake


As an intermediate mountain biker, I loved the blue trails, both for the challenge of the terrain and the wooded, mountain setting. We stayed cool in the forest, and experienced mostly downhill with only a few climbs (all the better for stretching out the run). It took us the better part of an hour to come all the way down (with frequent breaks). Some of Snow Summit’s trails are actually ‘adopted’ from the forest service, which means they’re open to anyone to bike up and down without a lift ticket. If you have your own bikes with you and want a workout, ask for directions to the bottom of the forest service trails.

Hiking:

Downhill and uphill hiking are, of course, available at Snow Summit, but many additional options are easily accessible from Big Bear. The Wonderland Trail nature trail is only 1.5 miles (loop) with 20 posted stops.Use it as a self-guided tour to learn about the botany, geology and wildlife of this area. If you’re looking for longer trails, check this resource. If you have young kids, the Discovery Center is a great pit stop, with a nature ‘classroom’ of its own where kids can learn about animal species and ecology, plus an indoor area staffed with knowledgable volunteers. Note: this center is closed Tuesdays and Wednesdays.

big-bear-lake

Big Bear Alpine Zoo:

I never recommend a zoo unless I’ve checked it out personally and feel it cares properly for its animals The Big Bear Alpine Zoo has a misleading name, because it’s actually a rescue center for animals who cannot live in the wild due to injury or other situations. The staff is caring and knowledgable, and the small zoo is filled with shaded, well-maintained enclosures with grizzly bears, black bears, dear, raccoons, bald eagles, mountain lions, wolves, foxes, and many other animals. Plan to spend about an hour here! Admission is $12 for adults and $9 for kids, and you can know it’s going to a good cause.

big-bear-alpine-zoo

Where to stay:

You can’t do Big Bear Lake justice in just a day. Plan to spend a long weekend in Big Bear with kids at The Lodge at Big Bear Lake. This hotel offers pretty standard rooms and a decent outdoor pool, but wins in our book because of the excellent made-to-order included breakfast at the attached restaurant. It’s also located in the heart of town, so families can easily walk to restaurants and shops.

big-bear-in-summer

Where to eat:

Like many small mountain towns, Big Bear Lake has many options for families. Throughout the walkable downtown core, you’ll find plenty of candy and ice cream shops, coffee shops, and restaurants. The best, according to us:

The Pines: for fine dining on the lake (date night, maybe?) The Pines takes great pride in its menu and has multiple specials per night. Locals tell us you could return many times before ever ordering the same thing twice. The Pines frequently has live music as well. 350 Alden Rd, Big Bear Lake

Big Bear Lake Brewing Company: This brewery is located right downtown and has indoor and outdoor seating. We recommend Mom and Dad order a beer flight to share, and everyone will love the burgers and salads. If the kids get restless, you can show them the brewing room (open to walk into). 40827 Stone, Big Bear Lake

Moonridge Coffee Company: Moonridge Coffee is located near the zoo, and is a charming and cozy coffee shop run by owners originally from Sisters, Oregon. 42646 Moonridge Rd, Big Bear Lake

big-bear-brewing

Grown-up bars recommended by local Captain John:

I promised to list a few watering holes recommended by Big Bear local and boat captain John. When you go on a boat tour, ask him for his recommendations yourself, but these are a few ideas he gave me. Bonus: Captain John plays music at many of these venues on various nights of the week, sometimes with his local friend and musician Art Harriman.

Whisky Dave’s: 40740 Village Dr, Big Bear Lake

Captain’s Anchorage: 42148 Moonridge Way, Big Bear Lake

Murray’s Saloon: 672 Cottage Ln, Big Bear Lake

Directions:

Big Bear Lake is easily accessible from all points in Southern California. It’s one hour from San Bernardino on Highway 330 to Highway 18.

Pin for later!

big-bear-weekend

As I disclose whenever applicable, I experienced Big Bear Lake as a guest of the destination, for the purpose of review. All opinions are my own.

Fun things for families in San Francisco  

San Francisco is one of the top destinations on the West Coast for families! With so much history, culture, and fun activities there’s so much to see and do no matter what your family is interested in! Traveling with kids can be stressful, that’s why it’s so important to plan activities in advance so you always have fun things planned! Hiring  airport transfers to SFO  should also be a part of your plan if you want a hassle-free travel going to your preferred destination and back to the airport.  Once in the city, whether you opt for Bike Rentals San Francisco or a children’s museum, you’re guaranteed to have a great time with the entire family!

Bike Rentals

San Francisco is such a gorgeous city, it’s perfect for exploring by bike! You can find a variety of bike rentals that are perfect for families. With kid equipment, tandem bikes, and surrey’s, there are a lot of ways to elevate your bike experience. Tour the bay area with the sea breeze at your side! Ride bikes to your favorite attractions or just tour your favorite park in a new way. You’ll feel like a local in no time.

California Academy of Sciences

Though the California Academy of Sciences sounds like it might not have many things for kids and families, it’s actually one of the best things to do in San Francisco. The California Academy of Sciences has things like a four-story rainforest walkthrough as well as a planetarium. Explore the deep blue sea with the Steinhart Aquarium or experience an earthquake with the earthquake simulator. With a lot of attractions and hands-on activities for kids, it’s the perfect way to spend a day!

Exploratorium

For more of an educational experience, spend a few hours exploring the San Francisco Exploratorium! Specifically designed for kids of all ages, you’ll learn about things like natural disasters, electricity, and engineering all under one roof! With so much to see and do and a rotating list of exhibits, this museum is particularly perfect for families!

Exploratorium san francisco

Pier 45

Pier 45 in Fisherman’s Wharf is home to one of San Francisco’s most historic attractions! You can tour a real WWII submarine which now calls Pier 45 home. This submarine went on a total of 6 missions in its lifetime and it’s still intact as a floating museum! For kids interested in submarines and history, this is a great way to spend a few hours! See the USS Pampanito for yourself to step into a real piece of US history.

The Coastal Trail

For outdoor enthusiasts, take in a perfect day in San Francisco by walking the Coastal Trail! This is a San Francisco staple which starts at SF Presidio and goes all the way to Ocean Beach. You can start or stop anywhere on the trail, and you’ll want to bring your camera! You can capture the best views of the Golden Gate Bridge as well as the beautiful blue water down below! Even if you don’t enjoy hiking usually, this is a trail you and your family won’t want to miss!

Ride the Cable Cars

Who said family-friendly activities have to cost a lot of money? Hop aboard one of the many cable cars in the city and go for a ride! While there are many lines to choose from, one of the local favorites is the Powell/Hyde line. This line goes from Union Square to Fisherman’s Wharf and it’s known for its stunning city views! You’ll also get to ride down one of the steepest streets in the city. Your kids might even think it’s a ride!

Are you ready to take a great trip to San Francisco with your family? Known as one of the most family-friendly cities in California, you can’t go wrong with a trip to San Francisco! With so much to see and do, not to mention stunning views, you’ll want to come back again and again!

Five favorite coastal campgrounds for families

Families wanting to make the most of the camping season need to head to coastal, temperate zones to avoid temperature extremes (bonus if they can find yurts or cabins at the campground). Family camping is economical, easy to plan, and often close to home! We’ve compiled a list of our favorite coastal campgrounds for families in the Pacific Northwest and California. At each of the following state campgrounds, you’ll find miles of beach, shady trails, ample camping space, and programs for kids. Check the websites below for exact pricing, but on average, California and Oregon state park fees are very reasonable (under $20 a night for tent camping and under $30 for hook-ups). Don’t forget hot cocoa and most importantly, the s’mores!


Sunset Bay State Park OR: Located just outside Coos Bay, Oregon on Highway 101, it’s safe to say Sunset Bay is my family’s favorite coastal campground. The sites are nestled in a beautiful forest just steps from the beach, flat, paved loops allow for perfect bike riding around camp, the showers are heated and facilities up-to-date, and the beach itself is gorgeous. Best of all, yurts are available (reserve far ahead!), as well as two additional state parks within easy hiking distance.

Cape Blanco State Park, OR: The beacon of the Cape Blanco lighthouse welcomes campers to this windswept section of Oregon’s pacific coast, where rugged cliffs and high coastal plains lead from Highway 101 to the campground. The sites overlook the beach and light with lots of space for kids to play and explore. All sites are first-come, first-served at this park, but there are four rustic cabins that can be reserved ahead of time. I’ve never seen this park truly crowded, and love the stark beauty of the storm-battered coast along this exposed shore. In season, families can take a lighthouse tour, too!

Harris Beach State Park, OR: One of our favorite beaches for its natural beauty and natural playground qualities for kids, Harris Beach is located just north of Brookings, Oregon (again, on Highway 101). Kids love to explore the rock formations along the cliff sides of this beach, as well as the creek that feeds into it from the nearby campground. I love that the campground has plenty of sites, and is on the bluff overlooking the beach, giving campers wonderful views of the ocean (and keeping day crowds away from the sites). The town of Brookings is near enough to offer conveniences, but far enough removed that families truly feel away from it all. And like Sunset Bay, yurts are available to rent (but be sure to reserve early!).


Navarro River Redwoods State Park: This gorgeous state park just off scenic Highway 1 near Albion in Mendocino County boasts beachcombing, swimming, picnicking, and camping at Paul M. Demmick campground. The redwoods here are fantastic: in summer, you’ll be cocooned in a shady bower (when you’re not seeking the sunshine on the beach), and kids love playing in and around these massive trees while at the campground. For a fun way to spend the day, venture to the Russian river for a swim!

San Onofre State Beach, CA: This sunny California beachside state park near the city of San Cemente offers sunbathing, surfing, and boogie-boarding in addition to San Mateo Campground, which lies one mile away via sandy trail. The pros of this camping experience are many: think blue skies, warm evenings, and beautiful surf. There are, however cons: the proximity of both the freeway (I-5) and Amtrak train tracks are definitely annoying, and the beach can certainly get crowded in summer. With 3.5 miles of sand at your disposal however, you’re sure to find a place to lay your beach towels!

Bonus campground idea: Check out Hug Point State ParkHug Point State Park for a more economical beach trip near Cannon Beach, Oregon.

Want more camping info? Get Pit Stops for Kids’ camping gear list!

San Diego with kids: U.S.S. Midway attraction

I can’t tell you how many times I’ve been in San Diego with kids and not gone to the U.S.S. Midway attraction. This incredible museum is comprised of the actual aircraft carrier that now sits in the San Diego harbor. Kids who love military vessels and planes will be in heaven, and even if your level of interest for these items is usually closer to lukewarm, you’ll still be blown away. We spent an hour here, thinking that would be enough, but wished we had at least 2.5 hours.

USS Midway

The U.S.S. Midway was in operation from 1945-1992. As families tour three main decks, a self-guided audio tour and interesting signage depicts what working aboard the ship (and general life aboard the ship) was like in all of these eras. A helpful staff member recommended we start at the top of the ship on the flight deck and work our way down, and he was right: seeing the planes (and the views of the harbor) first was a great idea. Starting here gave us a good introduction to what an aircraft carrier does. Throughout the flight deck, docents in yellow hats offer various talks on flying planes and landing them on the carrier and duties aboard. Most are retired military personnel, and they’re well worth stopping to listen to. Their passion for the subject was evident, and we really enjoyed hearing their accounts of time spent on the Midway.

USS Midway plane

From the top deck, we headed back to the hangar deck, where we sat in cockpits (and tried not to feel claustrophobic!). Then we visited the City at Sea area, which actually includes the 2nd, 3rd, and 4th decks. I found this to be the most interesting part of the ship: we toured berths, mess halls, officer’s quarters, the war room, a hospital wing, and even a dentist office and barbershop. Walking through the labyrinth of hallways and staircases, you really get a feel for life aboard a carrier.

Midway docent

The tour is self-guided, with the exception of an optional 30 minute tour of the bridge/flight tower at the top of the ship, which is led by a docent. These tours depart regularly from the flight deck, and are worth waiting for if you’re traveling with school-aged kids. The audio tour of the rest of the ship is included in your admission, and definitely worth doing. It’s well-planned, in that the exhibits are numbered, and visitors can simply input the numbers they want to listen to into their audio set, and skip the ones they aren’t interested in. There’s both a kid version and an adult version, and every headset can play both, so older kids can opt for either. Honestly, I found the kid version to be more interesting!

USS Midway interior

Admission:

Adult tickets are $19, youth/student is $15, and kids (6-12) are $10. Five and under is free. Families can get $2 off per person by ordering online, and current military personnel get in free. The better deal: the Midway attraction is included in a Go Select pass…these city passes definitely save money.

Hours of operation:

10 am to 5 pm daily (except Thanksgiving and Christmas). Last admission is 4 pm.

USS Midway

Dining:

There’s a cafe on-site on the hangar deck, overlooking the harbor, which scores points on the fun factor. Otherwise, plan to visit between meals. Vending machine drink machines are located on both the hangar deck and flight deck, should you need waters.

Directions:

The Midway is easy to find right on the harbor by the Manchester Grand Hyatt at 910 N. Harbor Drive. Parking is on-site, or families can walk from most downtown areas. Pedicabs and regular taxi cabs are readily available outside the museum.

As I disclose whenever applicable, I experienced the U.S.S. Midway as a guest of the attraction, for the purpose of review.

Where to stay at Squaw: Plumpjack Squaw Valley Inn review

Squaw Valley Alpine Meadows is one of our family’s favorite Tahoe ski resorts. We’ve recommended staying in a condo at the Village at Squaw in our guide to skiing Squaw Valley with kids, but there’s an additional village option you should know about.

Plumpjack Squaw Valley Inn review:

We’ve known about Plumpjack, located at the edge of the Village at Squaw, for its fantastic Plumpjack Cafe, serving the kind of fine dining meals you don’t forget about quickly. We love the ambiance here: the cozy restaurant is nestled behind a circular bar area with a large open fire pit. But until recently, we hadn’t stayed the night here.

The 60 or so rooms at Plumpjack vary from standard two-queen arrangements to suites, and are currently functional but fairly dated. We didn’t mind the ‘old-school ski lodge’ feel to Plumpjack at all; in fact, the location in the village (steps from the slopes) and the incredible value of free parking and a hearty included buffet breakfast more than made up for any dark interiors. There’s a pool and two hot tubs out back (the pool is closed in winter) and while there isn’t room service, you’re within a one minute walk to dining options in the village.

Plumpjack invites with a warm atmosphere; you feel like you’re in Europe, truly. It’s easy to find cozy nooks and crannies to settle in with a book and a warm drink, and the outdoor areas are inviting and private as well.

Room rates during our visit were around $225, which is a good value for the heart of the village and within steps of the slopes. In fact, if you’re looking for a hotel experience (as opposed to a condo) with an intimate feel, Plumpjack can’t be beaten. While the cafe is fine dining, families are very welcome here, and the breakfast has lots to offer. The bar area is kid-friendly, and serves excellent craft cocktails for Mom and Dad. Since our kids weren’t digging the idea of a nice dinner after a day of skiing, we set them up with take-out from the village and slipped away for a parents night at Plumpjack Cafe. Win-win!

Photo credit

Two ways to ski backcountry terrain on your next ski trip

If you’re one of those skiers or snowboarders who looks up at the most distant peak from the chairlift and says, “How do I get up there?” or notes tracks in fresh powder and wishes you’d put them there, you may want to elevate your next ski trip to include a day of backcountry terrain. Or, if you have teens (16 or older) who are yearning to learn what AT or touring skiing is all about, it might be time to try a backcountry experience as a family.

Backcountry skiing off-piste and outside ski resort boundaries can expand your ski horizons exponentially, but it’s crucial to go with a guide until you’ve become trained in reading snow conditions and have the right gear (which often includes an avalanche beacon, shovel, probe, and AT or Alpine Touring skis and boots with skins and a backpack to put it all in). I explored two gorgeous backcountry regions with two fantastic guide services, and highly recommend them both.

Two ways to ski backcountry terrain on your next ski trip

Alpenglow Expeditions, North Lake Tahoe:

Alpenglow Expeditions operates out of Squaw Valley Alpine Meadows in California, and offers both backcountry tours and a variety of snow safety courses. I joined them for a full day in the Squaw Valley backcountry, where we did two laps of the National Geographic Bowl.

I arrived at their office in the Village at Squaw Valley at 8:30 am, ready to ski…minus the gear. Alpenglow can outfit you, which is nice if you don’t already own AT gear. It allows you to try a full backcountry experience before committing to the equipment. The guides at Alpenglow set me up with a ski pack with all the necessities, plus AT skis and boots. I brought my own helmet, goggles, lunch, water, and ski apparel.

The nice thing about Alpenglow’s location is that you can ride the Squaw lifts to where you need to start, saving time and effort. We headed out by 9 am on the Squaw lifts and reached the top of Granite Chief lift by 9:30 am. From here, we boot packed to the top of Granite Chief Peak (approximately a 20 minute, fairly strenuous hike) with our skis strapped on our backs. At the ridge, the snow was fabulous (despite fairly challenging conditions on the lift-served areas). We transitioned into our skis (the guides will help you do this if you haven’t skied AT before). We skied down the bowl, and at the bottom, transitioned again to skin up the trail that led to a side ridge, where we could ski back down to the Granite Chief lift. The skinning uphill took longer…probably an hour or so, and if you haven’t used skins on your skis before, there is a learning curve here. Your heel is freed and the skins on your skis give you traction, so the climb feels similar to cross-country skiing (but a bit more difficult).

When we reached the ridge, we skied down to the chair and did it again! This time, we boot packed a bit farther to explore a different descent, and at the bottom, we enjoyed our packed lunch in the sunshine. We achieved two laps by 1:30 pm, and were back at the village by 2:30 pm. We probably had time for one more lap, but my legs didn’t have the power!

The day proved to be an excellent introduction to Squaw’s backcountry, and since my teenage boys are interested in exploring terrain outside ski area boundaries, I’d definitely sign them up next time. All tours are individual (with either just yourself or just your group) so you can customize as needed. All guides are highly trained in avalanche certification and first aid, and carry radios. I was given an avi beacon and shown how to use it.

Ski Utah Interconnect, Cottonwood Canyons

Headed to Utah instead of Tahoe? I also tried out Ski Utah’s Interconnect tour, which allows you to check out backcountry terrain on your downhill (Alpine) skis. You can read about the Ski Utah Interconnect here, and watch a helpful video starring Deb Lovci, lead guide, but even after doing your research, the Interconnect is hard to explain. It really needs to be experienced. It’s part backcountry adventure, part (permitted) rope ducking, part on-piste hidden tracks, and part off-piste (as in way, way off). No matter what way you look at it, you’re in for seven hours of breathtaking views of the Wasatch Front Range and Heber Valley. Along the way, you get a ski resort sampler platter, with 1-3 runs in each of Deer Valley, Park City, Snowbird, Alta, Brighton and Solitude.

You start your day at Deer Valley Ski Resort, where you meet up in a base lodge and are briefed by your guides. As noted, you can use your own downhill gear, but you’re given a beacon to use for the day. In contrast with my Alpenglow trip, I didn’t need a shovel or probe of my own, so I could use my own small backpack, and I didn’t need to carry a lunch, as it’s provided on the trip.

We started out by skiing a few Deer Valley groomers to get warmed up, then ducked the rope (with permission) and traversed through the backcountry to Park City resort, where we rode another chair up before skiing off-piste through pristine powder toward our next resort on our itinerary. We boot packed a few short times (holding our skis) before making it to Solitude for a delicious lunch at their Roundhouse mid-mountain lodge, which serves up Himalayan mountain cuisine (included). We rode the lifts here to access a backside bowl to Brighton, then rode up again to take the most beautiful traverse, the Highway to Heaven trail toward Alta and Snowbird.


This part of the journey definitely proved most strenuous, but we were rewarded with more gorgeous backcountry on the descent. We skied through Alta and reached Snowbird by 3:30 pm. Skiing six resorts in one day definitely made for a long ski tour, but it didn’t feel that long, thanks to some lift access along the way.

What to know before you book:

For both of these tours, it’s important to be a strong skier, able to ski ungroomed runs with confidence (intermediate or advanced). Perhaps even more importantly, you do need to be fit. The uphill boot packing, skinning, and/or sidestepping will work up a sweat and leave you legs like jell-o! For the Interconnect, you need to be a skier, not a snowboarder, due to restrictions on snowboarding in several of the resorts.

If you’re used to getting plenty of exercise and are a decent (don’t need to be great) skier, don’t hesitate to try one of these tours! It will open your eyes to new skiing possibilities, and greatly enhance your ski trip. Take a day to enjoy the backcountry, then return on-piste with more confidence.

Call the office of either tour to ask any specific questions; they’re eager to help walk you through the process and explain what gear you’ll need and what lift tickets might be required. Let them know of any limitations of your group and be honest with them about capabilities, and they can answer any doubts you may have.

Want a taste of non-lift-served terrain by exploring some side country (within ski area boundaries)? You can expand your limits on downhill skis by signing up for a Hidden Tracks guided day. I checked this out at Solitude Mountain Resort and had a blast with my private guide, who could show me all the hidden stashes and boot-pack trails to (mostly) uncharted terrain. He showed me Solitude’s many gated areas, and we hiked to several pitches of fresh powder. The rest of the time, we traversed and side-slipped to new-to-me slopes within boundary. At Solitude, you can opt for a full day or half day tour; I went half-day, which gave me a nice balance of challenging terrain and some nice groomers after my legs got tired.

Tahoe with kids: Granlibakken Ski and Sledding Hill

Looking to explore off the beaten tourist path in Tahoe with kids? Granlibakken is traditional Tahoe at its most authentic: this old-school resort boosts lodge rooms, condos, sledding, a day spa, and ski learning on poma bar and rope tow-accessed terrain. In the summer, there’s a large treetop rope course and easy access to hiking trails and the lake shore.

Keep this lesser known resort top-of-mind if you are planning a multi-generational vacation to Tahoe or a family reunion because they have multiple lodging options that work for larger families or even wedding parties. All lodging guests enjoy a complimentary buffet breakfast each day, too.

Granlibakken

We headed to Granlibakken for a morning of sledding. With four kids in our party, we weren’t keen to pay the hefty tubing prices at larger ski resorts, and didn’t have the option of finding our own sledding hills on Tahoe’s many sno parks (due to snow conditions). Granlibakken proved to be a perfect choice, with a large hill (with multiple routes down) and an organized hike-t0-sled path, plus plastic sledding disks to use. We started in the quaint warming hut, where we bought tickets for $12 per child, and headed outside to the hill. You can also rent snowshoes here or cross-country skis, and access either their own maintained nordic trail or more trails just over the hill.

Tip: Adults can watch for free of course, but should you want to go into the sledding area to help or just to take photos, you will need your own tickets. 

Tahoe with kids

It’s fine to bring your own sleds (just make sure they’re not metal), and prepare to spend about an hour or two here. If the snow conditions are good, kids may want to stay to play in the snow longer. In the lodge, you’ll find a counter-service dining option, where the hot chocolate flows and coffee is quite good. There’s a learning hill for kids on skis, with a rope tow, and one lift (poma bar accessed) for intermediate skiers and riders. Check for current lift ticket prices, as we only used the sledding area on our visit.

Granlibakken

Date last visited:

December 2014

Distance from the interstate:

Located just outside Tahoe City, about 20 minutes from I-80 and just steps from CA-89.

Directions:

Turn left at the stop light in Tahoe City onto CA-89 S. Drive one-half mile to Granlibakken Road and turn right.