Traveling with kids with Down Syndrome

In honor of World Down Syndrome Day, it’s my pleasure to share a personal post from our midwest travel contributor, who travels with her family of four kids, one of whom has Down Syndrome.

Ten years ago, I found out that my newborn daughter had Down syndrome. At that moment, I was far too worried about things like walking and talking to consider the implications her diagnosis might have on our ability to explore the larger world. But as our life with Julianna has unfolded, I’ve found that a disability doesn’t have to be a death sentence on dreams of travel and adventure.

julianna

Author’s daughter Julianna on a beach trip.

First, a word of caution. There’s a truism among the disability community: “If you’ve met one person with Down syndrome, (or autism, or any other disability), you’ve met one person with Down syndrome.” This post is the experience of one family, whose child is both verbal and mobile. Still, I hope it illustrates that traveling with kids who have disabilities is a reachable goal.

1. Plan around your family’s unique situation.

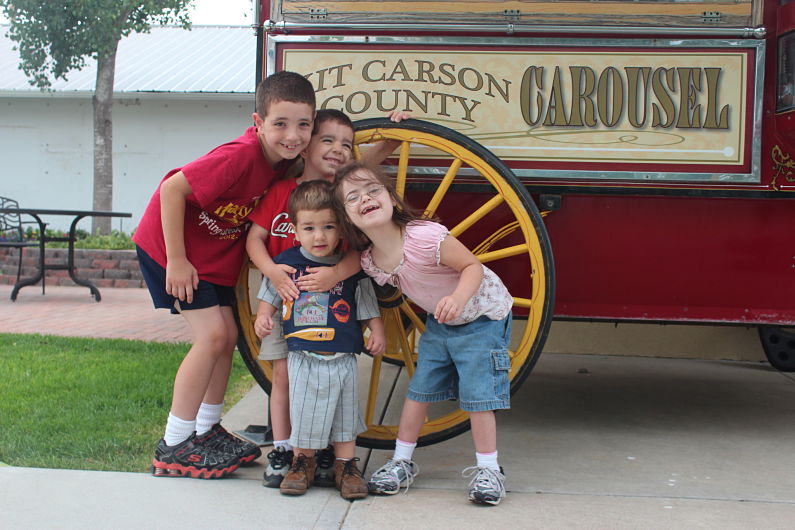
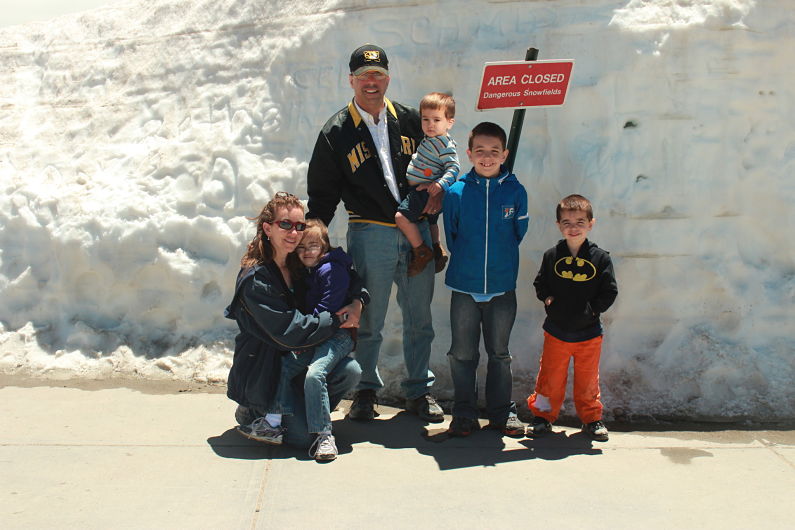
The key for our family has been planning around the abilities of all our children—not just Julianna. By the time Julianna turned eight years old, she had visited Mackinac Island (twice), Rocky Mountain National Park, and Disney World. Some of these trips were more successful than others, but each one fine-tuned our understanding of our kids’ limits and, equally important, our own. When we look at available activities, we choose what is appropriate for our whole family. Sometimes—often, even—this means we don’t get to do some of the things that would be more interesting to us as adults. (Sound familiar?)

2. Look for child care where you’re going.

On the other hand, some places—cruise ships and some nicer hotel/resorts—offer group programs or vetted babysitters for hire. We have taken advantage of that both at Mackinac’s Grand Hotel and on a Royal Caribbean cruise ship. Of course, some kids with more significant special needs will need a special kind of child care provider—but don’t rule out the possibility before you take the time to talk to the people in charge. You’ll never know unless you ask.

burlington CO

3. Ask about accommodations for disability.

Many places go out of their way to accommodate people with disabilities. For example, Disney World offers a disability pass that gives families a set return time (much like a Fast Pass) so you don’t have to wait in long lines. Many other amusement parks offer similar services.

4. Look at travel as an opportunity to increase awareness.

I remember sitting in a Golden Corral in Valdosta, Georgia, and realizing that two or three adults were staring at my daughter. But not an ugly, cruel stare—on the contrary, they had the look of dawning understanding. I could see them realizing, through seeing my vivacious and charming daughter interact with other people, that disability is not a curse—that it can, in fact, be beautiful.

In this way, Julianna serves as an ambassador for Down syndrome. She loves people, and she functions at a high enough level that she can overcome—or perhaps the better term might be “overwhelm”—most people’s inhibitions.

One particularly memorable New Years Eve, we were taking shelter from a tornado in a McDonald’s in Nashville, Illinois. While we were trying to keep her brothers entertained, 3-year-old Julianna slipped away. We found her walking up and down the aisles saying “Ah! Ah!” (how she said “hi” at age 3) and waving to other refugeed travelers. When we caught up, she was sidling onto a bench and eyeing someone else’s box of french fries. We ended up in conversation with that family and several others, comparing weather reports and swapping travel stories. It was a moment of connection we would never have had without her.

DisneyWorld

5. Take reasonable precautions.

Of course, there’s a flip side to having a child with a developmental disability who’s never met a stranger. One December, we were waiting in line to tour the “Holiday Train” when Julianna simply disappeared.

It’s every parent’s nightmare: a big space, lots of exits, thousands of people, and a child who, although verbal, has trouble making herself understood. She didn’t yet know how to ask for help, and worst of all, we knew she wouldn’t even recognize she needed it.

Eventually, we found her riding the kiddie train at the end of the terminal. Mind you, this was a train that cost $5 to ride. We asked the operator, “How did she even get in?”

She answered, “Well, she just acted like she belonged there…”

After this, we ordered a medical bracelet and necklace with our mobile numbers engraved on them. We also have tags that attach to her shoe laces. Julianna has been coached extensively and repeatedly on what to tell an adult if she doesn’t know where we are.

It’s worth it!

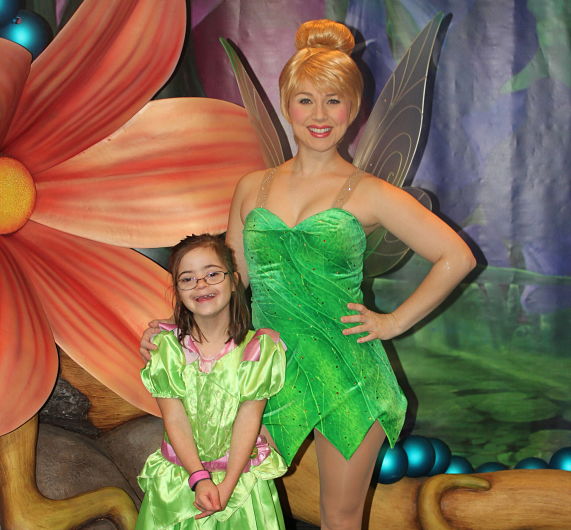
As Julianna gets older, she’s less prone to wandering and better at following instructions. Traveling has given her lasting memories—from the fire-breather at the Chinese Lantern Festival to meeting Tinker Bell—that she still talks about.

Rocky Mountain National Park

Your special needs child will likely always face limitations the rest of the family does not—but you know how to plan around that; you do it every day. The rules don’t change when you travel—they just require a little more advance prep to be familiar with the possibilities and prepare for the possible pitfalls.

You want to travel with your special needs child? Go for it. You’ve got this.

How to take travel photos on your phone

There are many benefits to using your phone to take photos while traveling. First of all, when you learn how to take travel photos on your phone, you won’t have extra equipment to pack; chances are, you’re already bringing your phone. It’s always with you during the day, and thanks to excellent technology, your phone probably comes packed with features better than or at least equal to those on your point-and-shoot camera. Your phone is portable, and with the right case, it can be waterproof and dust-proof, which is crucial for some travel spots.

bryce-national-park

Photo opportunities, and how to make the most of them:

You don’t have to be a photography expert to take great travel photos with your phone, but it does help to keep some basic photography techniques in mind. If you don’t remember anything else, remember that a great travel photo tells a story, showcases a subject (whether it’s an object or person), and captures a moment in time. To achieve these goals, follow these basic photography rules.

  • Rule of thirds: Turn on your camera’s grid feature, which will show you a nine-square grid overlaying your framed shot. Use this grid to frame your subject proportionally. Place your primary subject in the middle three squares of your grid, or try an off-centered subject for an eye-catching effect.
  • Place that sun behind you: Sunshine is lovely, but when you take a photo directly into the sun, your photo will be washed out, and you’ll lose the detail of your subject(s). Especially when you’re taking photos of other people, place the sun at your back. Yes, your subjects will be tempted to squint as they’ll be looking into the sun, so suggest they close their eyes, count to three, and then open them for the photo!
  • Pay attention to exposure: Many people don’t realize that they can adjust the lighting of a shot with one touch on a phone. Tap and press on the subject of your photo to make sure the shot is properly exposed before taking it. You’ll see the lighting adjust on your screen.
  • Go horizontal: Most of the time, you should get in the habit of taking horizontal photos. Video should always be horizontal, not vertical. Why? Horizontal videos use the most screen space when you show your work on a computer or TV screen. Vertical videos will appear as just one strip of the screen.
  • Get to know your flash setting and when to use it: Placing your flash on auto will work most of the time, but in low light, indoors, and in fully dark settings, play with your flash to get your desired result. If you’re taking a selfie in the dark, such as in a nightclub or at a concert, turn on a flashlight app if you don’t have a front-facing flash (which can be the case with older phones).

Get creative when you take travel photos with your phone:

Now that you know how to use your settings, it’s time to make your travel photos more interesting. Remember how every travel photo should tell a story, focus on a subject, and capture a point in time? It’s easy to do that with your phone on any vacation, whether it’s a bucket list-worthy trip or a road trip to grandma’s.

Start by getting new angles. Your phone is mobile, so make yourself mobile too! Get down on the ground to take a shot from below your subject, or get elevated to get an overhead angle. Notice the shot everyone around you is taking, and do something different. If everyone is taking a long-range photo of a mountain, focus your shot on the trail leading up to it or the trees in the foreground, for instance.

When you’re taking photos of people, shots of smiling groups are nice, but they’re nothing remarkable. Focus on emotion instead. Try to capture a laugh, an expression of joy or surprise, or a look of wonder on the faces of your subjects. The best way to do this is to have your phone ready to shoot as your friends and family discover new experiences or see a new sight.

Last, to use your phone camera to its fullest, don’t forget to try your high dynamic range (HDR) setting. This setting can feel intimidating to those who rely on auto settings on their cameras, but it can greatly enhance your travel photos. Your HDR setting will help you properly expose your photo much better than simply pressing a finger on the screen to adjust the lighting. This is because doing so only adjusts the subject, and it can over- or underexpose the background. In your HDR setting, your phone is essentially taking three photos for every one and then layering them for ideal lighting. However, this means it takes longer to take the shot, so you need to hold the camera still.

To make sure your HDR setting is being used to the fullest, use a tripod or brace your elbows on a ledge or table when shooting. Your subjects need to hold still as well. For this reason, I only turn off HDR when I’m shooting wildlife that will not cooperate or when I cannot hold the camera steady (such as when I’m on in a moving boat).


Source: eReplacementParts.com

Have your phone at the ready and take lots of shots! Have photo tips? Share them in the comments!

Introducing Twist: a digital magazine celebrating family travel

Who has not been inspired to try a new destination after seeing gorgeous photos of a friend’s trip? Or has not turned the pages of a glossy magazine and drooled over a hotel spread? We all have, and I know that for me, I often get new travel ideas from other parents who have adventured before me. The idea of sharing travel ideas through personal experiences is, of course, the message and intent behind Pit Stops for Kids, and any story I write elsewhere.

Twist magazine

Introducing Twist travel magazine:

I’m proud to say that I’m now contributing to another, new outlet for sharing travel experiences and inspiration: Twist magazine. Twist is the brain child of Keryn Means of Walking On Travel and Andrea Fellman of Wanderlust Living, and will come to your computer screens in high resolution, digital magazine glory. I know that when I previewed this first issue of Twist, I was inspired myself by the travel destination pieces packed into its pages. There are now 2-3 new places I cannot wait to take my kids!

TWIST

In addition to destinations, Twist issues will always feature gear reviews and travel style and trends for both parents and kids, plus practical advice and currently trending travel services and tour companies. Because TWIST will be seasonal, and features over a dozen contributors who are all family travel experts, you can expect to get the very latest in travel news, travel deals, and travel inspiration.

Please go HERE to download your first issue of Twist. I am confident it will not be your last!

Apple Watch travel tips

I bought my Apple Watch for heath and GPS exercise tracking. I regarded its travel uses with skepticism. After all, I have a phone, which already accompanies me on trips, and saw no need to carry two devices for the same purpose. However, after using the Apple Watch for a few months, I’ve found it to be an extremely useful travel tool. It’s not great for everything, but it’s helpful enough that I no longer travel without it. Ready for some Apple Watch travel tips?

How, when, and why to use your Apple Watch while traveling

Apple Watch travel tips:

For me, the prime benefit of traveling with my Apple Watch Series 2 is the ability to keep my hands free and my phone stashed away. Using the apps on my watch means I can keep my backpack or tote bag closed, my eyes up, and my distractions to a minimum. Here are the uses I’ve found for my watch on travel days:

Boarding passes in Passbook:

When I check into my flight online, I use the appropriate airline app on my phone. Then I save my mobile boarding pass to Passbook. When I open Passbook on my watch, my boarding pass is right there. I can scan it at the gate and at security and never have to dig my phone out of my bag. I also keep the airline apps I use on my watch, because they will alert me of any changes to my flight right on my wrist.

Note: the TripIt app is now available for Apple Watch too, and I find it very helpful to get their alerts.

Directions on my wrist:

I have no sense of direction, so when I travel, I rely heavily on my Maps app. When I use Maps with my phone, I’m distracted, looking down at my screen while I walk unfamiliar streets, or worse, glancing too often at my phone while driving in unfamiliar cities. When I set up mapping directions on my phone before I depart, they sync to my watch, which gives me point-by-point directions as I go. I wasn’t sure if I’d like haptic touch (where the watch buzzes and vibrates to indicate which way to go), but I find I love it. I can drive and be confident about when to turn without taking my eyes off the road.

News bites in real time:

I have the CNN and New York Times apps on my watch, and appreciate how I can stay up-to-date on news as I travel. Yes, I could see updates on my phone, but how often, on a busy day, do I actually take the time to open a news app and read? With CNN and NYT on my wrist, short, one-line news bites are delivered to me, helping me be more aware as I travel.

Note: there are many other great news sources; for my watch, I chose CNN and NYT because their app headlines are particularly succinct and digestible…good for the small screen of my watch.

Apple pay on the go:

I can’t tell you how many times I’ve approached the register at an airport newsstand store or dining venue and had to dig around in my bag for my wallet or phone to pay. It’s time consuming, and can be unsafe to open everything up…important things could easily fall out of my bag. I use Apple Pay on my watch, and I’d say it works easily 70% of the time. The other 30%, it’s a big pain in the butt because it doesn’t work for some reason and I have to dig my wallet out after all. So there are negatives to using Apple Pay, but still worth trying.

GPS tracking for safety:

Some people don’t like to track their GPS, and I get that, but when I’m in a new city, I still like to run outdoors when it’s possible. I appreciate the fact that with just my watch, I can track my route, so I can easily find my hotel again. Also, in the case of anything going wrong, my route is tracked on my phone (which is back at the hotel room), so my family can more easily find me. It’s just a precaution, but one I appreciate.

A few of my favorite Apple Watch apps (not mentioned above):

  • TripIt: great to plan travel and get live updates on your travel plans
  • Timer: fun to time waits in line (so you can prove to kids that they haven’t been ‘waiting forever!’)
  • Breathe: a nice relaxation tool on travel days
  • Uber: I’ve found it to be pretty seamless as long as your account is up-to-date on your phone
  • 1Password: for when I’ve forgotten a password that I need to enter on my phone and my computer isn’t handy
  • Music: I pair with bluetooth headphones and listen to music on the go

What I never use Apple Watch for:

  • Email: heck no! Way too small a screen
  • Photos/video: though I know people who like the remote camera app
  • Banking/Paypal: no real reason other than the small screen
  • Social media: I like to see Instagram, Facebook and more on a bigger screen

Do you have an Apple Watch? Do you use it for travel?

5 Tips for Traveling to Europe With Kids

Traveling to Europe with kids is an exciting, rewarding, and exhausting experience. You’ll create lots of family memories and give your kids invaluable chances to experience other cultures. At the same time, you need a lot more planning and plenty of patience.

Europe with kids

Plan Travel in Advance

It is so important that you do your research. Plan your destinations and transportation on Europe-specific travel platforms like GoEuro before you leave. Decide how you’ll be getting from city to city, whether that be by bus, train, or plane, and book those tickets while you’re still in the states. The last thing you want to deal with is tired, hungry kids while you’re figuring out train tickets in an unfamiliar place where you don’t speak the language. As an alternative, you could book a pre-arranged Europe tour if you want to avoid the hassle of planning.

Concentrate on Fewer Locations

When you’re in Europe, you’ll be tempted to see as many spots as you can during your visit. Focus on getting the most out of just a few locations if you’ll be there for longer than a week, and concentrate on just one if you’ll be there for less than a week.

Planning your transportation through Europe is simpler when you aren’t hopping among five cities in four weeks. Similarly, if you focus on smaller destinations, such as Bath instead of London, you’ll have an easier time exploring with kids. Big cities can overwhelm children, but they’ll adjust to smaller places more quickly.

Leave Room for Downtime

When traveling with adults, you might be able to see four museums and monuments in one day without hailing a single cab. Kids get tired and bored more quickly, though. Plan for downtime, but be open to rescheduling or extending it depending on how your kids are feeling. Otherwise, you might have to cut short a visit to the Louvre or cancel a tour of the Colosseum.

Plan for Emergencies

Kids get lost even when you’re paying close attention. When it happens in a city where you don’t know the language, the experience is especially terrifying. Create contingency plans before you start packing. This might include giving your kids cell phones or GPS devices so you can locate them or telling them to stay put as soon as they realize they’ve lost you. Rick Steves has lots of great ideas for families who want to plan for this kind of emergency.

Europe with kids

Try Not to Check Bags on Flights

When kids are young, they can only carry a small backpack containing a few belongings. You’ll have to carry the rest. In Europe, you’ll be doing a lot of walking. Imagine lugging two or three gigantic suitcases behind you while you walk from the train station to your hotel!

To avoid this situation, pack light. Cut down on toiletries and nix the non-essentials such as hair dryers and excess makeup. Plan to wash clothes while you’re there, and research accommodations that offer laundry facilities. Pack one carry-on per adult to make your trip simpler.

Traveling with adults has its own list of perks, but taking your kids to Europe is a rewarding experience. Plan ahead to design a trip that nobody in your family will soon forget.

Where to ski in Utah: Brian Head Resort with kids

Deciding where to ski in Utah is a little like deciding which tropical island to buy…you really can’t go wrong, wherever you choose.  That said, there are distinct differences between Utah resorts, and perhaps an even bigger difference between Salt Lake City and Provo area resort and Southern Utah resorts. For the first time, I explored the skiing options in Southern Utah, where I loved the friendly, relaxed, and sometimes almost eccentric vibe.

brian-head

Brian Head Resort with kids:

Brian Head Resort has the highest base elevation in Utah (you’ll be at over 9000 feet at all times, and up to 11,000+ feet while skiing). It offers 650 acres with eight chairs. It’s not the largest Utah ski resort, and also not the most challenging in terms of expert terrain, but it has something distinct going for it that really plays in its favor: isolation.

brian-head

Because Brian Head is pretty far from a metropolis (you’re 3.5 hours from SLC and 3 hours from Las Vegas), your closest neighbors during your stay are national parks and monuments. Brian Head has the distinction of being a Dark Sky location, which means you’re free from light pollution. All this isolation means Brian Head Resort makes its own fun. Events, apres ski dining options, live bands, and special programming seems to be scheduled for just about every night. Need proof? Just take a look at their event schedule.

Getting the lay of the land:

When skiing Brian Head resort with kids, it’s important to note Brian Head has two distinct base areas: Navajo and Giant Steps. They are separated by the highway, with a ski bridge that links them. Base lodges are at both locations. The simplest way to categorize them is to say that Navajo offers the beginner and intermediate terrain, and Giant Steps offers intermediate and expert terrain. There’s a meeting place for the winter sports school at both locations, but the kids’ camp is at Navajo. The two Brian Head hotel lodges are a couple minutes’ drive from the Navajo side, but there are many house rentals and condos available at both base areas.

brian-head

You can absolutely ski between the two sides using the ski bridge, but it does take a few chairs and some traversing. There is also a  free shuttle that connects the base areas, convenient if you have family members skiing at different levels but want to meet up for lunch or apres ski.

Skiing at Brian Head:

Brian Head is one of those resorts that seems to double its size on powder days…there are just so many open areas to ski. (The openness of the resort is actually due to the need to remove many trees during a beetle infestation years ago.) But of course, not every day can be a powder day. During my visit, we stuck mostly to groomed runs, which were plentiful and pleasant. There are a number of great chutes near the top of Giant Steps, and even after the fluffy powder is skied out, hidden stashes remain in the trees. On the Navajo side, the green beginner runs are some of the most interesting I’ve seen…think winding paths through forests and fun curves.

brian-head

From both sides, skiers are rewarded with views of classic Southern Utah red rock, and glimpses of nearby Cedar Breaks National Monument. On clear days, it’s possible to see all the way to Great Basin National Park in Nevada. What you won’t see often are crowds. We visited on a Saturday in January, and it felt like a quiet Tuesday morning.

Other things to do at Brian Head:

Remember how close you are to Cedar Breaks while in Brian Head? If you want to take an afternoon off from skiing, you can actually take a snowmobile tour from the resort area to High Mountain, which offers incredible close-up views of the red rock of Cedar Breaks. Thunder Mountain Motorsports offers 1.5 hour, 3 hour, and all day rides. We found 1.5 hours to be just enough time to go through the backcountry of Brian Head to High Mountain and back, with time to play around in snow-filled meadows and learn about the natural history of the area. Our guide was fantastic: the perfect mixture of helpful and informative but also lighthearted and fun. Tours start at $85/machine, which families can ride double for only $15 extra. If you have it, you can even take your own machine and follow the tour for $20.

snowmobiling

If snowmobiling isn’t your thing, you can also snowshoe or cross-country ski in Cedar Breaks. It’s best to call for up-to-date info on road conditions and where to start your winter exploration: 435-586-9451.

Brian Head also offers snow tubing, which I’m told is on a steeper track than most. (I didn’t get a chance to try it.) However, one of the best things I did at Brian Head was their free ‘Star Party’. Held once a month at Navajo base lodge, star parties are a fun and informative viewing of the night sky. Because Brian Head is a Dark Sky location, the view on clear nights is fantastic. They bring out ‘dark rangers’ (like park rangers) to lead short talks, in which they point out constellations and planets and give families time to look through telescopes. There are fire pits and hot chocolate as well.

Where (and what) to eat at Brian Head:

Remember how I said Brian Head was just a bit eccentric? This characteristic is most evident in their dining and entertainment scene. Brian Head was bought by a new owner a few years ago; owner John Grissinger has brought his love of Kansas City BBQ to the resort, and everyone benefits! At least once a week (and usually more often), families can find ‘John’s KC style BBQ’ on the events calendar. Held at Last Chair Saloon at Giant Steps base, this BBQ meal is not to be missed. You may get two choices on the menu, but don’t expect more. What you’ll get is amazing BBQ meat (usually ribs, catfish, or tri-tip) served with sides. It’s accompanied by live music, and the whole event is very family-friendly.

When you can’t get BBQ, you have other options: Giant Steps lodge and Navajo have your standard ski day fare, and if you want to dine out in the evening, the Grand Lodge offers a simple but solid menu at their Lift Bar and Grill. Cedar Breaks Lodge offers a restaurant as well.

Where to stay at Brian Head:

As noted above, there are many condo rentals and home rentals in Brian Head. If you opt for a hotel, you have the choice between the Grand Lodge and Cedar Breaks Lodge. We stayed at Grand Lodge, which has a great indoor pool and hot tub, plus an outdoor hot tub. Their spa was closed for the season, but it is on offer in summer months. They have a decent continental breakfast at the Lift Bar and Grill, which is convenient before your ski day, though it does cost extra (around $10 pp). I found this price to be too high for the standard fare; at some chain hotels, you can get a similar spread complimentarily). However, our waitress did charge less for those who were eating less, which was nice.

grand lodge

Rooms are standard, with mini fridges and microwaves, which is nice to have, and the lodge has fun live music and a pretty hopping bar on weekends. It’s a friendly, welcoming vibe. You’re about a one minute drive to the base of Navajo, or you can get on the free Brian Head shuttle.

Getting to Brian Head: Take I-15 to Parowan, then Highway 143 to Brian Head. It’s about 3.5 hours from Salt Lake City or 3 hours from Las Vegas.

Pin it for later:

Ever heard of Brian Head? Here's why you should take note of this small ski resort!

Disclosure: I experienced Brian Head as a guest of the resort, for the purpose of review. All opinions are my own.

How to prepare meals in a camper van

When your family hits the road in a camper van, you want your kids to be well nourished throughout your journey. After all, well-fed kids are generally happy kids, which can make your road trip more enjoyable. However, a small campervan kitchen might pose a challenge and leave you scrambling for diverse and delicious meal options that your youngsters can enjoy. Once you’ve devised your road trip and secured your camper van rental, take time to meal plan before you hit the open road.

camper van

Know What You’re Working With

Before your trip, familiarize yourself with the campervan kitchen. Typically, you’ll have a refrigerator, a couple of burners, and a small grill. So, while real estate might be small, you’ll have enough basic tools to throw together a variety of meals for your hungry family.

Focus on One-Pot Meals

You don’t have to rely on hot dogs every night—even if your kids might love that—when you’re road tripping in a campervan. However, you do need to get creative to provide a well-rounded meal that doesn’t require too many pots and pans. One-skillet meals are a smart solution when you’re cooking in a campervan. For breakfast, brown sausage in a skillet, pour eggs over the cooked sausage, and top with cheese. You’ll have a hearty breakfast skillet, which you can serve on its own or wrap in a tortilla to make breakfast burritos. Diced potatoes, veggies, and kielbasa or turkey sausage is another mouthwatering meal that requires just one skillet.

Get Grilling

If your campervan includes a small grill, take advantage of this versatile appliance. Hot dogs and hamburgers are, of course, a simple and kid-friendly option when you’re exploring the open road, but don’t limit yourself to these classics. Tortillas can double as pizza crust—just top them with sauce and your kids’ favorite toppings for a simple and crowd-pleasing dish. Enjoy a Mexican-inspired night with bean and cheese quesadillas cooked on the grill. Grill packets are also convenient when you’re on the road, and they minimize messes. Chopped veggies and potatoes, along with an easy-to-grill meat, wrapped in aluminum foil requires little effort and delivers a hearty meal every time.

Minimize Cooking But Maximize Meals

Don’t spend too much time on your journey in the campervan kitchen. Instead, focus on ways to cook in bulk for your family and use up every last ingredient to create a diverse menu that pleases both kids and adults. For example, chicken breasts have a variety of uses, so cook several pounds of breasts at once. You can boil the chicken and shred it or fire up the campervan grill. Make chicken salad for sandwiches, add shredded chicken to tortillas for tacos or quesadillas, or toss some barbecue sauce on it and add it to a bun. This way, you’ll devise several convenient meals in one cooking session, which leaves you more time to enjoy your adventure.

Tip: Looking to have a camper van adventure outside of the states? Check out RV hire Australia for great options.

Even though the quarters are tight and the resources limited, cooking in a campervan doesn’t have to be frustrating. You can keep your family well fed during your getaway with thoughtful meal planning, simple recipes, and versatile ingredients.

Image BY studio tdes via flickr.com under a Creative Commons License CC BY 2.0

Airport hotel tip: Red Roof PLUS+ review

While destination resorts and luxury properties may be fun to write about (and read about), it’s just as important to know about quality hotels for road trips and airport layovers. We have our go-to brands we trust, which now includes Red Roof PLUS+.

You’ve heard of Red Roof Inns…the Red Roof PLUS+ category is just that…a Red Roof Inn with more. They include amenities you won’t see at many economical hotels, like high end bedding and mattresses, enhanced lighting, spacious bathrooms, and extra seating…basically upgraded everything.

red-roof-plus

Even more important to me when I travel, the PLUS+ category always has min-fridges and microwaves in their premium rooms. Ditto for free WIFI. Basically, seeing the PLUS+ sign is an easy way to be sure of quality before you arrive at the hotel property.

Our reviewer checked out the Red Roof PLUS+ property at Boston Logan airport after an international flight. She found all the amenities listed to be as advertised, but the best part of her stay was the guest service. They came into the hotel lobby tired and travel-worn, and were grateful for a seamless check-in experience. It could be argued that every hotel brand should strive to have the best possible service in all their hotels, but for what it’s worth, Red Roof PLUS+ promises enhanced costumer service at their PLUS+ properties.

Right now, Red Roof has PLUS+ properties in 20 states, but they’re expanding quickly. If you decide to try a PLUS+ property during your next layover or road trip, check out the promotion below:

Red Roof has opened their 500th inn and 50th Red Roof PLUS+ location in the U.S.!  To celebrate, they are offering travelers some great incentives including 500 RediCard bonus points. Here’s how it works: sign up for Red Roof’s loyalty program, RediCard, and register for the 500th Property Promotion to get rewarded. Guests will earn 500 bonus points on their first stay when staying at any Red Roof location from January 15 to February 28, 2017.


Boreal Mountain Resort with the M.A.X. Pass

If you read Pit Stops for Kids’ ski coverage regularly, you know we’re big fans of Lake Tahoe, CA skiing. I grew up in the area, skiing at resorts throughout Tahoe, and we try to visit our favorite resorts at least once a season. However, until our visit last month, it had been YEARS since I’d been at Boreal Mountain Resort.

Boreal Mountain Resort

One of the oldest and most established ski resorts in the Tahoe region, Boreal has always been known for its terrain parks, affordability, and easy access from I-80. I remember it best as the first Tahoe resort (to my knowledge) to allow snowboarding. Ever since, it’s been snowboard-centric. Because I’ve never been an avid snowboarder or lover of big jumps, Boreal hasn’t been on my radar for some time.

However, I now have three kids who love terrain parks (one of whom exclusively snowboards). I knew they’d love Boreal’s five terrain parks and half-pipe. But as one of the most affordable resorts in Tahoe, Boreal is on the small side. Before we arrived, I wondered whether its acreage would keep us occupied for a full day.

Enter Woodward Tahoe, located directly at the base of Boreal. This indoor action sport training facility is every kid’s dream: it’s filled with indoor trampolines, foam pits, skate parks, ramps, and more. With a Boreal OnePass, you get access to Woodward in addition to the slopes at Boreal (and nearby Soda Springs ski area if you’re interested). We got our tickets through The M.A.X. Pass, which is a 39-mountain season pass that includes Boreal (more on that below).

How Boreal and Woodward work together:

When you arrive at Boreal and get your Boreal OnePass, you have access to both Woodward and Boreal. Woodward is used in several ways: extreme action sport athletes use it for serious training, classes and camps are offered, and single use sessions are available to the public. To use Woodward during your ski day, you’ll want to make a reservation. Your OnePass gets you a three-hour session, which we found to be more than enough time. We opted to make a Woodward reservation for after lunch, then skied and snowboarded all morning, switching to indoors in the afternoon. Of course, you could do the reverse.

Woodward Tahoe

First-timers at Woodward need to take a 30 minute orientation session, in which instructors explain the equipment and show you the proper way to jump (and fall) safely. It’s easy and really helpful. After that, you’re let loose on all the trampolines, foam pits, ramps, and ropes. If you want to use a scooter (to jump off ramps into a pit), you can rent one by the hour. I believe it was $15/hour. Kids can also bring their own, as well as their own BMX bikes or skateboards. To skateboard and ride, helmets are required. We simply used our ski helmets. Check out our favorite Woodward video!

You’ll want to bring a change of clothes for anyone playing in Woodward before or after skiing or snowboarding; there are bathrooms to change in at Woodward, and cubbies in which to store your ski stuff. There’s a nice counter-service lunch and drink place upstairs, where there’s also a nice viewing and lounging area for anyone not participating.

What to expect on the slopes at Boreal:

As noted above, Boreal is known for its terrain parks, and it definitely delivers. We were there in late December, and not every terrain park was up and running yet, but there were still about four to pick from. As a parent, I appreciated the option of an extra-small park, where the jumps and ramps were beginner-sized. Sometimes, beginners and young kids can get in the way or even hurt on large terrain parks. From there, it goes up all the way to expert level. There’s a half pipe, and an additional park called Neff Land, which is sponsored by Neff and includes fun elements like tunnels and side walls.

Boreal

For those not into terrain parks (like me), Boreal has a surprising amount of glade and off-piste skiing, which I found on the extreme far sides of the resort. The Cedar Ridge chair was especially lovely, with a ride up the mountain amid deep forests. While the overall ambiance at Boreal is still snowboarder-centric, I did find my own place there.

Using The M.A.X. Pass:

As noted above, I visited Boreal after so many years because it is one of the 39 resorts included in our M.A.X. Pass, which our family is trying out this year. Yes, you read that right: the M.A.X. Pass includes 39 different resorts across the US. Many are on the east coast, with a handful in Utah, Colorado, California, and the Pacific Northwest. I’ll be reviewing additional M.A.X. Pass resorts later this winter. For $749, M.A.X. Pass users get five days at each of the resorts, with no blackout dates. I buy a season pass at our local mountain annually, and I can tell you it’s not far off that $749 price just for one property. If your family plans to spend five days at a single M.A.X. Pass resort on vacation this winter, plus could use the pass for a day here and there throughout the rest of the season, the value is definitely there. Check out all the resorts offered on the MAX Pass.

I visited Boreal in partnership with the M.A.X. Pass, for the purpose of review. All opinion remains my own.


Born Wild: The importance of getting our kids into the outdoors

Happy New Year! I’d like to start 2017 with what I believe is an important subject: the value of getting our kids into the outdoors. Long-time readers of Pit Stops for Kids know that as often as possible, our pit stops, destinations, and adventures are of the outdoor variety. We ski, hike, snowshoe, mountain bike, camp, backpack, kayak, raft, and fish, and while we’d be crazy not to enjoy five-star hotels and luxury resorts, we’ve noticed something over the years:

born-wild

Our kids remember their outdoor adventures most fondly, and the vacations they ask to repeat are ones spent in tents and hammocks, not luxury hotels.

The articles on Pit Stops for Kids that I am most proud of help parents explore nature with their kids: tips for backpacking, advice for road trips that explore national parks, reviews of river rafting expeditions, and the like. We know it can feel intimidating to get outside with kids. We know that for parents without experience in the outdoors themselves, there are real questions and concerns. So I’m excited to introduce a new website with core values that align with ours: the importance of getting our kids in to the outdoors, and the benefits families can find from communing with nature.

born-wild

The Born Wild Project is a brand new site that serves as a hub for the adventure-ready and adventure-curious. It includes tips and tricks, how-to’s, gear reviews, and regular blogging by their growing collective of awesome parents. I hope to contribute there, as I believe wholeheartedly with their mission.

So why is it so important to get kids outdoors?

I believe in getting kids outside, in the dirt, in trees, on the sand, in the water, and on the snow because in the last generation or so, we’ve seen a barrier build between humans and nature. The more kids stay indoors, the less ‘real’ nature feels to them. It’s something scary, something ‘other’. And when that happens, a whole generation loses their love of, and desire to protect, planet Earth. Plus, kids love the outdoors!

I promise, you can spend a fraction of the cost of a Disney trip camping with your family, and your kids will remember it more fondly, if you give it a chance.

Parents who fear the outdoors can embrace it with the help of a community.

I love that the Born Wild Project offers a community of like-minded parents who either want to get outdoors with their kids or already do. We can learn so much from one another! Even those of us who spend a lot of time outdoors have questions and need advice. When we decided to sea kayak on the marine trail through the San Juan Islands, we didn’t have any experience with ocean kayaking. We relied on the help of guides and the packing lists provided to us from fellow parents. Likewise, after we allowed our 17-year-old to hike the Pacific Crest Trail for a month, many parents asked us specific questions so they could plan their own adventures.

born-wild

So if you’re ready to go outdoors on your next trip or at home, get inspired from Born Wild’s documentary series, showcasing families who decided to make outdoor trips part of their lifestyle. And check out our Adventures for Kids section, of course!