Italy with kids: Cinque Terre itinerary for families

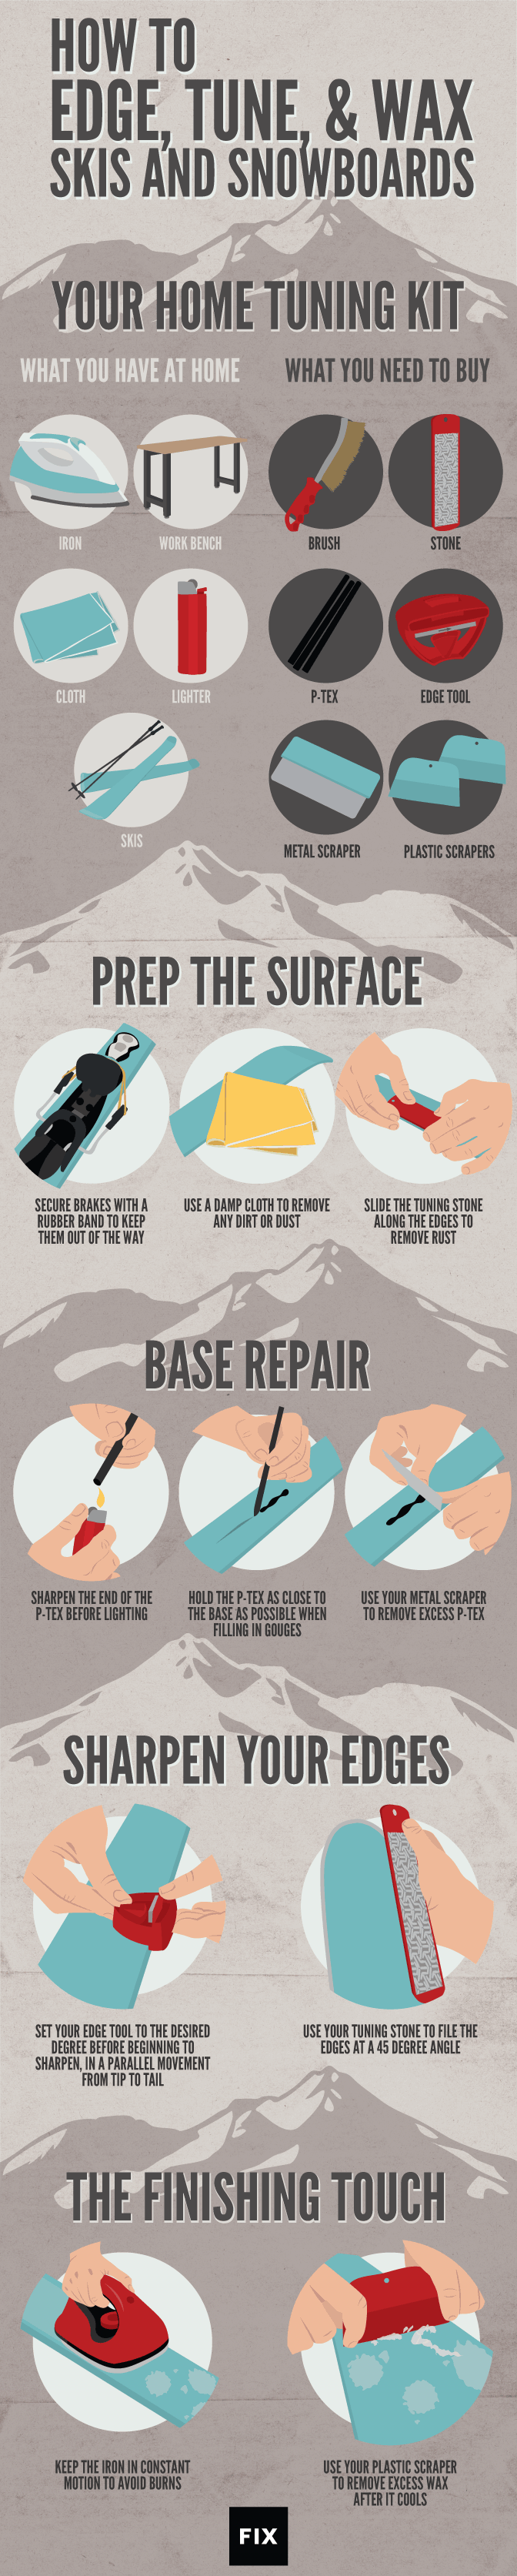
On a trip to Italy with kids, you’re likely to devote a good deal of time to art and history in Florence and archeological ruins in Rome. Afterward, escape the intensity of the city with this three-day Cinque Terre itinerary for families.


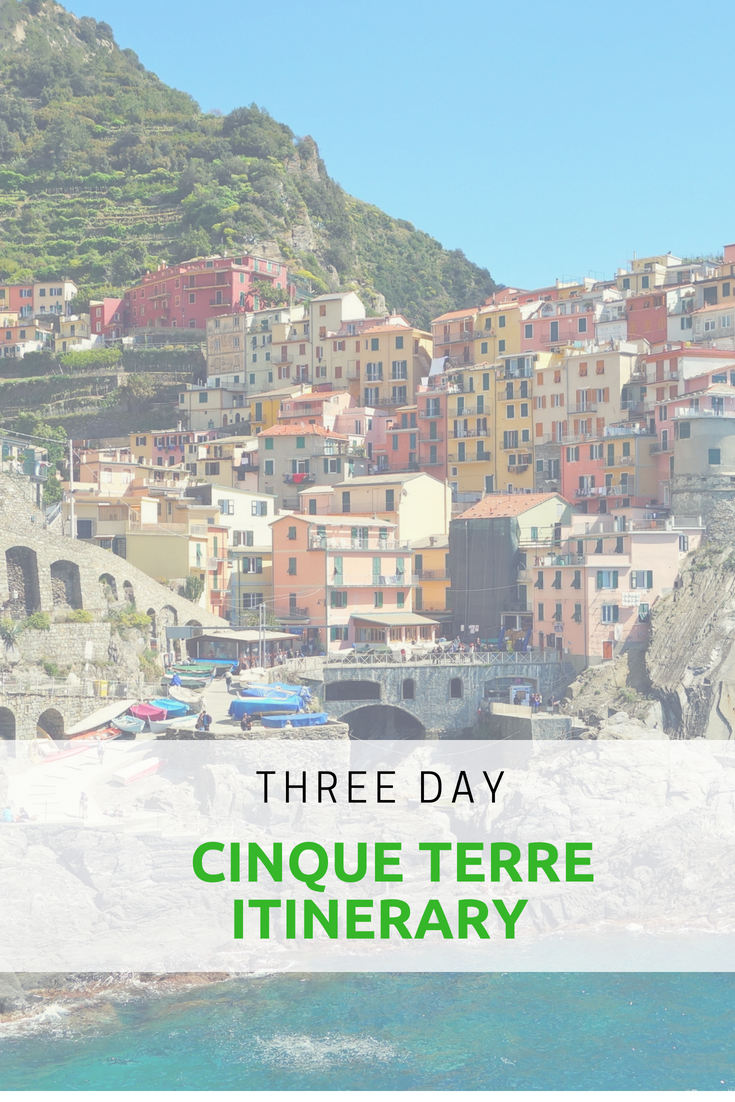
Day One: Florence to Cinque Terre

We took a morning train from Florence to Lucca and spent several hours walking around this lovely walled city. It’s definitely worth the side trip. There is a baggage check place right across from the station where we left our bags. From there you can just walk into the town or rent a bike from the same place. 

Then we took a train from Lucca to La Spezia (you can get one ticket that is Florence to La Spezia and just get off and on again) where you change trains for the towns of Cinque Terre. Be sure to get off at La Spezia Centrale station, not La Spezia Milgliarina.

In La Spezia, make sure you take a local train that stops in Riomaggiore (Genoa-La Spezia line). Check the train schedules because they don’t all stop at the little Cinque Terre towns.

We stayed 2 nights at Affittacamere Le Giare which I found through Trip Advisor and booked through Booking.com. Being off-season many places were closed. But this was a wonderful little apartment where our host was waiting for us and made dinner recommendations. We had time for a walk around the town using Rick Steves’ guide.

Note: you can also go from Milan to Cinque Terre.

Day Two: Village to village hiking

We awoke to rain but it cleared up by 9:00 and we found a café in town for breakfast. All the Cinque Terre villages cater to American tourists who come in droves in the summer so there are many cafes trying to serve American or English breakfasts.

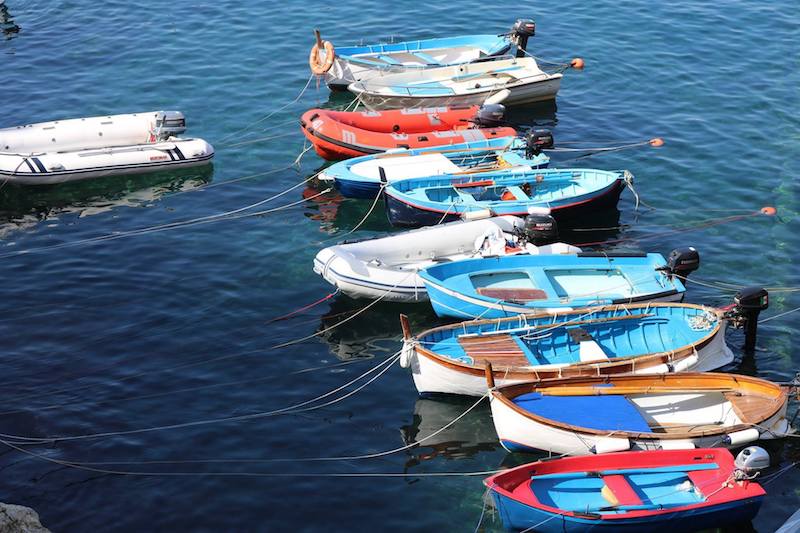
You can go from village to village three different ways: by train, hike or by boat. Boats only run in season (and we visited in winter) and most of the train trip is through tunnels, obscuring views between village stops, so we opted to hike. The entire hike is approximately eight miles one-way, which is do-able with older kids and teens, when broken up into a leisurely day.

The first two sections of the hiking trail were closed: Riomaggiore to Manarola is only a 20-minute walk and has been closed for years; the second section, Manarola to Corniglia takes a little longer but is less scenic.

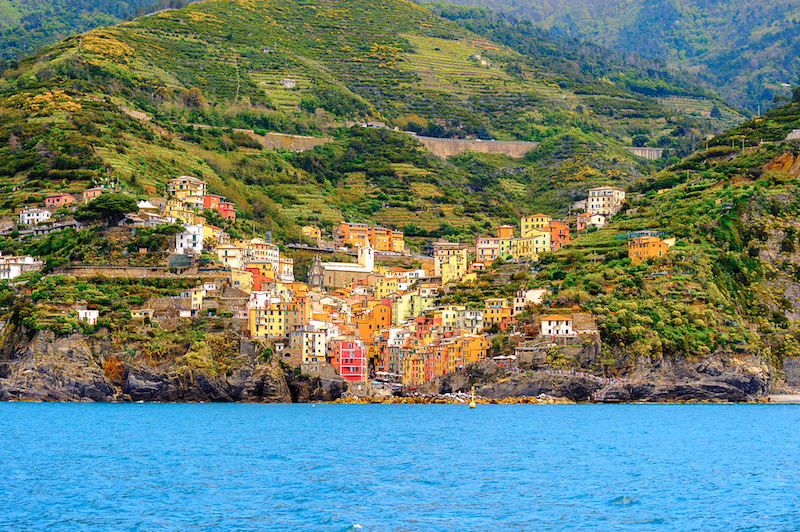
We took the train from Riomaggiore to Corniglia and started our hike from there. Finding the correct trail out of Corniglia toward Vernazza proved to be a bit of a challenge but after climbing a long set of switchback steps up to the town center, we found the red and white stripes on the stonewalls that serve as trail markers.

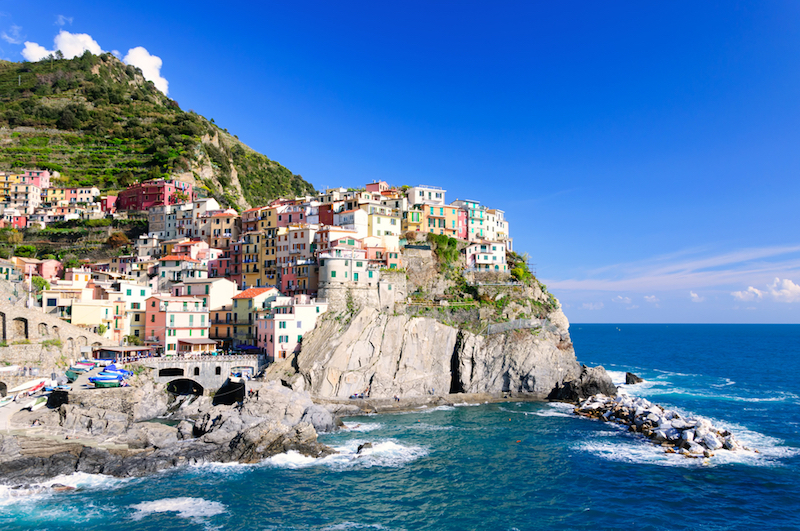
Tip: It’s a beautiful hike up out of Corniglia and you are able to look back at the village perched on the cliffs. Stunning!

The hike from Corniglia to Vernazza takes about an hour and a half but it is rocky, with some stone steps and somewhat hilly. You hike through vineyards and ravines. No one was on the trail when we were there, which made it pretty magical. In summer the crowds must really take away from the remote beauty, which is why we enjoyed an off-season visit. In another hour we came to Vernazza where we stopped for a delicious pizza lunch at a busy café right by the harbor.

Finding the continuing trail from Vernazza to Monterosso was easy. But the hike to Monterosso was the most difficult of all. It took us about an hour and a half with lots of ups and downs and muddy areas. But most of it is along cliffs with amazing views.

Monterosso is more of a resort town than the others. It is built on flat land and divided into two parts—the old and new. There are long stretches of beach and umbrella rentals, etc. It is also the only Cinque Terre village that is on a main train route. It was our least favorite.

To return to Riomaggiore, we took the train (they come about every hour, more often in summer) and rode it straight through from Monterosso to Riomaggiore. We were back in time to shower and rest up before a nice dinner by the harbor.

Day Three: Manarola back to Rome

We were headed back to Rome today for our morning flight out the next day, but before we left Riomaggiore we took the train to the second village that we could not hike to due to trail closures, Manarola. What a perfect morning outing! We found a little café for some pastries, but not much else was open. It was very quiet. Rick Steves’ walking guide took us up through the town and into the vineyards and graveyards with stone terraces. 

We took the train back to Riomaggiore, got our bags and then took another train to La Spezia where we changed trains to get back to the Rome Termini.

In summary:

  • Visit Lucca coming or going to Cinque Terre
  • Walk as much of the trail as you can and what you can’t, go back to by train and visit the villages that way.
  • Don’t think you’ll have views on the train because you don’t.
  • Pick one village as a base because they are all so close together.
  • Go off-season. We were told April was the best.

How we planned our European trip on a budget

This winter, the Pit Stops for Kids crew will be heading to France, Belgium, the Netherlands, and Italy. Our entire trip has been planned with budget in mind, by necessity! If your family, like ours, wants to plan a European trip on a budget, we have tips below!

european-trip

We will travel in an off-season.

Yes, Paris in springtime is lovely, and Scandinavia in the summer is just about perfect. But airfare and lodging prices soar during peak time periods. Everyone knows that when on a budget, one of the easiest ways to save money is to travel in the off-season, but with kids in school and sports, we know this is easier said than done. Think outside the box: I was surprised to learn that if booked far enough in advance, the Christmas holiday season was very affordable, with cheaper airfare than in spring. We were able to book a trip that didn’t force the kids to miss any school days but still fell into a budget season period.

If you do book a winter holiday trip, go with the flow of the Christmas and New Years’ holidays, taking advantage of special events and offerings. Instead of lamenting that you won’t be able to have the exact same trip you’d have in June or July, look for festivals, religious ceremonies, and celebrations that are unique to this festive season. For instance, I was bummed we wouldn’t be hiking in the Dutch countryside during our December trip, until I realized we’d be able to experience Belgium’s famous Christmas markets.

We finalized our travel dates around the best airfare.

Instead of deciding on our exact travel dates, then finding airfare to work around them, we kept our departure dates loose and finalized them around the most affordable airfare. This allowed us to use calendar tools on airline websites to find the cheapest fare within a 3-4 day window, each way. For example, for the Alitalia flight we booked from San Francisco to Paris, the price was $200 less if we flew on a Thursday rather than a Friday. On our return, flying on New Year’s Day is significantly less than flying the day after. Read how to find the lowest airfare for any trip.

We booked apartments instead of hotel rooms.

Hotel rooms are hard to come by economically for a family of five in major European cities. Instead of trying to cram into a room or booking two rooms per night for our family, we are using HomeAway and AirBnB vacation rentals. We enjoy booking directly from locals, because they can often give us extra tips and hints for our city travels, recommend restaurants, and give us directions to grocery stores. We’ve never had any problems booking through the above sites. Here’s an example of our savings:

  • Paris mid-range hotel room that sleeps 3: $200/night ($2,000 total for two rooms for five nights)
  • Paris apartment rental that sleeps 5: $100/night ($550 total for five nights including taxes and fees)

We priced lodging, transportation, and tours a la carte.

It can be easier to book lodging and tours in one package from a number of tour operators, but we dislike large group tours and don’t want to stay in hotels that cater to large groups. Instead, we booked individual tours in both Rome and Paris. (We’ll be touring with Fat Tire Tours and Overome.) While this seems like an extravagance, it’s actually less costly because we’ve gotten our lodging for a good price, and we’ll have the benefit of touring in a much smaller group.

We opted for longer stays per location.

Instead of giving into the temptation of changing location every few days, which would bump our transportation and lodging costs considerably, we have opted to stay overnight in only three locations over 15 days. This gives us time to fully explore each area, and keeps our lodging costs as low as possible (five nights in an apartment rental is far cheaper than five separate nights in five different accommodations). We can also forgo Eurail type ticket packages in favor of one-time fares because we won’t be taking trains very often.

We price compared trains vs planes.

Once our transatlantic flight plans were set, we needed to figure out how we’d travel from city to city within Europe. Don’t assume train travel will be cheaper than airfare. For our travel from Paris to nearby Belgium, the train was our best option, but leaving Brussels, it was far cheaper to grab a flight on an economy airline to Rome than to take the train to nearby London, for instance. We are using EasyJet and RyanAir for our internal flights. These airlines are bare bones, but for short flights, we’re willing to make this sacrifice.

We’re not renting a car.

Car rental in Europe can get expensive, as it can anywhere. We will be buying prepaid metro tickets for each major city we’re visiting, and will be relying on bus and train schedules everywhere we go. Would driving a car be more efficient? Sure, but we’re happy to see the sights in a more leisurely manner via public transit for the tradeoff of not having to navigate roads. Be sure to budget for public transit, and note that if you have anything larger than a family of four, taxi cabs will not likely be economical. Note: the only exception to our public transit rule will upon our arrival in Paris. After a long transatlantic journey, we know we’ll be tired. I opted for a private town car to pick us up at the airport and deliver us to our apartment. This ‘luxury’ costs less than getting two taxi cabs. (We’re using Blacklane.)

We’re eating street food and shopping in grocery stores.

For us, having our own kitchen in each of our apartment rentals just makes more sense than eating every meal out. While we will certainly eat some meals in restaurants, we plan to enjoy the multicultural experience of shopping in local grocery stores and making our own meals. When we booked our apartments, we looked for rentals with grocery stores within walking distance. For lunches, when we’ll be out in cities exploring, we plan to buy foods at delis and stores for picnics and try street foods in cities.

Where to ski in Utah: Brighton Resort

If you just read my post reviewing Utah skiing at Solitude Mountain Resort, you know that Brighton Resort is its closest neighbor, nestled right next door in Big Cottonwood Canyon outside of Salt Lake City. Both resorts offer incredible ski terrain for experts and backcountry skiers and snowboarders, both offer a friendly, local vibe, and both have enough skiable terrain for a family to be happy for days.

brighton-resort

Brighton Resort differs in that it does not offer on-site lodging, apart from private home rentals. There’s a big base area with a day lodge and a separate lodge with gear rentals and a snow sports shop, and a smaller lodge at an adjacent base area on the other end of the parking area. The resorts are only five minutes’ drive apart, so families can certainly stay in the Solitude village if they’re looking to stay in the canyon, and can even ski between the resorts with a resort hopper pass.

So who is Brighton Resort for?

Take a look at the Brighton mountain map, and you’ll see a sea of black diamonds. Like Solitude, Brighton is big and bold, with incredible pitches, glades, bowls, and backcountry for serious, expert skiers and riders. If you’re looking for challenge and seemingly endless skiable terrain during big snow years like 2017 has proven to be, you’ve found your place. But what if you’re a beginner or intermediate skier? The good news is that there are green circle runs even at the top of the resort, a nice touch for those who get tired of always being at or near the base while they’re learning. You’ll find green runs off the Snake Creek chair, and even off the Milly chair, which also has some of the steepest, deepest runs in the resort. Intermediate skiers and riders will want to focus on the blue-friendly Crest and Majestic chairs; this is also where you’ll find a surprisingly big selection of terrain park features.

If you’re an expert skier or rider:

Trust us, you could do laps all day on the Milly Express chair, and never get tired of the terrain. Your legs will, however, get tired. This chair was our favorite, with double-blacks on both sides of the chair, hike-to terrain along the ridge, and back bowls accessible for backcountry skiers with touring skis. Of course, all of this is dependent on conditions, and it’s essential to look at signage to see what’s open. This is big avalanche country, and the mountains should be respected.

Brighton

Over on the Great Western chair, some of the steepest pitches take you down wide, mogul-filled black diamonds, and there are more tree glades with powder stashes along the far end of the resort. However, some of my favorite skiing all day at Brighton was found in what I deemed the ‘peaceful powder forest’, located near the top of Snake Creek and Crest. The woods here seemed to go on and on, with lots of powder between the trees and a more relaxing pitch.

If there’s less snow, you’ll definitely find less variety, but even then, the groomers along Crest and Big Western and Milly proved excellent. I loved the rollers and gentle curves to these runs, which got great sun throughout the day. We opted to break for lunch at the base of Milly, where the newest lodge of Brighton was far less crowded and offered excellent burgers and soups.

Planning your day at Brighton Resort:

As noted above, there is no overnight lodging at Brighton, so it will probably be a day trip for you. If you’re driving up Big Cottonwood Canyon (i.e., not staying at Solitude or in a nearby home rental), plan at least 25 minutes on an average day, and up to an hour on a holiday weekend…the traffic goes slowly on really great ski days.

Tip: Big Cottonwood Canyon is 15 miles of pretty curvy, mountainous roadway, and 4×4 drive or chains ARE required fairly regularly. You can opt to take a bus from the base of the canyon, where there’s a convenient park and ride parking lot for your car.

Because Brighton Resort is a day use resort, the parking lot does fill up on busy days. We skied Brighton on a holiday weekend after a big dump of snow, and were glad we arrived just after 9 am…by 11 am, the parking lot was completely full and people were parking on the road.

brighton-resort

Lift tickets are under $80 per day per adult, which is relatively reasonable, by ski resort standards. Better yet, you can ‘reload’ your day pass the next day for $10 less. Kids 10 and under are FREE at Brighton, which is a fantastic perk. To save money, consider a Brighton pass if you plan to ski regularly there, because it includes free ski bus access, or, if you have a pass elsewhere, see if it’s a M.A.X. Pass resort and do a M.A.X. Pass add-on for the best value. You can get a Solitude-Brighton ticket for under $100, and ski between the two resorts, but I bet you’ll have enough to keep you busy right at Brighton.

Pin it for later!

Why Brighton: Top resorts for experts

Disclosure: I visited Brighton as a guest of the resort for the purpose of reviewing M.A.X. Pass resorts. All opinions are my own.

Ski Vacation Hack: How to tune and wax your own skis

Winter outdoors enthusiasts gearing up for ski and snowboard season know how expensive snow sports can be, and how important it is to take care of skiing equipment. But if you don’t have $40 to $50 to spend on every professional tuning and waxing session, you can easily do it yourself! This is one of our favorite ski vacation hack ideas! For about the same one-time investment, skiers and snowboarders can tune and wax their own gear all season long.

smuggs for teens

What You’ll Need

The items below can be picked up individually (some you’ll already have on hand at home) or bought in a ski and snowboard tuning kit.

  • Wax: pick up a stick of all-purpose (all-weather) wax at your local ski shop or outdoor store.
  • Iron: use an old iron at home, or buy a ski-tuning iron.
  • Means of securing skis or board: most tuners use a wooden table and vise, but any workbench will do, and a two-person team can hold skis securely without a vise.
  • Metal scraper: found in ski shops, a metal scraper is for scraping P-Tex only.
  • Plastic scraper: any plastic scraper with an edge will do! Pick one up for just a few dollars at any ski shop.
  • File and file guide: a metal file specifically made for edging skis and boards can be found in ski shops or outdoor stores; pair it with a file guide.
  • Edge tool (alternative or in addition to the file): included in most ski-tuning kits, edge tools make finding the correct file angle easy.
  • Brush and cloth: a soft brush is important for wiping away wax shavings, and a damp cloth will remove dirt and dust from bases.
  • Stone: ski stones are useful for removing rust from edges.
  • P-Tex: a must for filling deep scrapes or gouges in ski and snowboard bases, found at ski shops and in tuning kits.
  • Lighter or matches: for lighting your P-Tex.

Preparation

Once you have the necessary tools assembled, it’s time to get started! To prepare your skis or board for tuning and waxing, it’s important to prep the bases. Start by securing your ski brakes, so they’re out of the way. Simply pull them back with a large rubber band. Next, wipe down the bases with your damp cloth. You’ll want to remove any dirt, dust, or grime that may remain from last season or from “summering” in your garage. Finally, remove any rust from your edges using your stone. Hold the stone horizontally (like a harmonica) and pass it across the edges at a 90-degree angle, working from tip to tail. Prep both bases before moving on.

Base Repair

Now that your base is prepped, it’s time to fix any major scrapes or gouges. Light the end of your stick of P-Tex with a match or lighter, then touch the lighted end to the scrape, allowing the melted P-Tex to fill it. Be careful not to drip the P-Tex in from a height, as this will burn the base. Once the scrape is filled, remove the P-Tex stick and blow it out gently. Let the base cool for approximately 10 minutes, then scrape away any excess P-Tex with your metal scraper until the base is smooth. You’ll want to hold your scraper horizontally, with your thumbs behind it. Push the scraper along the gouge until the P-Tex is flat and smooth. Alternatively, you can pull the scraper toward you, “cutting” the P-Tex until smooth. Repeat for both ski bases, as needed.

See the rest at our fix.com article, or follow the illustration below:


Source: Fix.com

Photo source: Smuggler’s Notch, VT

Gift-free holiday: Why we opted for no presents at Christmas

When we decided the best time for our family’s bucket list trip to Europe was Christmas break, we, as parents, realized how unrealistic it would be to buy Christmas presents on top of the cost of the trip. While we would be budget traveling through Europe, we would still spend far more than the average amount we set aside for holiday spending. In addition, it simply wouldn’t be practical to try to haul Christmas gifts across the Atlantic to open Christmas Day, only to haul them back.

gift-free-holiday

The idea of a gift-free holiday focusing on the wonderful gift of travel and experiences appealed to us greatly.

We went to the kids (ages 16, 14, and 11), and asked them what they thought of having our European trip be their Christmas gift. And their only Christmas gift. Their answer (in September), was a resounding YES. Whatever it took to get us all to Europe, they were onboard.

I was proud of them; I’ve never considered us to be a particularly materialistic or consumer-driven family, but let’s be real: my kids like presents. And like most families in middle class America, a big part of the Christmas holiday is centered around gifts, for better or for worse. None of my children still believed in Santa Claus, but they definitely still believed in making a list.

With the kids on board, we continued with our plans for Europe, spending all our Christmas gift fund on our travels. I knew we’d be celebrating Christmas Eve and Christmas Day in Florence, Italy, and started making plans for that time period in particular. I knew I wanted to make it special, despite the lack of gifts.

airport waiting

Because many parts of Italy celebrates the Epiphany more intensely than Christmas Day, I found that many local celebrations would have ended before our arrival in Florence. This disheartened me a little, but I forged ahead, asking our AirBnB host for restaurant recommendations that would be open and checking museum hours. By the time I was done planning, we had a lovely Christmas Eve meal reserved at a cafe recommended by a local, a Christmas morning self-guided walking tour, and plans to shop for and cook a Christmas Day dinner in our rented apartment.

I also enlisted the family’s help making a single family gift, which we would open together on Christmas morning. I ordered an AwesomeBox. This innovative gift allows families to add custom photos, stories, and messages to special cards for a lucky recipient. In our case, the recipient was us! Everyone filled out simple information online, such as ‘favorite family memory’ or ‘what I like most about this person is…’. AwesomeBox prints the cards, and ships them in a memory box. I had the box shipped to our house before we left, then brought the cards, unread, with us. They took up no more room than a deck of playing cards, and when we opened them on Christmas morning, it would be both a gift and a family event.

souvenir-shopping

Lastly, we decided to do a family Secret Santa during our trip. We always budget a small amount of money for souvenirs, and for this holiday trip, we opted to purchase souvenirs for each other instead of for ourselves. Each family member drew a name, with the plan to buy three souvenirs for that person before Christmas Day. Souvenirs were to be $5 or less each. This way, we’d still be ‘buying things’ and everyone would still have something to ‘open’.

Here’s how it turned out (the good and the bad):

The first problem we had with our excellent gift-free holiday plan was with me. A few days before our departure, I started to panic. Maybe it was classic mom-guilt, but it just suddenly seemed terrible that I didn’t have gifts purchased for my kids. I even tried to talk my husband back out of our plan, and wanted to spend any amount, to purchase anything, for the boys. Needless to say, this was ridiculous, and I was talked down from the ledge.

eating in italy

The second problem we had was with our youngest. Despite agreeing to our plan, he apparently thought we didn’t really mean it, because in the days leading up to our trip, and even once on the trip, he referenced Christmas presents several times. Each time he said something about his anticipation of gifts, we reminded him gently that we’d decided our trip was our gift. And each time, he agreed, but seemed to continually ‘forget’.  Needless to say, this did not help my guilt. What saved us was our Secret Santa plan. Our youngest loves buying things for others, and doing so brought him so much joy (and distraction) that he stopped wondering about ‘big’ gifts. It also helped that he knew someone was buying small items for him, too.

As it turns out, kids simply love the process of buying things for others and opening gifts, no matter how small.

At times, the souvenir shopping got to be a chore or a point of stress (as in, “I still need one more thing for so-and-so, and I can’t find anything!”), but for the most part, it was very satisfying. And our AwesomeBox was, well, awesome.

What our Christmas Day ended up looking like:

We arrived in Florence via train on Christmas Eve, and walking through the historic city center to our apartment was nothing short of magical. If the kids had ‘forgotten’ it was Christmas, they quickly remembered. On every corner, violinists played, and every street was adorned with holiday lights and decorations. Every church had an intricate cache out front. The bells chimed the hour, and we were entranced.

florence-italy

After settling into our apartment, we ventured out to the grocery store, where we purchased the makings of our Christmas morning meal. We bought a traditional Italian panettone (like a coffee cake), my kids’ favorite peach juice that’s abundant in Italy, and coffee. Then we walked to the small restaurant where we had a reservation, and had our first Tuscan meal. We ordered sparkling water and a bottle of wine, and toasted to our European Christmas.

That night, I reminded the kids yet again that ‘Santa’ had already gifted them with this trip (“Yeah, we know Mom!”…by this time, they’d heard it many times) but that we’d exchange our Secret Santa souvenirs and open our AwesomeBox with breakfast. For the first time ever, everyone slept in Christmas morning. We awoke to more church bells and a fun, special breakfast complete with a lace tablecloth I found in the apartment kitchen. We ate the panettone and exchanged our $5 gifts. Some were silly and some were thoughtful, and all made us feel loved.

christmas-in-italy

We opened the AwesomeBox and took turns reading cards that expressed our gratitude for each other and our funniest/silliest/most important family memories. We took our time with this, and I think it was very special. The kids still keep their cards tucked away in their rooms.

We went out around noon, taking our historic walk of the city to learn more about Florence. The kids tolerated this with only some enthusiasm. I even heard things like, “It doesn’t feel like Christmas anymore.” Then, we turned a corner to find a tiny Christmas carnival in a small square. There was an ice skating rink, kiddie carnival rides, and a hot chocolate (cioccolata calda) stand. We stayed for the better part of an hour. Then we hiked to the best city views at Piazzale Michelangelo, where a large Christmas tree stood sentinel. It felt like Christmas again!

ice-skating-florence

We ended up at a sidewalk cafe serving pizza for a late lunch, and never ended up making dinner! We ended our day with a nighttime stroll amid the city lights and an early bedtime in anticipation of museum hopping in the morning.

Today, the kids say they have no regrets about missing out on presents. After all, they’d be hard-pressed to remember what they’d gotten for Christmas, but still remember this trip like it was yesterday.

Tips for planning your own gift-free holiday:

christmas-nativity

  • Prepare kids well ahead of time. This goes without saying, but remember that kids may need frequent reminders as well. Weave your gift-free holiday plans into the fabric of your itinerary, if you will. We said things like, “Because we’re not doing gifts, we’ll be able to rent Segways in Rome,” or, “With the money we’re saving on presents, we’ll be able to go out to that expensive restaurant as a family.”
  • Have a Christmas Day plan. (Or whatever day is most important for your family, whether that’s Christmas, Christmas Eve, Three Kings Day, Boxing Day, or a day of Hanukkah.) Book a special restaurant reservation, plan a tour, or schedule a special family event. In other words, still mark the day. Don’t pretend it’s just like any other. Remember that many things may be closed on Christmas; ask ahead.
  • Encourage kids to think of the entire trip as ‘Christmas day’. Maybe that one special day won’t be chock full of events and celebrations, but remind kids that every day of your trip, you’re doing special things, eating fun foods, and seeing amazing sights. Organize a family ‘white elephant’ gift giving, or have ‘secret Santas’ to facilitate smaller-scale gift giving and thoughtfulness.
  • Bear in mind the ages of your kids. Honestly, I would not consider a gift-free holiday with kids who still believed in Santa. During family trips with kids this age, we’ve certainly scaled back presents for the sake of travel-ease, but we’ve always ‘delivered’ on the Santa promise.
  • Start small. If you’re not ready to commit to a completely gift-free holiday, consider buying your kids experiences instead of physical gifts for some birthdays or holidays. Buy them memberships, tickets to that special show, or lessons. Make the gift of experiences a regular thing in your family.

Tips for celebrating the holidays at Disneyland Resort

The holiday season truly is magical at the Disneyland Resort, bustling with special events, entertainment, and decorations. It’s also bustling with holiday crowds, which can certainly impact your experience. Here’s how to enjoy all the holiday magic while navigating the masses.

guide to the holidays at Disneyland

Tip 1: Know when to go

The holiday season at Disneyland and California Adventure officially launches in early November and continues through the beginning of January. The crowds will be lowest before December 20th, which is the week most kids are out of school.

Tip 2: Know what not to miss

The Festival of Holidays continues to be a hit at California Adventure, which celebrates the festivities of many cultures at kiosks offering multicultural crafts and holiday food, and performances showcasing music and dance. Families can even join in the fun during select performances, learning holiday dance moves. Think of the Festival of the Holidays as a cross between the Food and Wine Festival and a mini, seasonal World Showcase where you visit kiosks instead of full pavilions.

Tip 3: Know what to expect from nighttime entertainment

Families can expect a holiday-themed World of Color at California Adventure nightly. Over at neighboring Disneyland, Wishes is now Believe…in Holiday Magic, lighting up the night sky with fireworks, along with snowfall on Main Street. FastPass is available for World of Color shows, which are two-times nightly during the busy holiday season.

Tip 4: Know which attractions will be ‘dressed’ for the holidays

Three rides get holiday overlays during this time of year, including Haunted Mansion, which gets a Tim Burton Nightmare Before Christmas theme, It’s a Small World, which adds carols from around the world and magical lighting after dark. Lastly, the Jungle Cruise turns in to the Jingle Cruise during the holiday season, with special details in the already-detailed theming of the ride, and holiday jokes added to the script.

Bonus: Don’t forget to enjoy CarsLand during the holidays, with holiday ‘wraps’ on Luigi’s ‘Joy to the Whirl’ and Mater’s Jingle Jamboree.

Tip 5: Know where to see Santa:

In California Adventure, the Redwood Creek Challenge Trail has the usual offerings of fun hands-on activities for kids, but now includes a holiday-themed scavenger hunt where kids look for ‘presents’ along the trail (ask a Cast Member for a sheet to get started), and kids can visit with the main man of the season…Santa. Santa can also be visited in Disneyland park at Critter Country.

Tip 6: Know how to navigate parade routes:

To view the Disneyland holiday parade, Christmas Fantasy, plan to find seating in designated areas a full hour before parade time. Ask Cast Members where you can sit or stand to view; they rope off disabled viewing areas and won’t allow families to watch in certain high traffic spaces. Once the parade starts, Cast Members will move along foot traffic, so don’t plan to watch on the fly. You also cannot watch in store and restaurant doorways, so don’t try! However, if you’re within a store, you can usually still see quite well…this is a good option if you find yourselves caught without a viewing location.

Tip 7: Know how to view World of Color

If you’re staying in either park for the nightly Holiday Magic or World of Color shows, prime viewing areas will fill up about 1.5 hours beforehand. For World of Color show, get a FastPass to World of Color (available by Grizzly Rapids in California Adventure by about 9:30 am) or book a dining package at a California Adventure restaurant. If you plan to simply stake out a spot, look along the benches by California Screamin’ or Ariel’s Grotto, but get there early!

Tip 8: Know how to view Holiday Magic

To watch Holiday Magic in a prime location, plan to start queuing a full two hours early. You’ll need to wait for the rope to drop in front of the castle to view there (then you’re permitted to put down a blanket and sit), or you can find a curb along Main Street. If you want to exit quickly afterward, I recommend grabbing a spot (again, well in advance) at the train station platform by the entrance to Disneyland. There are no dining packages available for the fireworks.

Travel planning: When and why to partner with a family vacation planner

Here at Pit Stops for Kids, we’re of a DIY mentality. If you’re a regular reader here, you probably are, too. We encourage you to travel by offering as much useful, free information as we can, so you can make informed decisions before booking your family vacations.

But…and this is a big but! We have used a family vacation planner for some very specific trips, and think you should, too. Bringing in a very specific expert can, sometimes, mean the difference between a good and a great family trip. Wondering when and why to partner with a family vacation planner? Read on!

When and why a family vacation planner may be a smart idea:

  1. When you’re planning that bucket list-worthy vacation and you want it to be epic. You know the type of trip I’m talking about: that dream African safari or that once-in-a-lifetime adventure in Patagonia. Maybe you want to check out the Galapagos Islands or perhaps you want to spend a full month in Europe. You’ve heard me suggest travel insurance for this type of expensive, dream trip. I also suggest a family vacation planner for essentially the same reason: it’s just too important a trip to mess around!
  2. When you need a destination vetted: A good family vacation planning service has been on the ground at destinations that can be tricky to figure out on your own. An example that comes to mind: Iceland is a country that’s easy to travel in but hard to picture before you get there. While it’s easy enough to explore Iceland by camper van, it’s more complicated to find the right-for-you hotel rooms should you want to travel in more comfort. I recently referred a traveler to a trusted family vacation planner to book Iceland hotel rooms, since I know this planner has stayed in nearly all of the best ones!
  3. When you simply don’t have time to plan: We’re all busy people. Maybe you simply don’t have time to plan that family vacation that deserves careful preparation. Maybe you simply don’t enjoy the planning phase of a trip. It’s a common misconception that only novice travelers use family travel planners. I know (and have referred) very savvy travelers to planning services. It’s okay to come to the planner with lots of ideas and recommendations…they can work with you whether you need a lot of help, just a little help, or something in-between. Planners are well-used to helping people who are used to doing it all themselves.
  4. If you’re looking for value (but not a quick deal): Value seekers will do well with family vacation planners. Deal seekers, not so much. If you’re truly looking for the cheapest Caribbean spring break package or the lowest cost flight to London, DIY is best. But if you are willing to pay for value, which, to me, means trusted advice and the peace of mind of knowing that what you’ve paid for will provide your family with the best experience, a planner is the right move.

How to work with a family vacation planner:

Email us! If you have a family vacation question, we encourage you to reach out via email or Facebook page. Often, all you need is a little encouragement–you got this!–or a quick bit of advice. But we can also let you know when we think a family vacation planner will best serve your needs, and, with your permission, can refer you to our favorites. A family vacation planner starts by getting to know you and your travel needs in an informational phone call, and services can be set up from there. Give it a try!

Have you worked with a family vacation planner? What was your experience?

The Wizarding World at Universal Studios Hollywood: What to know before you go

If you have kids who live and breathe all things Harry Potter, and you can’t take them on a trip to the motherland, the Wizarding World of Harry Potter at Universal Studios is the next best thing. With the Wizarding World is now open on both coasts, we opted to check out Hogwarts and Hogsmeade in Hollywood. Read on for our best planning tips:

wizarding-world

Don’t forget to budget time for one of the best things to do in Hollywood, the Museum of Illusions, plus additional fun in the greater Los Angeles area!

Rides at Wizarding World of Harry Potter: 

There are two rides at the Wizarding World of Harry Potter, both of which are pretty tame by theme park standards. However, here’s what you should know about each:

  • The Flight of the Hippogriff is Universal Studios Hollywood’s first outdoor roller coaster. It is family friendly and appropriate for younger muggles over 36 inches tall.
  • Harry Potter and the Forbidden Journey at Universal Studios Hollywood takes place inside Hogwart’s Castle. This 3-D adventure is perfect for diehard Harry Potter fans who can brave the Quidditch pitch, Whomping Willows, dragons and dementors. We loved it, but there’s a lot of twisting and turning, and some of us felt a bit queasy afterward. If you get motion sickness, know this in advance!

Shopping inside Wizarding World:

Normally, souvenir shopping wouldn’t get more than a cursory mention in one of my posts…after all, no one comes for the shopping. Not so at Wizarding World! Shopping for Harry Potter souvenirs is truly part of the fun at Wizarding World, and you’ll want to take time to do some browsing. Be sure to go into the various shops, such as Honeydukes candy shop for some chocolate frogs, Bertie Bott’s Every Flavor Beans, chocolate cauldrons and more. Inside the castle and as you exit the Forbidden Journey are where you will find Filch’s Emporium of Confiscated Goods. I could have spent hours in there! You can purchase clothing, house crest banners, toys, games and replicas of the movie props.

If your kid (or you!) want to buy a wand, do it early. Why? You can use interactive wands (the ones with the specially marked sticker on the box) throughout the Wizarding World. It’s really fun to perform spells at any location with an emblem on the ground. There’s always a Universal employee stationed nearby to give you tips.

To get a wand, you can either go through a wand ceremony (where you wait in line to watch the ceremony where one person is picked to be the recipient, then buy your own if you weren’t picked), or you can go directly to the wand shop. If you want to watch the ceremony, we suggest making this your first stop.

The wand shop is usually crazy crowded, but it’s also jaw-dropping to see the wand boxes literally stacked floor to ceiling. Wands will set you back $50 each (yes, really!) but it’s one of those things you should probably just budget for, because once in the Wizarding World, they’re hard to resist!

This video was created with ProEditors…learn more about creating your own!

Food & drink of wizards: 

Like shopping, eating is a big deal at Wizarding World. There are all kinds of edible treats from the candy in Honeydukes to the restaurant and pub, as well as Butterbeer. In the Three Broomsticks restaurant, you’ll find the Hog’s Head (bar), but also English fare for the whole family. You can snuggle up with a drink in a cozy booth or spot in front of the fireplace. We found it expensive but fun to eat a meal in the Three Broomsticks.

Wizarding entertainment:

On the Hogsmeade stage you will find some entertainment throughout your visit. Some of the Hogwarts choir students (one from each house) perform with their large croaking frogs. You can also cheer on the Beauxbatons and Durmstrang students as they get the crowd excited for the Triwizard Tournament. After each performance, you can take photos with the singers and dancers.

Dealing with crowds:

Universal’s Front of Line pass will be worth your while if you’re visiting during peak season (summer) or just about any time in the first months of the park’s opening, even though there are only two rides in the park. The pass is good for both rides, and lines are definitely long. It also includes front access to shows, saving you time (as you won’t have to hold seats). These passes start at $199. There is a single rider line available for The Forbidden Journey. There’s a VIP pass as well, which gets you all the perks of the Front of Line pass, plus a guided tour, breakfast, and lunch, but at over $300 a ticket, we don’t see the value.

Buying tickets:

As with most theme parks, Universal Studios gives you an array of options for ticket purchase (in addition to the aforementioned Front of the Line pass). Always buy tickets online ahead of time if buying directly through Universal to save some cash, but if you plan to do anything else in the greater Los Angeles area, do as we did and use a Go Los Angeles card attraction pass. A 3-day card gives you a day at Universal Studios, which you can upgrade to a Front of the Line pass should you desire. We loved that we didn’t have to wait in the ticket line at all: cards are fully integrated with the Universal Studios Hollywood ticket turnstiles.

Where to stay: If budget allows, consider staying in LA style with luxury villa rentals Los Angeles. Or, staying at a Preferred Hotel gets you early admission privileges, and may even get you shuttle service to the park (in some cases). What we like: there’s a large selection to choose from, making it possible for families on all budgets to book a Preferred Hotel. Be sure to use hotel loyalty programs when you book to ensure you come away with points as well as a great vacation!

Read also: our tips for Universal Studios Hollywood!

Pin for later!

wizarding-world

Photo credit: Prayitno

Traveling the Canadian Rockies on VIA Rail

Overnight passenger train travel can be more expensive and slower than air travel today. So why should you go? And where?

Train across Canada: after spending two nights traveling the Canadian Rockies on VIA Rail‘s Canadian, the ‘why’ is easy to answer: in an age when traveling to a destination has become only about getting from Point A to Point B in a rushed, often stressful manner, a few days (or more) aboard a passenger train is a vacation in itself. The pace is relaxed, the scenery can be fantastic, and the service is friendly. After my experience aboard The Canadian, I would venture to say passenger train travel is in fact the sole remaining mode of idyllic transportation from the golden age, outlasting air and cruise travel.

The Canadian

Incorporating a VIA Rail journey into a Canadian vacation itinerary will greatly enrich your trip. There are many routes to choose between, the longest being the four day journey from Vancouver to Toronto on the Canadian. We opted for a fraction of this trip, embarking in Vancouver and departing in Jasper, Alberta (then returning on the same route after days of sightseeing in the Canadian Rockies). The 20-hour one-way trip was spent taking in the scenery from one of several observation cars with 360 degree views, dining in the relaxed yet elegant dining cars, getting to know fellow passengers, and sleeping, reading, working, or napping. We found that the ‘rail level’ views and relaxed pace afforded a more intimate experience with the British Columbia and Alberta wilderness.

observation dome

Who to take with you:

If you’re bringing kids, I wouldn’t recommend this trip for kids under age six (though as always, parents know their own children best). During the rail trip, passengers are definitely confined to a series of train cars, and young kids would certainly get restless. Is there enough for older kids to do? Here’s what we found: a variety of board games in the ‘activity cars’, on-going snacks and juices in the lounges, and interesting sights out the window, whether it be scenery whizzing by or temporary stops at stations or through towns. In other words: not a lot of on-board entertainment.

If you travel with kids, we recommend downloading a few movies onto a computer, iPod, or iPad, and bringing plenty of reading material, activity books (such as coloring books) and card games. Plan on several hours between each meal that you’ll need to fill. Expect a primarily-adults-only passenger list: during our October trip, we saw only two children aboard the Canadian. This is not to discourage families from bringing kids: rather, know you’ll need to bring diversions and entertainment as needed. WiFi was not available aboard our train, though 3G and 4G service could be found via roaming off and on.

panorama car

Which fare to book:

Determining which fare is right for you can be tricky. On the Canadian, there are two basic options: sleeper or economy. In economy, you’ll get a seat that reclines, access to an observation car with upper deck, access to a lounge with tables and chairs, and the option to buy food at the Starlight Cafe, serving meals and snacks to go. Passengers sleep in their seats, and share bathroom facilities. Economy is obviously the more affordable option, but quite frankly, didn’t look too appealing (despite the fact that VIA Rail seats are considerably more comfortable than airline seats).

Sleeper fare offers three bed configurations (each a different price) in the Sleeper Plus category. Passengers can opt between a one-passenger or two-passenger private cabin, or a semi-private upper or lower berth (closed with curtains). We experienced Sleeper Plus in a two-passenger cabin. We had a tiny-yet-functional cabin space with two chairs and a large window, a private bathroom with toilet, and a sink. Also included: a small amount of storage space and two outlets (yay!). In the evenings, a train steward comes by to lower your beds, which in the two-passenger cabin is bunk-bed style: upper and lower single beds. Beds are fully made-up each evening, and very comfortable (provided you’re not quite tall).

two passenger cabin

The one-passenger private cabin features one bench-like seat that flattens to accommodate a bed, plus a sink and toilet (the latter of which features a cushioned cover to become an ottoman during the day, but is covered up by the bed at night…a definite downside). Both the two-passenger and one-passenger cabins share one shower per car.

The last sleeper option is to book an upper or lower berth. These compartments feature bench seats (two facing each other) during the day, which fold out to become a lower berth bed at night. The upper berth bed folds out from the wall by the ceiling. These berths are made up at night and feature thick curtains for privacy. They share a public toilet and shower (one per car).

VIA Rail food

All Sleeper Plus fares include meals in the dining car (breakfast, lunch, and dinner, depending on when you’re onboard), snacks in the lounge, access to several observation cars and lounges, and complimentary champagne and appetizers upon embarkation.

Here’s a photo depicting 1. a two-passenger cabin made up for bed, 2. a lower berth made up for day, 3. coach seats:

VIA Rail

Which to book will depend on your comfort level (how much privacy do you need?) and your meal needs. We absolutely recommend the all-inclusive dining: if you opt out of this, you can buy meals a la carte in the cafe, but this option would get old (and expensive) if traveling more than one night. We enjoyed the privacy of a cabin, but could have been comfortable in an upper and lower berth as well. Keep in mind that only up to two passengers fit in a cabin: families of four or more will need to book two (or more) cabins or opt for two or more upper/lower berths in a row. (The latter option will allow for more freedom of movement between beds as needed, but you’ll only have access to a shared bathroom.

View our VIA Rail experience video:

Tips:

1. Carry-on sized bags only are allowed onboard. Full-sized bags will need to be checked, so plan accordingly. Cabins have space for up to two carry-on bags, but if you opt for a berth, you’d be better off with only a large tote or backpack.

2. Bring a water bottle to refill. While coffee, tea, and juice is on offer at all times, I found the need to also keep a water bottle filled to prevent dehydration. If you like to sip coffee or tea all day, bring a small thermos or insulated mug.

3. Bring a hair dryer if you’ll need one: in cabins, towels, shampoo, and soap are provided, but not hair dryers.

4. Be prepared for plenty of motion and some train noise at night. We slept surprisingly well onboard, but you’ll definitely feel the movement.

Date last visited:

October 2013

Fare cost:

Calculate Via Rail fares here. Definitely plan early and check for fare discounts, offered several times per year. What we found: VIA Rail is not more economical than flying, so you need to consider the fare cost a part of your vacation experience, not part of your transportation costs.

Directions:

If embarking in Vancouver on the Canadian, you’ll depart from Pacific Station. Located next to Science World, it’s easy to get here from SkyRail from either the airport or the Waterfront station in downtown Vancouver.

As I disclose whenever applicable, we experienced The Canadian as guests of the VIA Rail, for the purpose of review. All opinions are our own, and we hope our experience inspires and equips other traveling families to make great decisions about rail travel.

How to find the lowest airfare prices for any trip (STEP BY STEP)

Securing low airfare doesn’t have to be frustrating, stressful, or futile! Cheap flights are out there, if you know where to look and how to book! You can take control of your airfare purchasing by planning ahead…far ahead. Here’s how to find the lowest airfare prices for your family…consistently:

lowest-airfare

Step 1:

Be thinking about airfare even before knowing when and where you’re going.

To find the best airfare, I’ve found it helps to be set on only one of two criteria: when you’re going, or where you’re going. If you are flexible on one of these two factors, you’ll be able to snag competitive airfare.

Let’s use the example of a recent airfare purchase I made for a family trip to Cancun. In this case, I knew where we wanted to go, but I was flexible about when. I was able to start at an airfare comparison site to use their fare forecast predictor.

I like JustFly, an online travel agency that has an easy to use search field. On the site, I could see a calendar of fares from my point or origin (more on that later) and my destination. From that chart, I was able to see at a glance that the cheapest time of year for me to visit Cancun was August, and that the cheapest week in August was the third week.

If you are not flexible about when you can vacation (you know you have the last week of July, and that’s that, for instance), try to be flexible about where you go. Start at Airfarewatchdog and enter your home airport to see what destinations pop up on the low fare list. You can set email alerts for a few weeks or months to see what rises to the top.

Note: Let’s say you don’t have any freedom at all: you know you have the last week of July off, and you know you’ll be visiting Grandma in Florida. Is there still hope for you? Yes. By following the next steps below, you can still do as well as is possible for yourself.

Step 2:

Once you know when and where you’re vacationing, determine exact travel dates.

The key here is that you’re still flexible. You’ve identified the week you’re vacationing, but fares fluctuate even in that window. Start at a booking site that specializes in search tools, like Yapta or the aforementioned Kayak. Put in your information, and click on the ‘flexible about dates’ icon. This will present you with fares within a 2-3 day window of your dates. See what comes up.

Once you’ve identified some flight options, open a new window to view each viable fare directly from its airline website. As each home page opens, scan it for promo codes or other web-only discounts. Search on the airline sites the same way you searched on the booking sites, with date flexibility. There’s a decent possibility of finding the fare lower here, or of finding options not listed on the booking site.

Most airline sites have quite decent calendars to show higher or lower fares on each side of your travel date. Most will show one-way fares, which is fine as long as you remember that your return fare (even if the same day of the week) may be dramatically different than your arrival fare. Most offer steep discounts if you travel for less than a week or more than 8 days with low fares on Tuesdays and Sundays, for instance. Usually, traveling to your destination on a Tuesday is the cheapest day of the week, but they’ll ding you on the way back, so plan to fly home again on a different day of the week. For an example, let’s return to my trip to Cancun: I planned to travel Tuesday to Tuesday, but fares were almost double to return on that day, so we opted for Sunday to Sunday…with a slightly more expensive arrival fare, but significantly lower return fare. Remember, we shopped this while our dates were still flexible.

Continue to Step 3!

Pages: 1 2