Tips for celebrating the holidays at Disneyland Resort

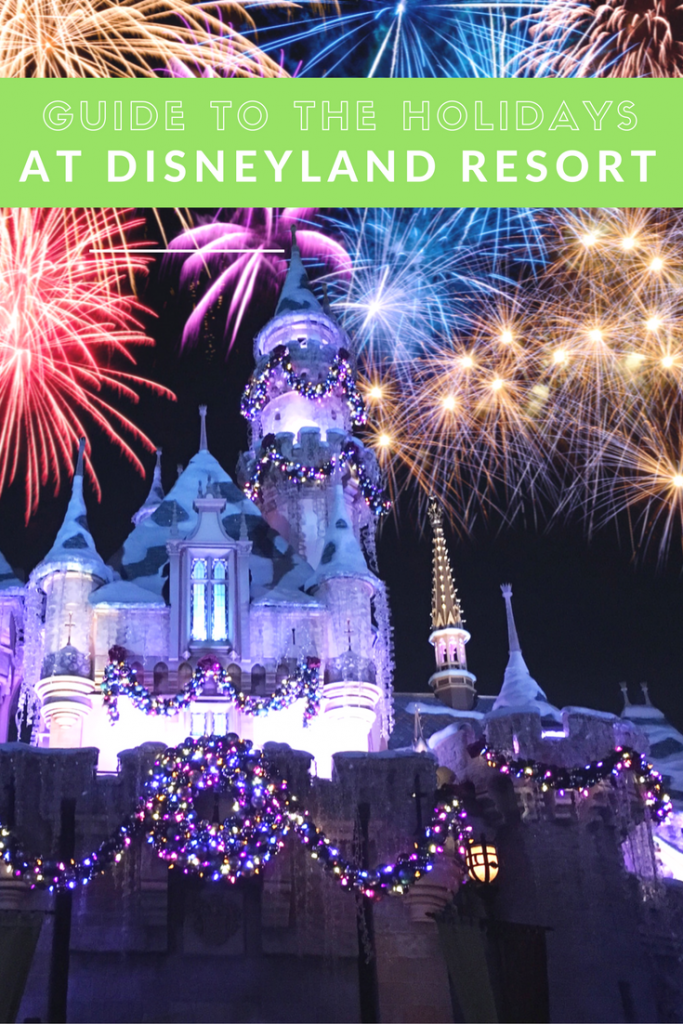
The holiday season truly is magical at the Disneyland Resort, bustling with special events, entertainment, and decorations. It’s also bustling with holiday crowds, which can certainly impact your experience. Here’s how to enjoy all the holiday magic while navigating the masses.

guide to the holidays at Disneyland

Tip 1: Know when to go

The holiday season at Disneyland and California Adventure officially launches in early November and continues through the beginning of January. The crowds will be lowest before December 20th, which is the week most kids are out of school.

Tip 2: Know what not to miss

The Festival of Holidays continues to be a hit at California Adventure, which celebrates the festivities of many cultures at kiosks offering multicultural crafts and holiday food, and performances showcasing music and dance. Families can even join in the fun during select performances, learning holiday dance moves. Think of the Festival of the Holidays as a cross between the Food and Wine Festival and a mini, seasonal World Showcase where you visit kiosks instead of full pavilions.

Tip 3: Know what to expect from nighttime entertainment

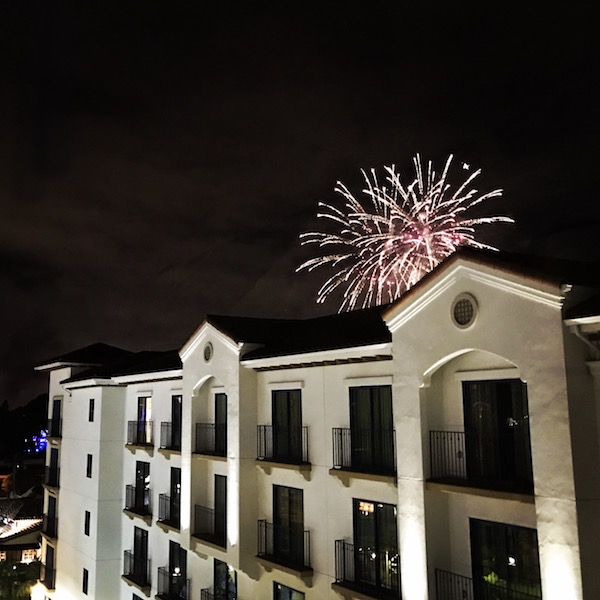
Families can expect a holiday-themed World of Color at California Adventure nightly. Over at neighboring Disneyland, Wishes is now Believe…in Holiday Magic, lighting up the night sky with fireworks, along with snowfall on Main Street. FastPass is available for World of Color shows, which are two-times nightly during the busy holiday season.

Tip 4: Know which attractions will be ‘dressed’ for the holidays

Three rides get holiday overlays during this time of year, including Haunted Mansion, which gets a Tim Burton Nightmare Before Christmas theme, It’s a Small World, which adds carols from around the world and magical lighting after dark. Lastly, the Jungle Cruise turns in to the Jingle Cruise during the holiday season, with special details in the already-detailed theming of the ride, and holiday jokes added to the script.

Bonus: Don’t forget to enjoy CarsLand during the holidays, with holiday ‘wraps’ on Luigi’s ‘Joy to the Whirl’ and Mater’s Jingle Jamboree.

Tip 5: Know where to see Santa:

In California Adventure, the Redwood Creek Challenge Trail has the usual offerings of fun hands-on activities for kids, but now includes a holiday-themed scavenger hunt where kids look for ‘presents’ along the trail (ask a Cast Member for a sheet to get started), and kids can visit with the main man of the season…Santa. Santa can also be visited in Disneyland park at Critter Country.

Tip 6: Know how to navigate parade routes:

To view the Disneyland holiday parade, Christmas Fantasy, plan to find seating in designated areas a full hour before parade time. Ask Cast Members where you can sit or stand to view; they rope off disabled viewing areas and won’t allow families to watch in certain high traffic spaces. Once the parade starts, Cast Members will move along foot traffic, so don’t plan to watch on the fly. You also cannot watch in store and restaurant doorways, so don’t try! However, if you’re within a store, you can usually still see quite well…this is a good option if you find yourselves caught without a viewing location.

Tip 7: Know how to view World of Color

If you’re staying in either park for the nightly Holiday Magic or World of Color shows, prime viewing areas will fill up about 1.5 hours beforehand. For World of Color show, get a FastPass to World of Color (available by Grizzly Rapids in California Adventure by about 9:30 am) or book a dining package at a California Adventure restaurant. If you plan to simply stake out a spot, look along the benches by California Screamin’ or Ariel’s Grotto, but get there early!

Tip 8: Know how to view Holiday Magic

To watch Holiday Magic in a prime location, plan to start queuing a full two hours early. You’ll need to wait for the rope to drop in front of the castle to view there (then you’re permitted to put down a blanket and sit), or you can find a curb along Main Street. If you want to exit quickly afterward, I recommend grabbing a spot (again, well in advance) at the train station platform by the entrance to Disneyland. There are no dining packages available for the fireworks.

Disneyland California Adventure MaxPass and how to use it

Have you heard of the new Disneyland and California Adventure MaxPass yet? Here’s what you need to know about Maxpass, in order to maximize your time in the parks.

disney maxpass

First, the facts of Disneyland California Adventure MaxPass:

Disney’s optional MaxPass designed to do two basic things: 1. take FASTPASS paperless in the parks, and 2. streamline your PhotoPass experience. Here’s how:

With MaxPass, families can reserve FASTPASS tickets for rides on the MaxPass app, which eliminates the need to run across the parks to get FASTPASS tickets out of the kiosks. I know what you’re thinking…how will we get our steps in now? MaxPass does not alter the way FASTPASS works: you’ll still only be able to hold one FASTPASS at a time (unless you’ve reached the window of time in which an new one is available), and the rides offering FastPass are the same as before.

I tried out the Maxpass system recently, and I did notice a few small changes going paperless. The longest period of time between making reservations is an hour and a half with MaxPass (instead of two hours with paper FASTPASS), and the return time windows are often sooner than with paper FASTPASS.

And if you use MaxPass, you can have your park photos (you know, the ones taken by official Disney photographers) and character photos put directly onto your app account, instead of having to buy them later. (You have until your park tickets expire to download them). You can also scan your ride photos and put them in the app, too.

When I used the app, I had trouble with the ride photo option: it notes that it can take up to 20 minutes for ride photos to appear, but I didn’t get mine until the next morning…hopefully this is just a temporary or isolated glitch.

How to get MaxPass:

  1. Download the Disneyland app.
  2. Enter the park you’re visiting using your tickets.
  3. Open the app.
  4. Tap the circular character icon at the bottom of the screen (it looks like a Mickey).
  5. Sign in to the app with your Disney account (or create one).
  6. Tap “Get FASTPASS”.
  7. Select all family members who want to use the Disney MaxPass feature (if someone is not listed, link their ticket or pass).
  8. Purchase the Disney MaxPass feature (right on the app).
  9. Go to the FASTPASS section and reserve.

MaxPass facts and tips:

  • MaxPass is optional and it’s a paid upgrade. I’m disappointed about this, because I loved that Disney resisted adding paid upgrades until now. It’s $10 per family member. (I’ll get to whether I think it’s worth it in a bit.)
  • The regular (paper) FASTPASS system is still in place. You don’t have to upgrade to MaxPass.
  • You can pay for MaxPass as an add-on when you purchase your park tickets, or later, right on the app.
  • MaxPass is unlike Magic Bands (in DisneyWorld) in that you must reserve your FASTPASSes the day-of, in the parks, not before your trip. You can’t even do it in your hotel room….you must be in the parks (though either park is fine).
  • If some members of your group are using paper FASTPASS instead of MaxPass, you can still link those people to your MaxPass. You won’t be able to reserve FASTPASSes for them, but you can see their schedule and return times.
  • If you have problems with MaxPass, any Guest Service location can run tech support.
  • You’ll want to get the app and register as a user before your trip. It’s a hassle to do in the parks.
  • You can’t get World of Color or Fantastic FASTPASS with MaxPass…just rides.
  • You’ll absolutely need a portable charger to use MaxPass, as it drains your phone! And it takes data, because the WiFi in the parks is simply not adequate.
  • If you have kids who don’t have their own phones, one adult can ‘hold’ their FASTPASSES on their device (but the kids will still need to ‘buy’ MaxPass).

Disneyland_hotel

Is MaxPass worth the upgrade? It is, if you answer yes to at least a few of these questions:

1. Your family often changes plans mid-day (you can cancel FASTPASS reservations right on the app and start over).

2. You hate running around to physically get passes.

3. You want to see all available ride and return windows at once (the handy map on the app shows you all this, plus your personal reservations for your whole group). If this is your main ‘want’, simply upgrade ONE person to MaxPass.

4. You often buy PhotoPass photos or ride photos (making the $10 worth it for unlimited downloads).

Tip: I recommend trying MaxPass on one or two phones to start with, and if you love the system, splurging for everyone in your group.

How to physically use MaxPass to get FASTPASS:

Follow the prompts one the app to reserve FASTPASSes (you’ll see a list of all available, plus their return windows). If you already have a FASTPASS, it will not allow you to get another one (unless you’re in the time window).

At your return time, go to the FASTPASS return lane and scan your FASTPASS at the computer kiosk at the entrance to the return line (a Cast Member will be there to assist you). Don’t put your phone away yet, though, because you’ll need to scan it again before loading (just like you have to show your paper FASTPASS twice).

After your ride, your FASTPASS will disappear from the app. In the event of a ride closure or breakdown, you’ll automatically receive a Multiple Attraction FASTPASS, which is good for one ride on any attraction with FASTPASS.

Have you tried the new MaxPass system? Do you like it?

Disneyland hotel pick: Courtyard by Marriott Anaheim Theme Park Entrance

The following guest post is written by Pit Stops for Kids contributor Elizabeth Bickford.

Need a Disneyland hotel pick? The Courtyard by Marriott Anaheim Theme Park Entrance has one of the best locations and properties combined in the Disneyland resort area! We had a great stay with our two daughters ages five and seven. The property is within walking distance and is surrounded by several dining options which make it easy to keep your costs low when spending several days at Disneyland!


hotel pool and waterpark

Check in at the Courtyard by Marriott:

I have to say this was one of the easiest check-ins ever! We even checked in during a rainstorm and were able to get in to our room within several minutes! The property offers valet only at a reasonable price of $20 per night – reasonable considering parking at the resort at Disneyland alone is $18! So for two dollars more you walk straight into Disneyland and you don’t have to break down any strollers or hop on any buses – I think it’s a great deal.  As a bonus, in the lobby, while checking in was an interactive coloring station where the children could paint and play while we received our room keys. There was also a cute library and game center set up to occupy your family.

The room review:

I was extremely impressed with the size of the rooms as well as the furnishings.   Each room sleeps six people! The room we stayed in offer two queen beds and a bunk bed! The children were delighted to have this option!  We had a great view overlooking the water park and Disneyland resort – we were able to watch the fireworks here one night when the rain was too much to stay at Disneyland.  We were so happy to be able to enjoy Disneyland from the comfort of our room.

courtyard room

Another great amenity at the Courtyard by Marriott Anaheim Theme Park Entrance was our room came with the option of two showers! This was great for coming in from the pool. We were able to get both children quickly showered and dressed so we could head right back out and enjoy all the fun that Anaheim has to offer!  The only negative was my children manage to both get soap in their eyes at the exact same moment which was quite comical I’m sure if you could see me running back-and-forth wiping children’s eyes as they bellowed for me. However, I think the likelihood of this happening to anyone else is extremely low!

The room also offered everything you would need for an extended stay; there was a mini fridge, coffee machine, and a microwave! The toiletries and complementary items were all of high quality and brand-name.

The property: What to expect at the Courtyard by Marriott Anaheim Theme Park Entrance

Overall, this was one of the most child-friendly properties that we have stayed at in the area. Not only is there a giant water play structure but there are two waterslides, a full pool, Jacuzzi and a one foot splash pool for the kids!  We found that many guests were able to find something for their children of all ages on the pool deck.  We also saw that this was one of the best places to catch fireworks if your room did not have a direct view – remember to check out the times for the fireworks so you can plan to get a front row view along the fence over looking Disneyland.

The property also housed a convenient store, quick market, and a bistro. The restaurant was open for certain dining hours only and it was not open throughout the entire day. We had a late start one morning and missed the bistro hours – however, there are so many dining options just outside of the property that it did not cause an issue during our stay.

anaheim theme park entrance hotel

Additionally, guests can use the on-site exercise room and the valet service is exceptionally quick. For valet they recommend texting the valet desk and they should provide an estimated time of arrival for your vehicle. This worked great and even though it was raining throughout our stay we did not get a drop on us when heading to our car.

 Suggestions for your stay:

If you are looking to stay on this property we highly recommend bringing a stroller for the young ones. The walk is extremely easy but, the stroller made it less stressful when crossing the main road. There is plenty of room in the entryway of the hotel room to store the stroller. Additionally, we recommend taking advantage of the in room amenities like the refrigerator by bringing some of your own items to offset the cost of Disneyland! Lastly, I would highly recommend Mimi’s café which is inside the same parking lot as the hotel – they offer all day breakfast which was great for the kids. It was one of the closest and most reasonably priced restaurants (other than McDonalds) in the area. We were even able to bring the food back and save it for the following morning.

I have to say, this was one of the best properties we have stayed at in the Disneyland Area. I highly recommend this property all year round as we were here in the rain and the water park was still heated to a nice temperature allowing the children to enjoy all that the property had to offer. Additionally, for the quality of the hotel – the location cannot be beat by an off property accommodation.  We cannot wait to go back again – my daughter has already requested a stay here as your birthday present this year!

Disclaimer: I received a complimentary two nights stay at the Courtyard by Marriott Anaheim Theme Park Entrance in order to complete my review, however all opinions stated are my own.

Why you should get the Disney Dining Plan

Most self-respecting Disney budget blogs will tell you the Disney Dining Plan is not a savings. If you plan to stay in a condo with a kitchen and cook meals in-house, pack peanut butter sandwiches for the parks, and eat at quick-service restaurants only, they’re right. But while the plan may not give you a lower bottom line while enjoying the parks, we believe it does add to your overall value, especially if you’re already staying on-site in a Disney resort. This is why you should get the Disney Dining Plan…even if it doesn’t save you money.

disney-dining-plan

Let’s break the Disney Dining Plan down (henceforth to be known as the DDP):

To get it, you need to have purchased a Magic Your Way vacation package, which is the first strike against it in the eyes of a budget vacationer. Packages are often more expensive than booking your vacation a la carte. However, with Disney, this is not always the case. If you’re staying in a Disney hotel, and booked your stay for at least 5-7 days, most likely a package is the best deal.

You can add one of several DDPs to your package. The cheapest is going to be the Quick-Service Dining Plan. Sounds good, right? Skip it. It only includes two meals per day, and doesn’t include any of the character dining or table service restaurants, which is where the value of the DDP comes into play (and remember, you’re staying on-site and don’t have a kitchen to cook that last meal).

“Grilled Vegetable Sandwich”, Tomorrowland Terrace, Disneyland Park

The next option is the standard DDP. It includes 1 quick service and 1 table service meal per person, per day, plus 1 snack each. Table service meals can be redeemed at character dining. You can add signature dining, but it will ‘cost’ you two table service points. This is a nice option, but remember, you’ll still be on your own for one meal per day. We find this plan to be the sweet spot, and simply buy some breakfast items to eat in the room.

You can also upgrade to a deluxe (3 meals per person per day), premium, or platinum plan, which give you more in the signature dining area, but the costs outweigh the value, unless your prime reason for being in Disney is to dine.

Prices for any plan depend on the number of days and ages of people in your party. Calculate it all here.

Now that you know what the DDP includes, how do you use it to the top value?

disney-dining-plan

  1. Use the DDP to take park breaks. Leave the park, hop on the monorail, and enjoy a more relaxed meal in a Disney resort. This gives you a chance to see the inside of some of the deluxe resorts without staying there, and gives your family a breather from the theme parks. Our favorite picks: Ohana at Polynesian Resort and Whispering Canyon at Wilderness Lodge (take the boat over!) For a quieter meal, opt for 1900 Park Fare when it’s not a character dining time period.
  2. Use the DDP to enjoy affordable character meals. The first time I booked a character meal at Disney without the DDP, I almost fainted when I got the bill. Are you kidding me, Disney? But with the DDP, you feel like you’re getting a downright deal. Our favorite tip: book a character meal in your favorite park before park opening. Once you’ve eaten, you’ll enter the park ahead of the wave of crowds.
  3. Use to DDP to curb kids from whining for snacks. Snacking is where I get really worn out at Disney. I just get so tired of watching the budget (disappear) and saying no. When we have the DDP, each kid (and grown up) gets one snack per day. That doesn’t sound like a lot, but it goes a long way toward morale. Toss granola bars in your backpack for those other 2,000 times per day people want snacks.
  4. Use DDP to truly experience all of the Disney magic. There’s something so wonderful about taking a tired, sweaty family and bypassing a long counter-service line in favor of sitting down in air-conditioned bliss. The first example that comes to mind: the day we were touring Epcot World Showcase, were practically at the end of our ability to walk/talk/be civil, and ducked into the sanctuary of Le Cellier for an elegant family meal. Everyone was in heaven. Ditto for stepping into Tusker House in Animal Kingdom or Ohana to watch the Magic Kingdom fireworks.
  5. Use DDP to have an amazing meal out. If you have babysitting services, use your DDP to have a signature meal out with your significant other. If not, spurge on a dinner show (our favorite is Hoop Dee Doo Revue). It’s already built into your plan, and using this option truly feels like you’ve unlocked a new ‘level’ of Disney.

disney-dining

But wait, you’re not done!

Now that you’ve decided which plan is best, swallowed the cost of it, and know how to use it to enhance your trip, you need to make Advanced Dining Reservations (ADRs). At Disney World, this is easier than ever, and at Disneyland Resort, it’s also cut-and-dried. Make ADRs six months in advance, and use this FAQ to get started.

Once you’re at Disney, each receipt you receive from a Disney Cast Member when buying meals will show your DDP balance. All participating restaurants are listed and have a DDP symbol (but don’t worry…it’s just about every restaurant).

Ready to travel? Sign up for our FREE subscription list and receive an air travel and road trip ‘cheat sheet’

Tour any Disney theme park attraction in 15 minutes or less (all day, any day)

Note: For current FastPass+ tips for touring Walt Disney World parks, please see our Understanding FastPass+ post. The below information still applies to touring Disneyland Resort parks.

No one should wait more than 15 minutes for any Disney theme park attraction…no matter what season, day, or park. Touring Disney line-free can be done, even during the busy Spring Break, summer, and holiday seasons. In fact, my kids were unaware lines even existed at DisneyWorld and Disneyland until they were well into their school-aged years, and that’s exactly as it should be for great family Disney vacations. Below, I’ll show you how to avoid Disney lines in five steps by providing a ‘real world’ example of how we toured Disney Studios during Spring Break with ride lines under 15 minutes (so you can, too).

Disney Studios FASTPASS

Get to the park at Rope Drop.

Sorry, late-risers, but this is non-negociable. If your park of choice opens at 9 am, as Disney Studios did the day we toured it, you need to be passing through the ticket stalls no later than 8:45 am. (Remember, parks have ‘soft’ openings; their main streets and entrance areas open earlier than their ‘lands’.) Park crowds snowball (and alarmingly fast!), and it’s important to stay ahead of the curve in the morning, to ensure you’re still ahead by midday. (Trust me.) If you’re arriving to your park by Disney transportation, I recommend leaving your resort one hour prior to park opening. During our Disney Studios day, we left Animal Kingdom Lodge at 8:15 (a bit late, but we had good bus karma), arrived at Disney Studios at 8:30, and were through the ticket booth five minutes before 9 am.

Ready to travel? Sign up for our FREE subscription list and receive an air travel and road trip ‘cheat sheet’

Use FASTPASS.

Disney’s FASTPASS is key to avoiding lines, and I’m always amazed to encounter park guests who still don’t realize what it does and that it’s free. Here’s how FASTPASS works, in a nutshell:

1. For rides offering FP (look on your park map for the FP emblem), locate the FASTPASS Distribution kiosks. They’ll be next to the ride entrance or exit.

2. Insert your Key to the World Card or park ticket (whatever you used to enter the park), and the kiosk will issue a FASTPASS ticket (and your own ticket back). You can gather up your whole family’s tickets and do them all at once.

3. Check the FP ticket for your return time. It will be an hour window. Disney Cast Members will tell you you need to return to ride within that window, but we have found you can return any time after the first time listed (they don’t ‘expire’). However, I’ve heard this may change, if it hasn’t already, at least at DisneyWorld.

4. Your ticket will also show a time you may secure your next FP or set of FP. (That’s important too, as you’ll see below.)

5. Return to the ride at your appointed time window, and enter the FASTPASS Return line. You’ll need those tickets, so hang onto them.

6. Bypass the stand-by line, and enjoy the ride!

Tower of Terror attraction

Prioritize your FASTPASS ride options.

Before you enter the park, you’ll want to identify your top four priority FastPass-enabled rides. Obviously, your choice will depend on your family, their needs (and their heights). On our Disney Studios day, our FP plan was: Tower of Terror, Rock ‘n Roller Coaster, Toy Story Mania, and Star Tours. Our goal: to ride all four, with a 15 minute or less wait, and visit other attractions in-between, all before noon. Here’s how we executed it:*

1. Upon entering the park, we went directly to Rock ‘n Roller Coaster (next to Tower of Terror). We secured FP times for RnR (return time of 9:35-10:35), then walked right over to Tower of Terror and rode stand-by (5 minute wait). Upon exiting Tower of Terror at 9:15, we noted that the stand-by line wait time was now 30 minutes (and we’d note that by 9:30, it had grown to 70 minutes). Remember that snowball effect? It’s never more pronounced than during Spring Break or holiday times!

2. After exiting Tower of Terror at 9:15, we grabbed some breakfast at the nearby counter service restaurant (no lines or crowds at this hour), and while everyone was eating, I walked across the park to Star Tours to secure our next set of FPs, even though we’d yet to use our first set. (Remember, you don’t have to wait until you’ve used your previous FPs to secure new ones. The time you’re ‘released’ to secure new FPs is printed on your most recent FP.) After I returned, we walked over to RnR at 9:45 to ride.

3. After exiting RnR at 10:00, we headed toward Star Tours, pausing to let the kids play at the Honey I Shrunk the Kids play lot in the shade until our allotted FP time (10:25-11:25). While they played, I watched the clock in order to cross the street to Toy Story Mania as soon as we were allowed another set of FPs.

4. Once I’d secured the Toy Story Mania FPs, we walked over to Star Tours and rode at 10:45. After exiting at 11 am, we caught the MuppetVision 3-D show (stand-by wait: 5 minutes), and exited at 11:30, just in time to use our Toy Story Mania FPs (11:45-12:45).

5. We rode Toy Story Mania, and were ready for lunch, having (peacefully) enjoyed all our ‘biggies’ at the park, by 12:05 pm.

*To execute our plan, you’ll need either two adults, or one adult and one tween or teen who’s willing (and trusted) to traverse the park.

FASTPASS Disney

Save shows, parades, and ‘low priority’ FP rides for the afternoon.

With all your high priority rides done, you’ll be able to spend time in the afternoon watching shows that don’t include a wait time or taking in a parade. Or better yet, go back to your hotel for a swim or a nap!

If you know you’ll want to ride an attraction twice, make it your first stop.

If you’re sure you’ll want to ride something twice, secure FPs for it, then immediately ride it stand-by (your first ride should be your only stand-by ride all day during busy seasons).

If someone’s too short for a ride everyone else enjoys, do the parent swap on top of your FP.

To utilize the Parent Swap, simply tell the Cast Member outside the FP line of your intention. Proceed through the FP line, then have one adult wait with the child while the other members of your party ride. Afterward, the first parent can immediately ride while the second parent supervises the child, ensuring he or she doesn’t have to wait as long (and you don’t need to wait in even the FP line twice). As a bonus, the other members of your party can often ride twice in a row.

An exception for parents of small children:

If your children are small and the bulk of your time in the park will be on non-FP attractions that garner long lines (such as rides in Fantasyland, ToonTown, or California Adventure’s Bug’s Life), ride as many as possible directly after rope drop before the wait time reaches above 15 minutes. (In our experience, this rule of thumb ensures 30-45 minutes of ride time before Fantasyland and Co ‘snowballs’.) Once the ride lines creep above 15 minutes, get out and grab FPs! Better yet, send one adult to grab FPs while the other adult plays in Fantasyland.

Photo credit: DigitizedChaos and bartsworldv6.

How to tour any Disney attraction in 15 minutes or less

Disney Done Right: a spring break review of Lots to Do in Line

If your family is headed to the Disneyland Resort this spring break, you’re not alone. That’s the bad news! The good news is, there’s a brand new way to help kids handle long wait times in the Happiest Place on Earth.

lots to do in line: DisneylandWhen author and mom Meredith Lyn Pierce sent me Lots to Do in Line: Disneyland for review, I wasn’t sure I could endorse anything geared toward coping with long lines at Disney–after all, I’m a broken record in my instance that no matter the season, families need not wait in Disney lines at all. But then I read through Pierce’s book (also available in an app) and I changed my mind. (Not about Disney lines being avoidable–I stand by that!–but about the inherent value of Lots to Do in Line.)

I really like this book for two reasons:

1. It captures the playful and fantastical essence of Disney. Look around you in any Disney line, and you’ll see incredible detail, artwork, and creativity. Sometimes, the line is almost as fun as the ride! (But only for a few minutes.) Lots to Do in Line recognizes what Disney has done, and runs with it, creating ‘I Spy’ games, treasure hunts, and trivia for literally every ride at Disneyland and California Adventure. Even while sitting in our own living room, my kids instantly loved this idea: they were quizzing each other on ride lines based on past trips alone!

2. There are several ways to use and adapt it. I’m impressed enough that Pierce researched and wrote about all 63 ride lines in the parks, but I’m doubly impressed that she’s included ‘FP’ symbols to utilize when enjoying the Fast Pass line, rather than the Standby line (because not to beat a dead horse, but yes, yes, yes you should be in the FP line!). Plus, kids can earn points and keep track of scores with Lots to Do in Line (a huge plus for my family) and there are several ways to play (including individual rounds and team rounds). She didn’t mention challenging Disney Cast Members to trivia about their own line, but I totally would.

3. Sometimes, just sometimes, you really do have to wait. And when you do, this book is easy to pull out of a backpack or even pocket. The app is even better, as it includes occasional audio clues and prompts. Even if you’re not waiting in line for long, Lots to Do in Line is a great conversation starter (I bet those around you in line will want to weigh in!) and way to keep your entire family engaged in the Disney experience.

If you’re headed to Disneyland Resort this spring or summer, buy Lots To Do In Line: Disneyland
at Amazon
or download the app at iTunes!

Note: Lots to Do in Line now has a Cars Land supplement! Download lots to do in line in Cars Land!

As I disclose whenever applicable, I received one copy of the Lots to Do in Line book and app for the purpose of review.

Disney done right: Making the most of your Disney vacation

At Pit Stops for Kids, we’re big fans of Disney, but we know planning (and enjoying) a Disney vacation with kids can be overwhelming! In our upcoming series of articles, Disney Done Right, we offer our (kid and parent tested) tips for making the most of your time in the happiest place on earth!

1. Plan an extended visit. If possible, book at least one week at Disney World or three days (This is especially beneficial if the most expensive single cost of your vacation is getting there and back.) You just can’t do these massive theme parks justice with less time, and you’ll only exhaust yourself trying. (You can’t see it all in a week, either, but a month or more isn’t an option for most families!) A longer visit equals more downtime, and while you may think R&R is hardly the goal at a theme park, without it, you’ll be miserable by Day 3. We made sure to rest every day, and reserved one entire day for simply exploring and enjoying our resort. More time also leads to more inter-family harmony: if you have two days to devote to Animal Kingdom, for instance, you can focus on rides one day and dining and shows the next. It’s simply more relaxing when you’re not sprinting through the Florida humidity, agreed?

2. Stay on-site at a Disney property. Yes, I know it’s much cheaper to stay half a block awayfrom the main gates. And yes, I happily advice families to take advantage of the price and convenience of rental properties such as HomeAway whenever possible,  but in the case of Disney, I am a purist. Why? Because never is the adage ‘time is money’ more true than during a Disney vacation. And I’m not talking about Extra Magic Hour: when you stay on-site, you’re simply closer to all the action…and to your hotel room should someone (you, most likely) need a nap, a snack, or a dip in the pool. Plus, you can use Disney transportation and have the opportunity to add the Disney meal plan, not to mention the fact that most Disney resorts are like additional theme parks in themselves. When we stayed at Disney’s Port Orleans Resort, we did our own laundry, ate all our breakfasts in our room, and returned to the hotel every day of our vacation to rest and swim mid-day. I like to think staying on-site kept us sane. (Extra tip: if you have very young children in strollers, consider staying on the Monorail Line at the Disney World resort–the Contemporary, Grand Floridian, or Polynesian–so you don’t have to disturb sleeping kids and babies to fold strollers!)

3. Make (and follow) an itinerary utilizing planning tools. I admit it: I’m a schedule Nazi. But even a generalized itinerary for your visit helps you to make the most of your day. We’ve all seen people wandering the happiest place on earth, grumbling about what to do next, and we certainly don’t want to be them. Start by looking up the exact hours each park will be open for each day during your visit, figure out what shows and parades you want to see, and which restaurants you want to try. It makes a difference: the parks open earliest will fill up the fastest but also empty the fastest in the later afternoon, as everyone who attended the morning Extra Magic Hour jumps ship for another park later in the day: consider taking an alternate path from the masses. If you’re very ambitious, I can personally recommend Tour Guide Mike, an online planning tool and wealth of park information that will change the way you look at touring Disney parks. ‘Mike’ will give you the ideal days to tour each park during your visit based on a scientific-(ish) using factors such as time of year, projected crowd levels, park hours and events, and more. The small membership fee is well worth your money.

Expedition Everest4. Take advantage of shopping opportunities. No, I don’t mean you should get out your wallet every time you’re fed through a souvenir shop, although that’s up to you. I mean that Disney’s shopping areas signify two things: crowd control and extended hours. For instance: Disneyland and Magic Kingdom‘s Main Street typically stays open up to an hour after official park closing. If you were planning on browsing the shops (or even having a late dinner or evening dessert) at the end of your day, don’t make the mistake the other thousands of visitors will do: there’s no need to hit the shops an hour before closing. Use that final hour to ride attractions, then shop and eat during your ‘bonus’ hour…the same hour everyone else is filing onto buses and into parking lots.  Concerning crowd control: you know how Main Street (and Disney’s other parks’ equivalents) become jam-packed before and after parades and fireworks? So does Disney…which is why all their shops connect. That’s right: there are no walls between 99% of Main Street’s stores, which allows savvy visitors to walk straight through (in the comfort of air conditioning) instead of elbowing through the crowds on the street.

5. Visit with characters at the table, not in the parks. You can spend half your day chasing down Piglet and Pooh in Fantasyland, or you can meet-and-greet in style at the Crystal Palace while dining on stuffed french toast. Seems like a no-brainer to me. Same goes for those princesses your preschooler is bugging you for some face-time with. It’s a huge time-saver, and you and your family almost always get extra attention than if you’d waited in line in the Florida sun. (Extra tip: for dining venues inside parks, schedule your character breakfasts for approximately one hour before park opening. You’ll finish eating and be released into the park right before opening, giving you the jump on all the rope-droppers.)

Read more Disney tips on our Disney Done Right page!