Jamestown Settlement and Colonial National Historical Park

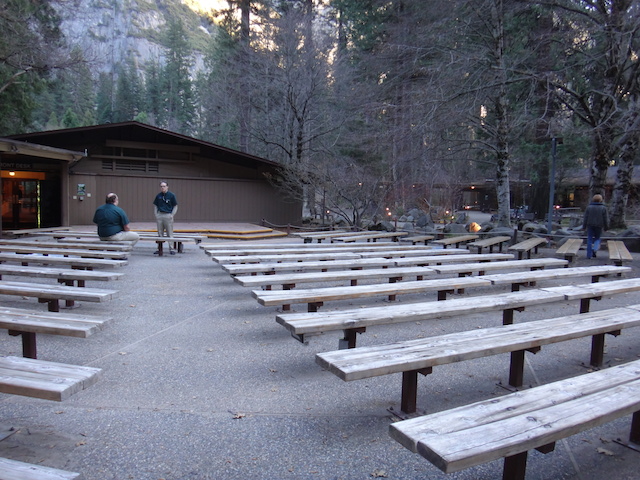
While visiting Colonial Williamsburg with kids, definitely budget half a day to visit Jamestown. Learning about this first viable settlement of Virginia rounds out the historical understanding of the area (the residents of Jamestown later migrated 10 miles to settle Williamsburg).

jamestown-with-kids

Jamestown is divided into two sections: the Historic Jamestowne Colonial National Historical Park is the National Park property, and features the archeological dig site of the actual Jamestown fort. The Jamestown Settlement is run separately, and features recreations of the colonists’ fort, a Powhatan village, and replicas of the three ships used by the Jamestown colonists. It also houses one of the most impressive museums in the area. Which to do? Both!

Start with the Jamestown Settlement:

jamestown-with-kids

We recommend starting here, watching the 30 minute film, and touring through the massive indoor museum first. Yes, even in the heat. Why? The museum gives families an excellent overview of the time period (both in the colonies and in England and Africa), and really helps kids know what they’re about to see outside. The museum follows the journey of the Jamestown colonists, and then continues chronologically all the way through the 1690’s, when Jamestown gave way to Williamsburg as a the main settlement.

jamestown-with-kids

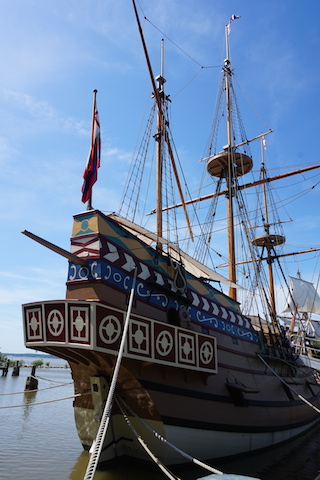
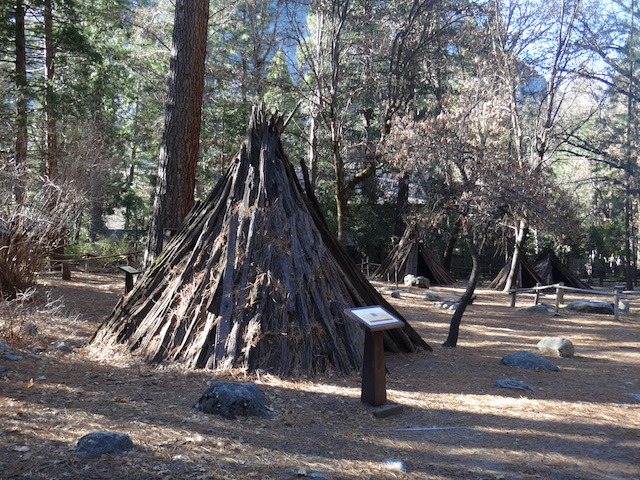
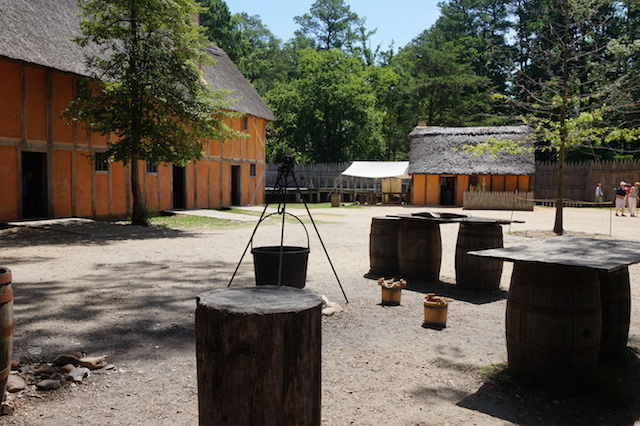
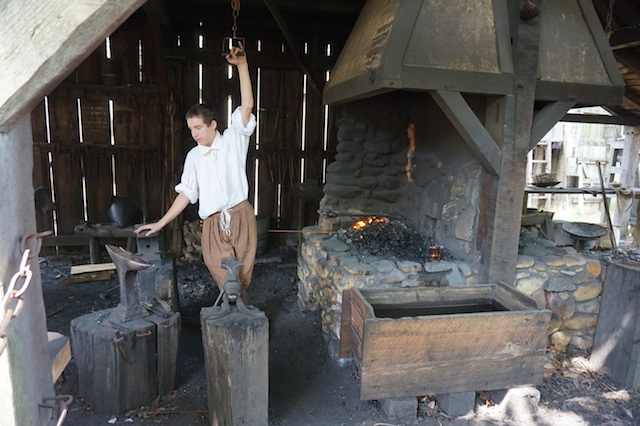
Then head outside: here you’ll find the fort, Powhatan village, and ships, all with interpreters in period costume ready to answer questions and demonstrate 17th century skills. This living history tableau rivals those in Williamsburg, with scheduled programs and impromptu conversations. We especially loved the canon firing demonstration and learning about the various levels of period dress.

jamestown-with-kids

In total, budget at least three hours for the Settlement. Picnic food is permitted in the picnic area out front (just show your museum map to regain entry) and there’s also a cafe on-site.

Admission:
Tickets are $16 for adults and $7.50 for kids 6-12. Separate admission is required at the national park site. It’s also possible to buy Historical Triangle tickets at Williamsburg that allows entry into both Williamsburg and Jamestown Settlement.

Then head to Historic Jamestowne to see the dig sites:

jamestown-dig-site

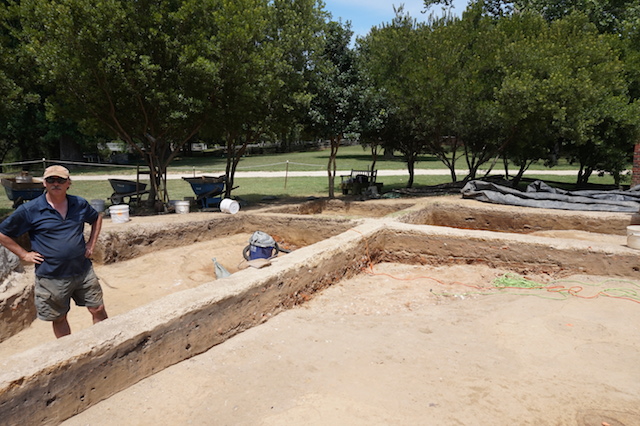
This section of Jamestown is located approximately one mile away (clearly marked) and is a national park site. This is where Jamestown actually stood, discovered by archeological dig only 20 years ago. There’s a good museum here too, but if you’ve toured the Settlement museum, you may wish to skip this to head out along the boardwalk to the fort site. Here, kids can talk to working archeologists who are currently excavating the site, and see original brickwork and artifacts emerging. The site is right on the James River, and very interesting. We are only stayed one hour, but are very glad we included it in our day.

Admission: Adults are $14 and kids are free (15 and under). Pass holders are $5.

Date last visited:

June 2014

Distance from the interstate:

Twenty minutes from I-64.

Directions:

Both sites are approximately 10 minutes from Williamsburg. Follow signs along the Colonial Parkway from the Williamsburg Visitor’s Center.

Four days in the Canadian Rockies: Jasper and Banff National Park road trip

It’s very hard to plan a trip to the Canadian Rockies. Why? No matter how ambitious your itinerary, there’s always one more place to visit just a few kilometers down the road. But if you do have to scale your trip to under one week, here’s how to spend four days in and around Lake Louise and the Icefields Parkway, during a Jasper and Banff National Park road trip.

Jasper National Park

Start in Jasper:

The small town of Jasper is a gateway to outdoor adventure in every season. From late spring through early fall, hiking and lake visits reign, and in winter snowshoeing, skiing, and ice climbing can be found throughout the area. We visited in October and loved the beautiful scenery to low crowd ratio.

Maligne Canyon:
Head just a few minutes outside of Jasper on Highway 16 to Maligne Canyon. In winter, this is where you’ll see ice climbers navigating the frozen waterfalls, but in all other seasons, the flowing water of the Maligne River bubbles and falls over rocks and through gorges before disappearing underground (just to emerge again in blue pools). The trail loops with several options for return, allowing families to choose how long they hike. We hiked for approximately one hour and made it to five of six bridges that traverse the river.

The water is fast-flowing, but railings are in place to keep kids from getting too close. The incline can be steep and slippery at times, but the scenery is absolutely worth the effort.

Town of Jasper:
You don’t have to leave town to see wildlife and enjoy trails. Take the Discovery Trail through town, which includes interpretive signs throughout to teach about the history of the area. Look for elk strolling town in the early evenings and mornings; they often stop traffic! And when you’re back from your hike, stop for ice cream or shop for souvenirs or hiking gear in the easily-navigated 2-3 block downtown.

jasper

Where to stay:

The Tonquin Inn is located just a few blocks from downtown and has everything parents with kids need: a large indoor pool and hot tub, additional outdoor hot tubs, a comprehensive complimentary breakfast buffet, and comfortable rooms with scenic views.

Make the most of driving the Icefields Parkway:

The Icefields Parkways has been rated as one of the most scenic drives in the world, but that doesn’t mean you don’t need a pit stop for two. Break up the four-hour drive from Jasper to Banff with a stop midway along the Icefields Parkway. Located at the border between the two national parks, the Columbia Icefields Centre is hard to miss. Here’s what to expect:

glacier adventure

The Columbia Icefields Centre is where you can stop for a meal and clean bathrooms, plus a great view of the Athabasca Glacier. Kids (and parents) will immediately notice the ‘Ice Explorers’ navigating the glacier surface…and want to ride in one. This attraction at the Centre is Brewster’s Glacier Adventure, and tickets can be bought in the lower level. The tour takes you on a short bus shuttle to the edge of the glacier, where you transfer to specially-designed Ice Explorers (souped up ATV-bus hybrids, for lack of a better description). The Ice Explorers take you on a short but exciting drive out onto the ice, where they stop and let you get out and walk around in a very contained circle. Because the space where visitors can stand on the ice is so small (and feels much like a parking lot with multiple Ice Explorers parked), most kids will find the ride out the most exciting part. Guides do a very good job of educating you on the glacier in an entertaining way, but the actual ice walk can be a let-down.

Closer stops to Jasper include either the Athabasca or Sunwapta falls. Both scenic falls are located roadside, necessitating only a short walk to the view points. At Sunwapta, a restaurant and other roadside facilities make for welcome additions. Closer to Banff, Bow Lake is an easy stop, and can include swimming in summer and short hiking options.

Up next, continuing your road trip to Banff National Park! Click on the button below to continue.

banff-road-trip

Pages: 1 2

Yosemite National Park travel tips: best tours, hikes, and advice

During a time when many vacations are not possible, outdoor activities in road trip-accessible locations offer the ability to safely social distance. Hotels.com asked me to share my favorite activities and tips for exploring the Yosemite area, so start here as you plan a safe and responsible vacation.

Yosemite National Park is one of the crown jewels of the national park system, and for good reason. Its stunning geological features, wildlife, and rich history make it ideal for an outdoors family vacation. This park has so much to offer, the following Yosemite National Park travel tips and touring advice are meant to supplement further research. Start with the official Yosemite National Park site to plan your trip, make sure activities and sites are open, and plan your lodging options! For touring advice and tips primarily for Yosemite’s Valley Floor region, read on.

Note: if you’re considering the Majestic Mountain Loop of three parks in one trip, start by viewing our Guide to Sequoia and Kings Canyon National Parks.

When to go:

Yosemite is open and active year round! While the vast majority of visitors arrive in the summer (of course), more is open during the off-season than many families realize. During fall and spring, some hikes and roads may be closed, but the majority are still at your disposal. Ditto for visitors centers and museums (just check seasonal hours). Winter is a wonderful time to stay on the valley floor without the crowds; families can easily rent snowshoes or Nordic skis to explore the area. If you must go in summer, don’t worry: the park is still very accessible with crowds. Plan to base your car in one location (ideally your lodging within the park) and take the free inter-park shuttle everywhere you need to go. We tried this out during a busy week in July (the peak of the busy season) and never waited more than five minutes for a shuttle bus. Busses run between campgrounds, lodges, visitors centers and hiking trailheads.

yosemite-national-park-tips

What to do on the valley floor:

Obviously, there’s too much to do in Yosemite to put into one post! The Tuolumne Meadows and Wawona regions are well-worth visits; however, if your family is new to the park, and you have at least three days, devote one morning to a Valley Floor Tour. This tour–conducted on motor coach in the off-season and open-air tram in the summer–offers a wonderful overview of the valley. If possible, ask for tour guide Bill: his knowledge is unparalleled, and he’s entertaining throughout! I loved that Bill described his tour as a ‘portal’ tour: he considered every major subject he addressed as merely a ‘portal’ to learning more (then gave the resources needed for those who wanted to dig deeper). Our Valley Floor Tour covered Yosemite Falls, Bridal Veil Falls, Tunnel View, Swinging Bridge, and Sentinel Rock, Cathedral rocks, and El Capitan. The bus stopped frequently, with plenty of photo ops. Because tours don’t stop for hiking, swimming, and the like, this is a good opportunity to note the areas you’d like to come back to on your own.

yosemite-valley-floor-tour

Lodging:

Where to stay in Yosemite National Park is as varied as individual family itineraries! For easiest access to the shuttle buses and to be within walking distance to the most sights, I’d opt for Yosemite Lodge or Camp Curry (be sure to reserve both well ahead of time). For families who may wish to divide their attention between Valley Floor activities and backcountry, many lodging options are located just outside the park.

Hiking:

Yosemite Falls: One of the easiest hikes to access from the valley floor, Yosemite Falls offers a very short hike to the lower falls, or a much more strenuous hike (3.8 miles one way) to Upper Yosemite Falls. Plan to spend the better part of the day if you tackle the latter! End your hike with a treat at the Food Court of Yosemite Lodge at the Falls.

yosemite-falls

Mist Trail: If you only do one hike in Yosemite, this should be it. But bear in mind that it will get very crowded in summer. Go early in the morning, or just before evening to beat the crowds (and heat). Enjoy the mist off Nevada and Vernal Falls as you make the short but very steep climb. If you’re up for more, this is the access point to hiking all the way to Half Dome to climb the backside using the cable system.

Note: permits are required for the Half Dome climb. You don’t need to be a rock climber, but you do have to be comfortable with heights and tall enough to hold the cables. If you’re not up for it, but do want a long hike, continue past the falls to Little Yosemite Camp, where you can watch the cable climbers.

yosemite-falls-trail

Glacier Point to Valley Floor: This is another hike for the hearty! Use the free shuttle system so you only have to go one-way! Because you are directly across from Yosemite falls, you get a great perspective since you start above the falls, and see it at every height as you descend to the valley floor. If the kids are up for it, bribe them with a promise of ice cream at Yosemite Village and keep trekking across the valley floor.

Our review of family backcountry hiking and backpacking in Yosemite.

Museums, programs, and visitors centers:

A trip to the Yosemite Village Visitor Center and museum is absolutely worth your time. Kids (and adults) learn about geography and wildlife in the center, then can tour an outdoor Miwok village at the attached museum. We also loved the baskets on display, and during the summer months, Native American artisans are on-hand to show you their techniques. The village center also has stores, restaurants, and the like.

yosemite-village-museum

For winter activities and snow play, start at Yosemite lodging, such as Yosemite Lodge or Camp Curry. Both locations will have sleds to purchase and snowshoes to rent. Camp Curry has an ice-skating rink (tickets can be bought at either lodge). Guided nordic skiing tours to Glacier Point depart regularly in winter. In fall, be sure to ask about the Swinging Bridge Ladybuy Hatch. This amazing event takes place annually on the Swinging Bridge in the valley, when hundreds of thousands of ladybugs hatch. An amazing sight, and one guests can only see in autumn.

Park programs and nature walks are available year-round at Yosemite! Definitely sign up for one of the park’s watercolor classes, Junior Ranger programs, or, my current favorite: the Night Prowl. Led by a naturalist, the Night Prowl takes visitors on wooded trails by moonlight, which chances to see or hear nocturnal animals. Even if you don’t see animals, guides do a great job of relaying interesting information and conducting fun group exercises to help you adjust to the dark and understand your surroundings. This program is ideal for school-aged kids, and is a deal at only $5.50 per person.

yosemite-programs

Tip: Did you know park rangers are not the only naturalists leading guided tours and programs in Yosemite National Park? The park’s chief concessionaire also employs naturalists to lead excursions, often filling the gap left by budget cuts. These services are available to book from park lodging!

Day hikes in Joshua Tree National Park: Hiking off-trail

During a time when many vacations are not possible, outdoor activities in road trip-accessible locations offer the ability to safely social distance. Hotels.com asked me to share my favorite activities and tips for exploring the outdoors near Joshua Tree, so start here as you plan a safe and responsible vacation.

I love a guiding company that doesn’t ‘dumb down’ experiences for guests. Joshua Tree Excursions definitely doesn’t take the easy route, literally or figuratively. If you’re looking for day hikes in Joshua Tree National Park, guide and owner Kelly Crawford is who to get to know. He challenged us during a five-hour hike through Joshua Tree National Park, during which we went off-trail to trek, scramble, and climb the park’s famous granite boulders. He allowed us to rise to the occasion during moments of challenge in the terrain, and gave us confidence that we could all do it. And we did.

Hiking off-trail in Joshua Tree National Park

The Joshua Tree Excursion experience starts when you book it, as Kelly prides himself in offering a fully customizable day or weekend. If you want a mellow hike through the park with a knowledgable guide, they can certainly do that, but they can also offer hikes that involve bouldering, climbing, or backpacking. Joshua Tree Excursions will even set up your entire camp for you (at a site in the park or in the backcountry) and can even provide all meals.

hiking-joshua-tree

Most families will simply want a day of hiking off-trail, as day hikes in Joshua Tree National Park are short enough to be do-able. It’s is an excellent place for off-trail adventuring. Families experienced in backcountry hiking can certainly hike off-trail in Joshua Tree on their own, with the right navigational tools (and knowledge in using them). However, even though we’re familiar with all this, we’re not familiar with the desert landscape of Joshua Tree, so hiring Joshua Tree Excursions is a good solution.

wonderland-joshua-tree

Our trip off-trail started with our group of adults loading up in Kelly’s 4wd vehicle and entering the park. Anyone without day packs was provided one to use, along with plenty of water. Given the length of the hiking experience (ours was 5 hours) I do think it would be helpful to also have a few healthy snacks. We parked at the Barker Dam trailhead, and Kelly took some time to go over local geology, flora, and fauna.

Joshua Tree Excursions’ motto is ‘journeys, not destinations’, and we realized this concept was more than just a slogan right away, when we left the well-worn trail almost immediately. Kelly explained that we’d be hiking approximately five miles off-trail, in a large loop with time for shorter side excursions and exploration.

joshua-tree

We hiked through sandy washes, weaved past beds of cacti (pausing to learn each variety’s name), and climbed over rocks and boulders. It was exactly the type of hiking my kids love, so I’ll definitely be heading back to Joshua Tree with them again. Usually, I am perfectly content to hike on the trail, but I must say, Kelly’s version was much more fun and exciting. I felt like a kid again as I jumped, scrambled, and explored.

We stopped often for mini-lessons on Joshua Tree (and to drink water), and to take photos. While we didn’t have a precise destination, we did hit upon some landmarks that were amazing to see, such as Garrett Arch, the ‘cube’ (a huge square-shaped rock), and the Wall Street Mine (abandoned historic stamp mill). At a few junctions, such as at Garrett Arch, there was an option to climb higher up (or wait below).

joshua-tree

The level of difficulty was what I’d call intermediate, but others may call advanced. This is where the customized trip comes into play. When planning a trip with Joshua Tree Excursions, it’s important to explain not only what you hope to do, but your level of fitness and experience in the outdoors. Either way, I guarantee you can do more than you think you can!

We ended just before sunset and drove back to the Joshua Tree Excursions office below the park.

Pricing: Customized hiking trips usually start at $124 per person. Yes, this is a serious investment during your trip, but I believe it to be a worthwhile one. Kelly can provide families with an experience beyond what almost all can do themselves.

Lodging options nearby:

Lodging near Joshua Tree ranges from family-friendly roadside hotels to unique rentals to B&Bs. We have sampled quite a few options, all of which match the free-spirited nature of Joshua Tree, California itself. Within the park proper, car camping is beautiful as well, especially during the cooler months. In the heat of summer, you’ll probably want to find area lodging.

Don’t forget:

  • sunscreen
  • hats for everyone
  • sunglasses
  • water (more will be provided)
  • backpack (provided if you don’t have one)
  • long pants for hiking in (cacti hurt legs!)
  • snack such as a granola bar
  • a tip for your guide
  • trekking poles are a good idea if you’re not scrambling (but hiking)

joshua-tree

Bonus stop: After your day with Kelly, be sure to go back up to the park entrance at dark for a Sky’s the Limit presentation of the night sky. Offered on Saturday nights and some additional (see list of dates), this non-profit observatory offers the most accurate orrery in the world (a orrery is a replica of the solar system laid out on the ground, with the sun in the middle and the planets in their paths around it, set to real time). This, and the nature path around it, can be enjoyed at any time during the day, but at night when open, the observatory also has volunteers on-hand to give a star presentation, complete with high-powered telescopes for viewing planets and stars.

joshua-tree
As I disclose whenever applicable, we are partnering with Hotels.com to bring you this post on Joshua Tree.

Exploring the Grand Canyon of Yellowstone: navigating Upper and Lower Falls

During a time when many vacations are not possible, outdoor activities in road trip-accessible locations offer the ability to safely social distance. Hotels.com asked me to share my favorite activities and tips for exploring Yellowstone, so start here as you plan a safe and responsible vacation.

Located a full 50 miles away from the central hub (and congestion) of Yellowstone National Park‘s Old Faithful, the Canyon Village area of the park offers arguably the most dramatic scenery with fewer tourists to contend with. In this “Grand Canyon of Yellowstone”, families can view yellow-tinted cliffs and the Yellowstone River at its most active at both the Upper and Lower Falls.

yellowstone national park

The best hiking and waterfall viewing is found at Lower Falls, which can be viewed by car pull-out along the North Rim Drive at Lookout Point and Red Rock Point. (South Rim Drive takes you to the Upper Falls at Artist Point.) If you’re hiking instead, take the South Rim Trail (though be advised that it is one-way), or the Brink of the Lower Falls Trail. Both offer great views of Lower Falls, which is actually longer in height than Niagara Falls. We opted to hike just 1/2 mile along the South Rim Trail, turning down steep steps to view the falls from an overlook. The entire hike, including the hike back to the car and the overlook detour, was approximately 1.5 miles…just right for a quick after-lunch excursion. The entire trail is 2.5 miles, though one-way.

national parks with kids

Be careful on all the overlooks and trails along the canyon with young kids. The way is often steep, and the drops are severe. We never felt unsafe, but we did require our adventurous kids to stay close by. Keep to the overlooks if series of steep stairs may be too much for little legs: the way is slow and long!

A good dining option near the falls is found at Canyon Village. Skip the often-crowded soda fountain and grille for the cafeteria.

Where to stay in and near Yellowstone:

Wondering about Yellowstone lodging? If you can get reservations well in advance (think 8-9 months out), a stay at the Old Faithful Inn is iconic (though often crowded). The Lake Yellowstone Hotel is another great option, or the park offers many cabin rentals in addition to campgrounds. You will need to reserve any and all of these well in advance. For an option away from the crowds, consider Harriman State Park, on the Idaho side. Its rustic yurts and bird sanctuary provide much-needed peace!

yellowstone river

What else not to miss:

In addition to the falls, time spent in the Madison section of the park will offer great geothermal displays, though crowds will teem here due to its proximity to Old Faithful (only 16 miles away). Another less crowded option in the park is Fishing Bridge and the Sylvan Pass area near Yellowstone Lake: the vistas are made even more beautiful here due to the lack of tourists. In our experience, Yellowstone’s West Entrance tends to get the most crowded, while the East Entrance is nearly always empty. Granted, visitors entering here will have a long drive to reach the center of the park (over 30 miles), but the way is rugged and stunning in its remoteness (just keep an eye on when the Sylvan Pass opens each spring).

No matter where you head in the park, expect slow driving on park roads, and plan to stop a time or two for wildlife viewing. During our single day in the park, we stopped for buffalo twice, a bear once, and an osprey nest (with osprey).

As I disclose whenever applicable, we are partnering with Hotels.com to bring you this post on Yellowstone’s Grand Canyon.

Things to do on Channel Islands with kids

Channel Islands National Park is located right off the coast of Ventura, CA, but feels a million miles away from the rest of Southern California. The park has a different vibe than most: the main visitor’s center is located not in the park, but in the Ventura Harbor, where visitors depart for the islands, and the islands themselves remain remote, isolated, and almost completely undeveloped.

channel islands

Don’t let the Channel Islands, and the logistics of exploring them, deter you: this national park is perfect for kids. Families simply need to know the best things to do on Channel Islands, how to get to Channel Islands National Park, and where to stay prior.

Channel Islands

Which island?

All the Channel Islands are accessible, but the most easily accessed (and with the most to do for families) is Santa Cruz Island, the largest of the five. Protected coves allow for great snorkeling here, and the camping is easiest (on other islands, backpacking may be necessary). Santa Cruz Island is also the most affordable to travel to, making it ideal for larger family groups.

Camping or day trip?

The next thing families need to decide is whether to make their Channel Islands adventure a day trip or an overnight. Camping at Channel Islands is reserved by ReserveAmerica, and the most popular camping experience for families is located at Scorpion’s Cove on Santa Cruz. This campground is walk-in (meaning backpacking is not necessary) and the lower campground is only .2 mile from the beach. Running water and pit toilets are available, and each site has a picnic table and food storage box.

channel islands camping

For families deciding not to camp, a day trip to Santa Cruz Island can be more than enough to experience the National Park. Santa Cruz (the most easily accessible island) is undeveloped; in addition to the campground, there are only a few ranger cabins (rangers are on-site), evidence of the island’s ranching history, and hiking trails. A dock exists at Scorpion’s Cove, where passengers disembark. For a day trip, we recommend taking an early boat (9 am) out to Scorpion’s Cove, and returning at 4 pm or 5 pm. This gives visitors enough time to experience the island’s snorkeling, kayaking, and hiking.

snorkeling on Channel Islands

How to get there:

Island Packers is the official transportation to the islands. They’re located in the Ventura Harbor adjacent to the Channel Islands visitor center (follow the brown National Park signs to the end of the drive along the pier) and reservations should be made in advance. The boat ride over takes approximately 1 hour and 15 minutes, and is certainly part of the fun. We spotted dolphins during our passage, and when the water is choppy, as it was on our visit, the ride is downright exhilarating. Kids can stand at the deck and feel the spray of the ocean, or interior seats are also available. The Island Packers crew and staff are all friendly, laid-back, and fun. The cost of an Island Packers passage varies by island and whether your passage is a day trip or camping trip. At the time of my visit, day trip passage was $56 round trip for adults and $39 round trip for children (up to age 12). Overnight passage was $75 for adults and $54 for children.

island packers

Snorkeling, kayaking, and hiking on the islands:

Snorkeling at Scorpion’s Cove, we swam with harbor seals, and spotted multiple fish species, sea urchins, sea stars, and kelp forests. Snorkeling gear can be rented by the day at Ventura Sports, located in the Ventura Harbor, but be advised: they don’t have adequate sizes for kids under age 10. While their staff was friendly, they rented us a wetsuit that was far too large for our seven-year-old, with no warning that it wouldn’t work for him. (Wet suits are usually necessary in all seasons on Channel Islands.) In addition to snorkeling, kayaks can be rented in the harbor and transported for the day or the duration of your camping trip by Island Packers, or guided kayak tours are available on the island (reserve ahead of time). When not on or in the water, numerous hiking trails (of about 2 miles in length at most) are available on Santa Cruz Island, and offer beautiful vistas of the island and sea.

Holiday inn express Ventura harbor

Where to stay in Ventura:

If you’re coming any distance to visit the islands, you’ll need to stay overnight in Ventura the evening prior. We recommend the Holiday Inn Express Ventura Harbor, which overlooks the Ventura Harbor and is less than a quarter mile from Island Packers. I call this Holiday Inn Express an ‘express plus’, because it’s directly tied to the Four Points Sheraton next door, and guests have access to their very nice outdoor heated pool and hot tub (hot tub for adults only). A pedestrian bridge connects the two hotels, and the Holiday Inn Express includes one of the best complimentary breakfasts we’ve ever experienced. Bottom line: the Holiday Inn Express Ventura is a great value for families, and you’ll be close enough to enjoy the Ventura Harbor prior to your Channel Islands trip.

One day in Badlands National Park itinerary with kids

We were blown away by the beauty and peacefulness of Badlands National Park! During our one day visit, we found ourselves comparing this dry, rugged, and dramatic park to other favorites: it has much of the same feel as Death Valley National Park and Joshua Tree National Park. However, Badlands adds another element: high prairie wildlife and terrain that will impress in a subtile, almost delicate manner. Here’s what to do with one day in Badlands National Park:

badlands-national-park

Allow me to explain: while the first thing visitors are likely to notice about the park is its dramatic rock formations and chasms (think of Grand Canyon in miniature, or as one fellow traveler put it, of being a giant hiking in the Grand Canyon), it’s quickly evident that beyond, and in some cases, above, these rock formations, lie plateaus, gulches, and lowlands blooming with sunflowers and wildflowers, harboring prairie dogs and rabbits, and opening up onto prairie grasses. The juxtaposition of dry, cracking rock and flowering plants is stunning.

badlands-sunflowers

The park is well-known for fossil finds dating to prehistoric eras, though we learned that dinosaur fossils are not found here. The region was underwater during that time period. Instead, early mammal fossils are found quite regularly, and dig sites can still be active.

How to spend a day at Badlands National Park:

Ready for your Badlands National Park itinerary with kids? Though the park area is quite large, most of the sites and hiking options are in a concentrated area, making this park do-able in a day, if needed. As we always suggest, start at the Badlands visitor center to get your bearings. Here, kids can see a well-made 20-minute video, then tour several rooms of exhibits on the park’s geological history, wildlife, and native history (this is Lakota territory). Stop at the desk and ask for a form on which to document any fossil finds. They can still be spotted in the rock throughout the park, and park scientists depend on visitor documentation to help their research. Cool, right?

badlands-fossils

After touring the visitor center, take the Badlands Loop Road. Backtrack to the Window Trail and Door Trail parking lot.

Tip: to do this itinerary as described, enter the park via I-90 Exit 131 instead of via Exit 110 near Wall. We suggest this direction because it places families at the visitor center early on.

The Door Trail offers an amazing vista of the canyons of the park, with half a mile of ‘trail’, which is actually rock hopping and free-form hiking from marked post to post (the rock bottom here doesn’t allow for a proper trail). The way is easy enough, but kids can make it more fun by climbing a few short rock formations along the path. The nearby Window Trail consists just of a boardwalk ending in a vista to see a very deep chasm in the canyon. Definitely do both. Note: we hit this trail at sunrise, which rewarded us with beautiful light against the stone.

sunrise-at-badlands

Accessed from the same parking lot, the short Notch Trail is great for kids who want more climbing, as this 1.5 mile loop descends through the canyon then up a wooden ladder to follow a ledge to a great view of the White River valley. Only proceed on this trail if you’re comfortable with heights.

badlands-hiking

For those wanting a longer hike, The Castle Trailhead is located just across the street from the Door and Window trails. This trail is 10 miles long, and travels west all the way to the opposite end of the Badlands Loop Road at the Fossil Exhibit. Those wanting to hike 10 miles will need a car to pick them up on the other end. However, thanks to a very user-friendly trail system in the park, it’s possible to hike only a portion of the Castle Trail. Starting at the trailhead at Door, hike a short distance on flat terrain to the junction of the Castle and Medicine Root trails. At this point, families have access to a loop of 4 miles, making the hike around 5.5 miles total, or can opt for an out-and-back for less mileage, turning around at the junction.

badlands-castle-trail

Or, do what we did: after seeing Door and Windows, head back on the Badlands Loop Road in your car and stop at the Saddle Pass trailhead. This quarter mile trail connects you to the Medicine Root/Castle Trail loop for a hike of 4.2 miles. The short Saddle Pass section is severely steep as you climb from the valley floor to the top of the ‘wall’, but once there, the terrain is quite flat. Up on this wall while hiking the Medicine Root Loop, you’ll see prairie grasses, sunflowers, wildflowers, and, possibly, snakes and other small animals. There is no shade up here, so plan to accomplish this part of your day in the morning.

Medicine-Loop-Trail

Further along the Badlands Loop Road, families will come to the Fossil Exhibit Trail. This boardwalk loop of about half a mile features well-done displays en route, which describe the various fossils found here, and whether these prehistoric animals ended up adapting, moving to a new region, or becoming extinct.

badlands

If you depart the park via the Badlands Loop Road toward Wall, you’ll come across many more roadside pull-outs with vistas of this area of the park. It seems to go on and on!

Where to eat:

During your day, definitely stop to eat at the Cedar Pass Lodge. This lodge is modern-looking and new, which didn’t quite seem to fit in with the setting of the national park, but inside, it has a very nice gift shop filled with handmade items and Lakota souvenirs, and a casual cafe that serves wonderful fry bread tacos. These native treats can be ordered with buffalo meat or black beans, and they are huge…two people can definitely share one. And yes, they are very fattening. Enjoy!

Where to stay:

The park does have lodging at Cedar Pass, in the form of very nice cabins overlooking the terrain (and the highway, but it’s no big deal). I did not stay the night on this trip, as the park can definitely be done in one day, but certainly this would be a good option as well.

The park is located along I-90 in South Dakota, near Wall. Make a stop at Wall Drug before or after!

Yosemite lodging pick: Tenaya Lodge review

What a gem of a lodging option for Yosemite National Park! Tenaya Lodge at Yosemite  is located just outside the park boundaries at the South Entrance, within very easy distance from Mariposa Grove and Wawona (just a few miles). Because the lodge is situated outside park boundaries, it can offer more guest rooms and sits on a large property. What this means for families: it’s far easier to get a reservation at Tenaya Lodge than at Yosemite Valley Floor locations, and offers more on-site recreation than you’d think!

Property overview:

Tenaya Lodge is a large property, but very compact. It has been recently renovated, with a wide variety of room categories, all of which include mini fridges, coffee service, and wifi. My spa suite included a tub I could swim in, plus a nice balcony. Even better for most families, Tenaya offers cottage rooms that can be connected to accommodate bigger families and family reunions, and brand new in 2019, Explorer Cabins at Tenaya Lodge, offering a “cabineering” experience.

Explorer cabins

The 50 stand-alone, two-bedroom Explorer Cabins are situated apart from the main lodge, giving families a sense of nature and serenity while still enjoying the perks of a full-service resort. You get a living room, kitchen, private deck, and sleeping for six. The ‘family’ units feature bunk beds (with a full on the bottom) and the others have a queen in one room, a king in the other. Family cabins also have bathtubs. The cabins also allow access to the Explorer Clubhouse, an 1,800-square-foot communal retreat with picturesque views.  You can check in here, get grab-and-go breakfast, and enjoy evening wine and charcuterie receptions. Communal fire pit areas are sprinkled throughout the cabin clusters…a nice touch.

In the main lodge, all Tenaya rooms got a face lift several years ago. The main lobby is breathtaking and cozy at the same time, and families will feel the upscale ambiance but also appreciate how casual and kid-friendly the property is.

Lodge rooms

Recreation at Tenaya:

Tenaya has a full outdoor pool and hot tub complex open during the summer months, and a very large indoor pool and hot tub for the off-season. (This is in addition to the cottage-area indoor pool.) Kids will be happily surprised by a large arcade adjacent to the indoor pool, which features pool tables and other non-pay-to-play options, and parents will love the Ascent Spa. I enjoyed one of the best Swedish massages of my life here.

For all other on-site activities, your first stop should be the concierge office on the lobby level. Here, you can reserve mountain bikes (there are forest service roads and a paved bike path to explore), purchase archery sessions, and secure day passes to the kids’ ropes course. (More on all of this below.) You can also book a guided tour of Yosemite National Park, with half-day and full day options. You’ll be transported in a converted Sprinter van designed for an open-air experience (think van convertible!). In summer, reserve at least one night to enjoy the Old West Summerdale Barbecue, where kids can shoot arrows at the adjacent archery range while adults make new friends at an outdoor BBQ pit. 

So yes, Tenaya offers archery (for everyone over age 5) on-site, as well as a multitude of hiking and biking trails. These trails can be accessed directly from the lobby. The adventure ropes course is for kids ages 5-12, which has a fee of $25 (half off for a second child) and grants you access all day long.

In the winter months, snowshoe rentals are available for use, sledding is ample, and the Tenaya Lodge ice skating rink (covered, no less) sits at the back of the property. We loved the huge fire pit adjacent.

archery-at-tenaya-lodge

An array of kids’ programming is available at Tenaya. While we prefer to stay together as a family during the day, I do recommend taking advantage of this service for a nice dinner out or a spa treatment. Kids’ programming varies by season, but rest assured: upon check-in, you’ll receive a full calendar of available activities and events. Most are included in your rate.

In addition to kids-only activities, Tenaya Lodge offers ice skating in winter, and archery, which my kids loved so much, they brought their new passion home with them. We bought bows (more ‘beginner’ than these from bowaddicted.com) and set up targets of our own.

Tenaya also has complimenary guided hikes led by naturalists. This is a program that runs concessionaire-wide throughout Yosemite National Park: lodge naturalists often supplement programs offered by park rangers. We had a great day hike led by a naturalist at Tenaya, ideal for kids of any age (parents come along, too). We even hunted for ants to sample…so glad we came up empty-handed! At night, we took a flashlight tour with guide and long-time Yosemite resident Mike, during which he kept us all entertained with stories of climbing, backpacking, and bear encounters. If your family is new to the outdoors or the California version of it, be sure to sign up for a nature tour.

Activities outside the property:

Tenaya is located right next to the Mariposa Grove (closed in winter) and the Mountain Sugar Pine Railroad, which is rich with history!

Hiking and outdoor play at Wawona Visitor Center is only 10-15 minutes away by car, and Badger Pass Ski Area is about 40 minutes. While in the Wawona area, be on alert for ticks during the summer months.

half-dome-yosemite

Of course, you’ll want to spend at least a day or more in Yosemite, exploring the valley floor. By car, it takes about an hour to reach the valley floor (due to windy roads and traffic). The concierge center at Tenaya Lodge can assist you with all programs, tickets, and tours you might want in Yosemite (a real time saver). They can also arrange for permits, horseback riding, and mountain biking.

Dining at Tenaya:

You’ll want to budget for some nice meals at Tenaya Lodge! In addition to room service, casual but upscale dining is available at Jackalope’s Bar and Grill for both lunch and dinner (the atmosphere here is very lively and warm). For a nice dinner out (with or without the kids), make a reservation at Embers. The interior of this small and intimate restaurant is plush and cozy, and the food is the best I’ve found in the region. You’ll want to linger over table-side caesar salad and leave time for dessert.

tenaya-dining

For more casual fare, opt for the poolide dining venue in summer, or the pizzeria located by the cottages, but be advised: this hot spot fires pizza in their own pizza oven and offers local IPA drafts. In short, you’ll find great fare at Tenaya, but you’ll need to budget for it.

Room rates:

Rates can start as low as $150 (estimate) depending on the season, and as stated, it’s not impossible to get last-minute reservations at Tenaya. In short, for the number of amenities and services on site, Tenaya Lodge is a great deal for families. Oh, and valet parking is always free.

Directions:

From Fresno, follow signs to Yosemite National Park, taking Highway 41. Tenaya Lodge is located just shy of the park boundary at the South Entrance.

As I disclose whenever applicable, my stay at Tenaya Lodge was complimentary, for the purpose of review. How better to get the scoop on best Yosemite lodging to recommend to families?

Guide to Sequoia and Kings Canyon National Parks with kids

On a recent tour through several California National Parks, I heard the same thing over and over again from fellow guests and even park employees: “We love Yosemite, but we’ve actually never been to Kings Canyon.” Or, “We come to Yosemite annually, but haven’t experienced Sequoia, yet.” This tells me two things: Yosemite National Park is one of the most popular in the nation (no surprise there), and neighboring Sequoia and Kings Canyon National Parks will be vastly less congested nearly all year long. Are they worth visiting? Absolutely!

Park overview:

Sequoia and Kings Canyon are two distinct national parks with one planning site. They have separate entrances, though the same entry fee will get you into both. They sit side-by-side along the General’s Highway off Highway 198 (accessed from Fresno, California) and sit at impressively high elevation: between 6,000 and 8,000 feet for the most part.  We suggest at least two days in the parks in the off-season, and three in summer, with the majority of your time spent in Sequoia.

What to do:

Giant Forest: 

giant-sequoia-trees

Most of us come to Sequoia for the Giant Sequoia trees. And yes, they’re absolutely worth the trip. These towering giants reside in this region because of the ideal conditions: they cannot grow like this anywhere else in the world. Take the Big Trees Trail to walk amid these giants (you’ll find the hush of the forest soothing…unless you have restless kids with you!). The General Sherman Tree is the largest tree in the world. Bear in mind: the General Sherman is not the tallest tree in the world, but rather the biggest, measured in circumference around its trunk.  The nearby Giant Forest Museum is worth a stop (in the off-season, it opens at 10 am).

Moro Rock:

moro-rock

Absolutely plan an hour or so at Moro Rock in the high season. This overlook includes a short but steep hike up the cliff-like rock, which will feel unsettling to anyone with fear of heights. I fall into that category, but had no problem with this short hike, because guard rails are set at key locations. There’s nothing to stop small children from wandering, however, so extreme attention is necessary. From the top of Moro Rock, the views are unparalleled. It’s possible to see the valley floor from one side of the viewing platform, and the peaks of the Sierras from the other. Point out the tops of the Giant Sequoias to kids: they look like bunches of broccoli from this height. Tip: after Moro Rock, continue a very short distance on the same road to drive through Tunnel Log and picnic in Crescent Meadow. Wolverton Snow Park is another nice resting stop in any season.

Crystal Cave:

I had no idea hundreds of caves lay under the surface of Sequoia National Park! The only cave available to tour is Crystal Cave, and it’s only accessible in summer. If you visit during the high season, this should be on your list.

sequoia-sightseeing-tour

Tip: Take a tour with Sequoia Sightseeing Tours with Paul Bischoff! Paul is a long-time resident of the area, and runs the best sightseeing tour I’ve taken from a private concessionaire in a national park. We spent a full morning with Paul, and learned more about the parks in a few hours than we ever could have guessed. Paul knows where the animals are, the best ways to avoid crowds, and can walk guests right to the most interesting trails and natural wonders.

Grant Grove of Giant Sequoias:

In Kings Canyon, the Grant Grove offers the General Grant Tree, plus a nice, easy hiking loop of additional Sequoias which includes some naturally downed trees. This is a great place for kids to see the root system of these giants, crawl through a fallen Sequoia log, and walk through a Sequoia tunnel! The Grant Grove Visitors Center is nearby as well, but we found it to be pretty limited.

Tip: While staying at Kings Canyon, catch the John Muir impersonation program by talented Frank Helling. Frank performs most Fridays at the Grant Grove evening campfire program during the summer months. I learned more about John Muir from Frank than I have before or since, and it was entertaining for all ages. Check at the Grant Grove Visitor Center to find out exactly when he’ll be performing during your summer visit.

giant-sequoias

Kings Canyon:

In summer, families can drive into the famed canyon, stopping for short hikes along the way. Kings Canyon is home to fabulous backcountry as well: if you plan to backpack in Kings Canyon or Sequoia, apply for a free backcountry permit. The good news: they’re far easier to get than Yosemite permits!

Tip: if you have the opportunity to listen to the storytelling of John Muir impersonator Frank Helling, make time to do this! Frank is absorbing and entertaining, and I learned more about John Muir in the 45 minutes I listened to him than I have before or since! Frank conducts his performances when available; as a park ranger or at the John Muir Lodge about opportunities to hear him speak.

Where to stay:

Kings Canyon offers the busiest ‘village’ of tent cabins, lodging, general stores, and visitors centers at Grant Grove Village. In the off-season, it’s quiet and we recommend the adjacent John Muir Lodge. However, in the height of summer, we’d opt for the less congested Wusachi Village of Sequoia National Park, where you’ll find Wusachi Lodge. This village center houses only the lodge and its restaurant (no adjacent camping and conveniences), which makes it somewhat quieter year-round. Read reviews of John Muir Lodge and Wusachi Lodge.

How to get here:

Access either park from Highway 198 from Fresno California. If you’re doing a loop of Sequoia and Kings Canyon as well as Yosemite National Park (called the Majestic Mountain Loop and highly recommended), you’ll need to depart Kings Canyon and return to the valley floor, then loop around to Yosemite via Highway 41. It’s not possible to drive over the Sierras, which is a good thing for all of us enjoying the parks!

Camping in Death Valley National Park: Furnace Creek Campground review

We love Death Valley National Park’s Furnace Creek Ranch, but as room rates for this family-friendly Death Valley lodging option rise (justifiably…it’s a great place to stay), we’ve been exploring camping in Death Valley. Here’s what we discovered about fantastic Furnace Creek Campground!

furnace-creek-campground

Families have their pick of several Death Valley campgrounds, including Stovepipe Wells campground, and all fill up fast in the primary season from February through May. Families with RVs or trailers may do fine at one of the more exposed first-come, first-served campgrounds, but for tent camping in Death Valley, Furnace Creek Campground is the clear choice.

Families can reserve a site at Furnace Creek Campground up to six months in advance, and I highly recommend doing so. The campground is comprised of both hook-up rv sites and tent-only sites, with the tent sites sectioned off in their own walk-in loop. (There are also a few drive-in tent-only sites, but they are directly adjacent to RV spots.)

The walk-in loop includes sites 115-150, and offers the full range of site quality: from fully-exposed and completely non-private to shaded and reasonably secluded. After spending four nights tent camping in Furnace Creek Campground, we recommend sites 133, 134, and 130 as prime location, with 121, 120, and 119 coming in a close second. These sites offer the most shade and comfort. It’s important to note that while these tent sites are labeled as ‘walk in’, the distance is only a matter of feet from the sites to the parking area. It’s also worth noting that sites are organized three deep: if you’re in 134, for instance, you’ll walk through the camp of 131 and 133 before arriving at your site. We disliked this structure, but it’s the nature of the beast: the desert terrain is wide and open. A walkway would be welcome, however.

furnace-creek-campground

In our site of 133, we had three alcoves shaded by mesquite trees for smaller tents, space for a large tent, and room to hang two hammocks. While we wished for more space from our neighbors, everyone camping during busy spring break in this section of the campground was respectful and fairly quiet, as patrons of tent-only sections of national park campgrounds tend to be.

Amenities you need to know about:

Every loop at Furnace Creek Campground has restroom facilities with flush toilets, sinks, and water stations for filling drinking water containers, doing dishes, and the like. There are no showers. Every site has a fire pit with grate, and firewood can be bought at the Furnace Creek Ranch store. Garbage bins are located at the end of the tent-only loop, as well as camp stove fuel recycling bins.

Want more camping info? Get Pit Stops for Kids’ camping gear list!

The Furnace Creek Visitor Center is located adjacent to the campground, and offers an amphitheater, evening campfire programs, the Junior Ranger program, and a nice video overview of the park. This is definitely worth being your first stop.

Bonus! Using Furnace Creek Ranch facilities:

furnace-creek-pool

The campground is a five to ten minute walk from Furnace Creek Ranch, which houses motel-style rooms, a few restaurants, a general store, gas station, and a park-like setting with tennis courts, lawn games, a basketball sport court, and spring-fed swimming pool. Can campground guests use these facilities? Yes, but read on for details:

Obviously, the store and restaurants are open to all (more on that below), and while technically the tennis and other sport facilities are designated for ranch guests, there’s nothing to stop campground guests from enjoying them with their own sport equipment.

To use the Furnace Creek Ranch pool (which you definitely will want to do), campground guests need to buy day passes from the Registration building. Passes are on a first-come, first-served basis, so it’s worth stopping in during the morning before heading out to hike or otherwise explore the park. Use the pass in the afternoon. The pool house also houses showers, so take advantage of that amenity as well.

Tip: Don’t forget about gear! Everyone in your family will need quality hiking socks, and you can get additional camping and hiking gear information in our travel gear section!

Dining:

Obviously, campers will be cooking most meals in camp, but a dinner or breakfast out at Furnace Creek Ranch can be a welcome treat. Expect higher prices at the 49er Cafe (and even higher at the buffet restaurant next door), but you’re paying for the convenience of skipping dish washing, right? Fare ranges from burgers to pasta and steak dishes, and breakfasts are typical: omelets, griddle favorites, etc. There is no kids’ menu at breakfast, so consider ordering for young children a la carte. Grab dessert from the store next door: they have a soft-serve station we enjoy. You can also grab perishables here, such as milk, ice, and cold drinks.

Distance from the interstate:

Furnace Creek Campground is on Highway 190, about 30 minutes from Beatty (Highway 95).

Rates:

Tent-only sites were $16/night at the time of our visit. (Room rates at Furnace Creek Ranch were approximately $225.)

Directions:

From Highway 95 at Beatty, follow signs to Death Valley National Park (along Highway 190).