


I have a confession: I love planning trips. For me, it’s like a puzzle to put together or a painting to outline and fill in…first you choose your family travel destination, then you book airfare and hotel rooms, then finally, you fill in the details of what you’ll do, where you’ll eat, and what you’ll see.

It’s this last part that can be tricky, however, especially in a brand-new-to-you location. For our most recent major trip to Paris, I tried out Momaboard‘s Family Trip Planning Service (FTPS). This online service is wonderfully simple: you select the city of your choice, you read about the local, parent expert for that region (Mombassador), and you click ‘Let Momaboard Plan My Trip’. Don’t worry: they don’t plan the whole thing, and they don’t book things for you. (This fact appeals to a control freak like me.) Instead, you fill out a short questionnaire about your trip (who’s going, your dates, what you like to do), and the Mombassador provides you with a day-to-day itinerary with suggested activities, dining picks, and routes.
How I used the Family Trip Planning Service:
When I discovered Momaboard’s FTPS, I already had several days of my Paris trip pretty well organized. However, two additional days were still blank slates on the calendar. When I filled out my questionnaire, I asked Paris Mombassador Coralie Grassint to focus on these two days, letting her know what I already had in the works for my additional days and what I still wanted to see, such as the Montmartre neighborhood, Notre Dame, and the Louvre.
After only a few days, Coralie provided me with a detailed itinerary (again, just suggestions) that I could access via the Momaboard site using a secure password. From there, I was able to download the entire itinerary as a PDF, which I saved on my phone for reference during the trip.
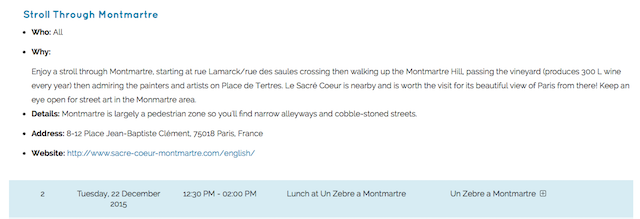
When I clicked on the locations, they expanded, showing me more details. At the bottom, I was given maps and specific walking and metro directions, in addition to generalized tips and helpful local phone numbers. Here’s what an expanded page looked like:
The way Coralie organized the activities per day was extremely useful, because while I knew basically what I wanted to do, I wasn’t sure which attractions to bundle together in each day, based on proximity and walking routes. Perhaps most useful of all, Coralie included restaurant picks for each day, based on both kid-friendliness and location. More than any other feature of the service, I used these restaurant recommendations. Without them, I would have had no idea which dining establishments to try in each area. (By the way, I told Coralie that we planned to eat at casual, budget-friendly restaurants, but I could have asked for upscale recommendations.)
Using the PDF, I added some of my two day itinerary to my TripIt app for easy reference, but also kept both a printed and digital copy of the entire itinerary so I could use it as needed. I found the level of involvement to be just right: I was still in control of my itinerary and could tweak it at will, but I had solid recommendations from a local parent at my fingertips.
So what does it cost?
A Momaboard itinerary of 0-7 days is $50, and an 8-14 day itinerary is $100. If you’ll be spanning multiple cities, you can email for a quote. We only needed advice for two days, but had I known about the service sooner, I would have asked for our full Paris week to be included. The suggestions based on your kids’ ages and interest combined with the step-by-step directions for navigation make a Momaboard itinerary absolutely worth the cost. I’m sure I’ll be using them again when we travel internationally.
To create your own itinerary:
Start at Momaboard.com, and follow the prompts to select the city you’re headed to. Their list of destinations can be found here.
As we disclose whenever applicable, we were offered a Momaboard itinerary free of charge, for the purpose of review. I’m sure I’ll be using them again, on my own dime!