Outdoor adventure road trip: 30 days on an outdoor adventure itinerary

Our absolute favorite type of travel involves an outdoor adventure itinerary, the longer the better! However, even we don’t cherish the idea of roughing it continuously for weeks on-end. While we will be spending a full week (or more) on the PCT with kids soon, we opted to plan the rest of our summer outdoor adventures with a little more comfort in mind. Here’s how we’ll be spending 30 days on an outdoor adventure itinerary in the Northwest US this summer, without channeling our inner Bear Grylls.

OARS

Day 1-5: Out on the water at the edge of Washington State

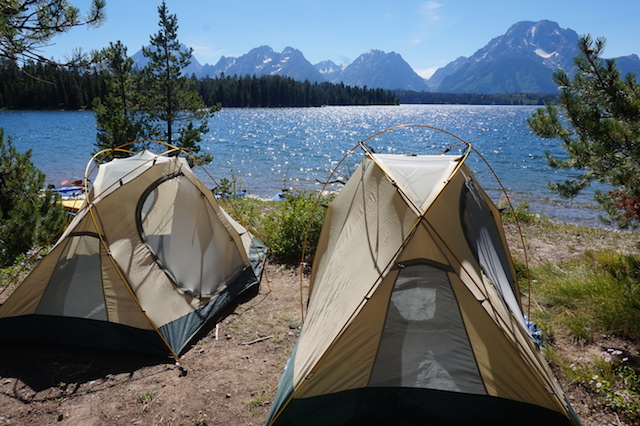
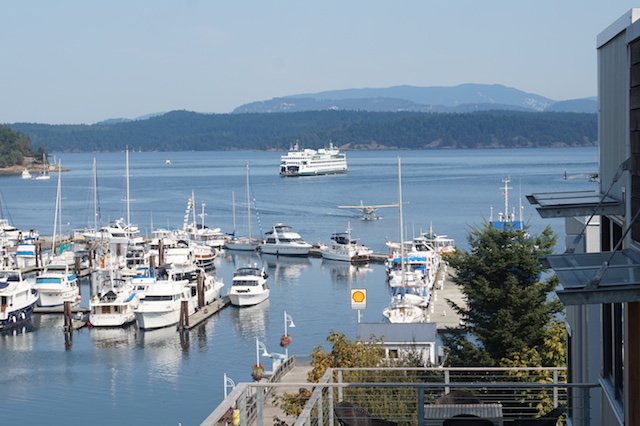
We’ll be starting our month of outdoor adventure on scenic San Juan Island, Washington. The San Juan islands are one of our favorite outdoor playgrounds for families, because they offer unparalleled beauty and nature as well as comfort and relaxation, should you want it. It’s easy to get around the island, exploring beaches, forts, and harbors. We’ll spend a night enjoying in San Juan Island hospitality, then set out for two days and two nights with Crystal Seas, kayaking around the side of the island and in the sound. I won’t lie: on this kayaking camping trip, I am very much hoping to see orcas…wildlife that has eluded me so far during multiple trips in the Pacific Northwest. Fingers crossed!

friday-harbor

Day 6-8: Mt. Rainer National Park

After one more night of R&R after our outdoor kayaking days at Snug Harbor Resort, we’ll say goodbye to the San Juans and drive back onto the mainland for a few days in Mt. Rainer National Park. Since we just camped out a few days on the island, we’ve reserved a cozy cabin outside the park instead (we got ours through HomeAway). While in the park, we have long day hikes planned; while it will be too early in the season for us to tackle the famous Wonderland Trail (we won’t have time, anyway), we’ll be trying a few of these day hikes. The teens and I will be wearing our Oboz hiking shoes, of course. (Curious about this? Check out why I’m an Oboz ambassador.) As the last Pacific Northwest national park we have yet to visit, I can’t wait to explore Rainer!

Day 9-11: Playtime at Suncadia

Our next set of stops on the itinerary will take us east across Washington, then up to British Columbia, but we don’t want to be in a rush, so we’re planning a relaxing stop at Suncadia. Located in Cle Elum, Washington, Suncadia is one of those one-stop outdoor resorts the Pacific NW is so good at creating. We’ll be able to spread out for a few days in a vacation rental, swim in the pools, ride rental bikes along the Suncadia paths (and perhaps embark on a little mountain biking). While at Suncadia, I’m looking forward to a well-deserved bottle of wine, some nice meals, and maybe even a round of golf.

Day 12-13: Rest(ful) stop in Spokane

spokane-riverfront-park

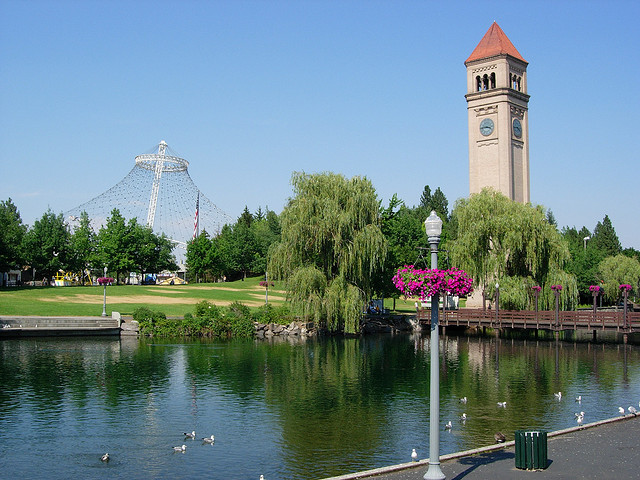
After leaving Suncadia, we’ll have a long drive ahead of us as we travel to Cranbrook, BC. Spokane Washington is a natural stopping point, with a lively and revitalized downtown and plenty of outdoor pursuits. We lived in Spokane for many years (in fact, two of the Pit Stops kids were born here), and I can’t wait to show them beautiful Riverfront Park and the Spokane River. We’ll be staying the night at the Red Lion Hotel at Riverfront Park, where the kids will get an evening of waterslides and pool fun. We’ll actually be returning to this hotel later, to watch Spokane’s well-known Hoopfest basketball tournament.

Day 14-20: Cowboy (and girl) living at Three Bars Ranch

After leaving Spokane, we’ll arrive in Cranbrook, BC, in the heart of the Canadian Rockies. Located between two of our favorite outdoor playgrounds–Glacier National Park and Banff, Alberta–the Three Bars Ranch is an all-inclusive dude ranch perfect for families. After trying our first dude ranch last year at Triangle X Ranch, Wyoming, we’re really excited to repeat a week on horseback. Every dude ranch is different, and we’re looking forward to reporting on how Three Bars differs from our Triangle X experience. Already, I know the boys are looking forward to using the tennis courts and pool at Three Bars! While I know our days will be filled with outdoor adventure, we’ll be sleeping in comfortable lodging every night, and able to soak sore muscles in the hot tub.

Day 21-27: Tackling the Main Salmon with O.A.R.S. Rafting

OARS river rafting

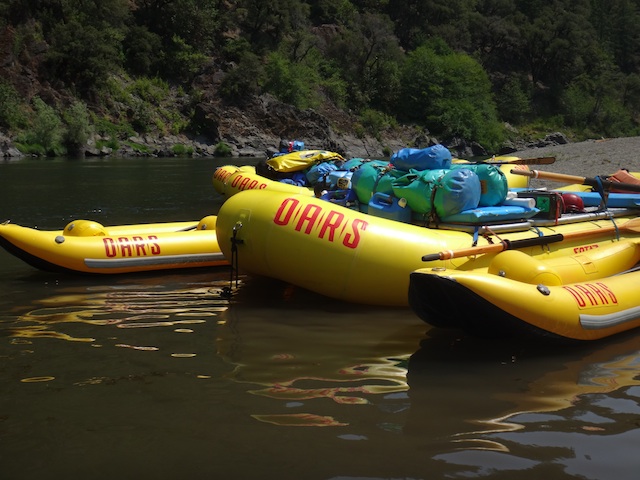
It’s no secret that we absolutely love O.A.R.S., so we’re very excited to announce we’ll be back on the river with this amazing company, this time on the Main Salmon in Idaho. After leaving Three Bars Ranch, we’ll return to Spokane, then head east to lovely McCall, Idaho. After our pre-rafting trip team meeting, we’ll be flying to our put-in spot on the Main Salmon, in the heart of the Frank Church ‘River of No Return’ Wilderness. For six days, we’ll be out in the elements, sleeping in tents and paddling the river, but with the O.A.R.S. team, families still feel pampered, even when on multi-day trips. I know there will be good food, comfy tents, and lots of fun and games.

If you’d love to spend the majority of your summer out-of-doors, but the thought of roughing it for days on end have you hesitating, consider one of the trips listed above…or be crazy like us and do them all! Look for detailed reviews of our experiences with Crystal Seas, Three Bars Ranch, Suncadia, and O.A.R.S. in the months to come!

Guide to flying budget airlines in Europe

If you’re like me, you find those super cheap budget airline ticket prices very tempting. €25 per person from Paris to Rome? €45 to Copenhagen? Sign us up! These prices are not too good to be true; families really can get fares like these on airline tickets in Europe. Fail to read the fine print, however, and you’ll end up paying more. Much, much more. Here’s what you need to know before flying budget airlines in Europe:

budget-airlines

Ryan Air tips:

The mack daddy of budget airlines (and certainly the first I became familiar with), Ryan Air offers insanely low prices. However, know the rules to avoid extra fees:

1. Print boarding passes before your flight. I don’t mean just check in before your flight, make sure you have your confirmation number, or find that booking email on your phone. I mean PRINT YOUR BOARDING PASSES. Otherwise, you face a steep fine for them to print them at the desk. Is this silly? Of course it is.

2. You can (and should) check in with Ryan Air one week before your flight. For us, this meant that during a recent trip to Europe, I checked in for my Ryan Air inter-city flight scheduled for mid-way through our trip before I could even check in for our cross-Atlantic flight. When you check in and print your boarding passes, you’ll be required to enter every person’s birthdate and passport number.

3. When booking, be sure to buy adult tickets for adults and kid tickets for kids (under 16), no matter the difference (or not) in price. If you don’t, you’ll be unable to check in your child when promoted for his or her birth year if you’ve accidentally booked an adult ticket. If for any reason you can’t print your boarding passes, use the online chat option to resolve the problem immediately. I chatted with a Ryan Air representative when I couldn’t print my 16-year-old’s pass and screen-captured the conversation in which he stated a gate agent would print the boarding pass at no charge. They complied at the gate because the conversation was noted in their system and I had the screen capture. Just saying, ‘they said it would be ok’ is not enough.

4.  Ryan Air now allows one carry-on and one personal item, just like in the US, though the officially carry-on size is one inch smaller. We had no problem boarding with 22 inch carry-ons, but we also made sure to queue up right when boarding was called to avoid being one of the last to board. These are the people whose bags were scrutinized.

EasyJet tips:

There’s nothing easy about flying EasyJet, but it’s certainly cheap. Here are a few tips:

1. Note their carry-on restriction of only ONE bag per person. This does not mean a carry-on and a personal item or backpack, but rather only ONE piece of baggage total. Families can check bags if needed, for 25 euros online, 35 euros at the check-in desk, or 45 euros at the gate. Ouch. Here’s what we did: each person in our family had a carry-on and a backpack. We put all our extra shoes and laundry in our largest carry-on, and paid to check it online for 25 euros. We then had just enough room for everyone to stuff their backpack into their carry-on for the flight, with one person carrying only the largest backpack. Whew!

2. Queue up to board early. If the boarding time is listed as 8:30 am, for instance, you’ll see people queuing as early as 8 am. By all means, join them, because like with Ryan Air, those last few to board have their carry on bag size analyzed more carefully. Though I will note that during the busy holiday season, a gate agent came down the line and measured each and every person’s bag. Talk about stress!

3. Bring water and snacks onboard. Nothing will be complimentary onboard. For those who have flown Frontier or Allegiant in the States, you know the drill.

air-travel

General tips and cost traps:

  • Budget airline gates are almost always located at secondary or smaller airports, which in turn are almost always further away than the main airport serving a city. Take this into account: while some of these airports are served by metro trains or shuttles, expect to pay more per person on ground transportation. If you have an early flight, you may even need a private car service or taxi transport.
  • For example, we had a 9 am flight out of Paris’ BVA airport, located further afield than CDG or even ORLY. While 9 am seems like a civilized flight time, we had to leave our accommodations at 6 am to get to the airport by 7:15 am. We used this airport shuttle service which picked us up at our door. Had we used the bus service offered, we would have had to leave earlier…too early to take the metro to the bus line. The takeaway: if you know you’ll be taking public transit to a distant airport, opt for a later flight time because the whole process will take awhile. If you need to fly earlier in the day, budget for a shuttle or car service. We paid $125 on ground transportation in this case. If we’d had a later flight, the bus would have cost us around $75. We still saved more than if we’d flown a more expensive airline, but the ‘hassle-factor’ is strong here.
  • For shorter airport transfers, consider booking a private car service in advance. Often not much more expensive than public transit for a family of 4-5, a car service is far more relaxing and convenient. We used Blacklane from CDG to our Paris accommodations, and liked them so much, we booked them again instead of a taxi when we needed early morning transportation from our accommodations to a tour office.
  • Don’t dismiss a taxi as an option. When we needed to get from our downtown Rome accommodations to FCA, the Da Vinci airport train would have been 14 Euros per person (almost 75 for our family of five) whereas a taxi cost us 60. Negotiate a price with the driver before you get in the cab. (In Rome, only take white taxis…the others are unofficial and illegal.)
  • We love multi-day metro passes in major cities, but these passes often do not include outer zones serving airports. Be prepared to buy one-way fare for each person if you book a later flight on any airline.

Even taking these ground transportation expenses into account, all our budget airline flights cost us less than their standard airline counterparts. By planning far ahead of time, using Ryan Air and EasyJet can absolutely be worth the hassle. Just don’t expect to come out ahead if you’re planning on the fly (no pun intended).

Trip planning with Momaboard Family Trip Planners

I have a confession: I love planning trips. For me, it’s like a puzzle to put together or a painting to outline and fill in…first you choose your family travel destination, then you book airfare and hotel rooms, then finally, you fill in the details of what you’ll do, where you’ll eat, and what you’ll see.

notre-dame

It’s this last part that can be tricky, however, especially in a brand-new-to-you location. For our most recent major trip to Paris, I tried out Momaboard‘s Family Trip Planning Service (FTPS). This online service is wonderfully simple: you select the city of your choice, you read about the local, parent expert for that region (Mombassador), and you click ‘Let Momaboard Plan My Trip’. Don’t worry: they don’t plan the whole thing, and they don’t book things for you. (This fact appeals to a control freak like me.) Instead, you fill out a short questionnaire about your trip (who’s going, your dates, what you like to do), and the Mombassador provides you with a day-to-day itinerary with suggested activities, dining picks, and routes.

How I used the Family Trip Planning Service:

When I discovered Momaboard’s FTPS, I already had several days of my Paris trip pretty well organized. However, two additional days were still blank slates on the calendar. When I filled out my questionnaire, I asked Paris Mombassador Coralie Grassint to focus on these two days, letting her know what I already had in the works for my additional days and what I still wanted to see, such as the Montmartre neighborhood, Notre Dame, and the Louvre.

After only a few days, Coralie provided me with a detailed itinerary (again, just suggestions) that I could access via the Momaboard site using a secure password. From there, I was able to download the entire itinerary as a PDF, which I saved on my phone for reference during the trip.


When I clicked on the locations, they expanded, showing me more details. At the bottom, I was given maps and specific walking and metro directions, in addition to generalized tips and helpful local phone numbers. Here’s what an expanded page looked like:

momaboard

The way Coralie organized the activities per day was extremely useful, because while I knew basically what I wanted to do, I wasn’t sure which attractions to bundle together in each day, based on proximity and walking routes. Perhaps most useful of all, Coralie included restaurant picks for each day, based on both kid-friendliness and location. More than any other feature of the service, I used these restaurant recommendations. Without them, I would have had no idea which dining establishments to try in each area. (By the way, I told Coralie that we planned to eat at casual, budget-friendly restaurants, but I could have asked for upscale recommendations.)

Using the PDF, I added some of my two day itinerary to my TripIt app for easy reference, but also kept both a printed and digital copy of the entire itinerary so I could use it as needed. I found the level of involvement to be just right: I was still in control of my itinerary and could tweak it at will, but I had solid recommendations from a local parent at my fingertips.

So what does it cost?

A Momaboard itinerary of 0-7 days is $50, and an 8-14 day itinerary is $100. If you’ll be spanning multiple cities, you can email for a quote. We only needed advice for two days, but had I known about the service sooner, I would have asked for our full Paris week to be included. The suggestions based on your kids’ ages and interest combined with the step-by-step directions for navigation make a Momaboard itinerary absolutely worth the cost. I’m sure I’ll be using them again when we travel internationally.

To create your own itinerary:

Start at Momaboard.com, and follow the prompts to select the city you’re headed to. Their list of destinations can be found here.

As we disclose whenever applicable, we were offered a Momaboard itinerary free of charge, for the purpose of review. I’m sure I’ll be using them again, on my own dime!


How to plan a Paris itinerary with kids

With its 20 arrondissements connected by a busy metro system, Paris can feel intimating at first. The key to planning a Paris itinerary with kids is to plan your days ahead of time, grouping destinations by proximity and utilizing walking tours to bridge the gaps (figuratively and literally).

paris-itinerary-with-kids

When planning our five days in Paris, I started by making a list of our must-do’s, which included the usual suspects: the Louvre, Eiffel Tower, Sacre Coeur, Notre Dame, and d’Orsay. Of course, at this point in my planning, I knew I was missing a lot. To properly fill out my itinerary, I utilized itinerary planning services that offer local recommendations, walking tours, and dining picks. Once I had ‘B list’ destinations and restaurants in the mix, I organized my days based on where we could walk after only one or two metro rides per day. Finally, I bought every ticket possible ahead of time, including Paris Museum Passes, which allowed us to skip every entrance queue we found (and we found quite a few).

Itinerary services we recommend:

Momaboard:

I’ve known the folks at Momaboard for years, and I was thrilled to learn they’d launched their trip planning program. Momaboard pairs traveling families with local experts with kids of their own. After a brief questionnaire about our trip, the ages of our kids, and our interests and goals, our Momaboard expert put together several days’ worth of itineraries for us, including detailed directions, dining recommendations, and fun facts en route.

How I used this information: certainly, families can use the itineraries ‘out of the box’. They’re ready to go. However, since I already had a very loose sketch of our our days would look, I instead mixed and matched the attractions suggested. For instance, our Momaboard itinerary suggested a morning in Montmartre followed by an afternoon near the Eiffel Tower. I did both, but broke them up into two different days. By far the most useful part of our Momaboard itinerary: the dining recs. We are not foodies, and we have hungry teens to feed, and all the restaurant picks were right on target for us.

notre-dame

TraveLove:

We also tried out Travelove on this trip. Similar to Momaboard in that Travelove uses local itinerary-builders and asks families questions ahead of time, Travelove printed us a multipage, bound guidebook with custom itineraries, walking tours, and maps…lots and lots of useful maps. They also put together a journal/activity book for our ten-year-old that included custom-built questions and activities based on our particular itinerary. He had a lot of fun with it.

By far, the best attribute of our Travelove service was the walking tours suggested. They went point-by-point, with great maps and descriptions. For instance, they put together an excellent walk from the Tuileries to the Lourve, which we actually walked in reverse. Starting at the Lourve after our morning there, we walked along the Seine past the booksellers, Latin Quarter, and Notre Dame, learning things along the way.

Here’s what our itinerary looked like by the time we’d implemented both these services and gathered ideas from other guidebooks. (I recommend Rick Steves.) Our must-dos we started with are highlighted.

louvre-with-kids

Day 1:

Metro from our neighborhood in Montmartre to Musee de Lourve. Morning at the Louvre, followed by a walking tour along the river through the Latin Quarter to Notre Dame. Dinner in the Hotel D’Ville area. Metro back ‘home’ in time to walk to Sacre Coeur at night to watch the Eiffel Tower sparkle.

Day 2:

Metro from our neighborhood to the Eiffel Tower area, where we booked a morning Fat Tire Tour of the Concorde and Invalides area. (See separate post.) Lunch at street vendors under the tower, followed by a stop at a creperie recommended by Momaboard. Timed tickets to go up the Eiffel Tower at sunset.

fat-tire-tours

Day 3:

Metro from our neighborhood to the d’Orsay Museum, followed by a shorter stint in the Rodin courtyard (recommended by a tour guide). Built-in ‘free’ afternoon; we spent it watching the new Star Wars movie followed by a visit to the Paris catacombs.

Day 4:

Toured the area near the Arc d’Triumph and Champs Elysees, including dining recommendations from Momaboard. We concluded our day with a boat tour along the Seine, and explored the seasonal Christmas markets. Almost all of this day was built out based on local recommendations.

Day 5:

Viator tour through Normandy to see D-Day beaches and museums (see separate post).

paris-metro-tips

Getting around:

We used the Paris metro system exclusively. We found it very easy to use once we got our bearings, with good signage and multiple stops. Each day, we hopped on the metro from our Montmartre neighborhood (Chateau Rogue stop) and rode it multiple times per day. To do this, we found multi-day metro passes to be crucial (see below).

A word on the Paris Museum Pass:

The Paris Pass allows families to skip the long lines at museums, and gives parents the freedom to plan shorter museum visits (with the pass, it’s no big deal if you only spend 30 minutes checking out 2-3 major works). Kids are free at almost all museums (18 and under) which is wonderful, but if they don’t have a kids’ Paris Pass, you’ll still need to wait in line to get them a ticket (silly, I know). Because the Paris Pass comes included with a multi-day metro pass, it may be worth it to pay for kids’ passes along with adults, so everyone can skip the lines. Without these passes, we would have waited over an hour to get into the Lourve and Notre Dame each (instead we walked in immediately). Look for the Paris Pass or advanced tickets queue, or ask for it. Note: a few locations indicate they ‘don’t guarantee line skipping’, such as Notre Dame. I asked the guard at the start of the line politely if we needed to wait in line, showing our Paris Pass, and he waved us right in.

General tips:

Seek out the less touristy cafes and food carts, but not at the expense of hunger. After hours in the Lourve, we knew we should go in search of a crepe or baguette, but everyone was hungry and tired and ready to revolt if we walked in the wrong direction. The museum cafe sufficed (and actually had very good takeaway sandwiches).

Give kids spending money: there are so many tempting treats as you walk along the streets in Paris, you’ll be saying ‘no’ every ten minutes if you’re asked to open your wallet that often. Give kids money of their own to spend on tasty but small change treats such as macarons, eclairs, and crepes.

What are your best tips for touring Paris with kids?

Pompeii or Ostia Antica: Which to include as a day trip from Rome

Click on just about any message board or forum about Roman travel, and you’ll see the question, “Should we go to Pompeii or Ostia Antica during our trip to Rome? After debating the question for ourselves last month as we planned our own Roman holiday, I can tell you there’s no easy answer.

pompeii-planning

For those in the early stages of planning, here’s the scoop: Pompeii is, of course, the site of the eruption of Mount Vesuvius, and the archeological remains are those of a civilization caught in time. Ostia Antica is the site of the one-time Roman seaport, which fell out of popularity slowly, as the sea receded (it’s now several miles away). Ostia Antica is also beautifully preserved, and somewhat more accessible in both location and visual layout. The bottom line: do you want to see your ruins with our without a volcano? Here are some questions to ask yourself as you plan:

How much time do you have?

Pompeii is easily a long full day trip from Rome, whereas Ostia Antica is just 30 minutes away. You’ll want to dedicate at least half a day to tour either location (the more the better), so take this into account. Some travelers even make Pompeii an overnight trip. It’s that extensive. To get to Pompeii, you’ll want to take the Frecciarossa line from Termini station in Rome to Napoli Centrale in Naples, then transfer to the local line. Be sure to start your trip early in the day, especially in the off-season, when exhibits at Pompeii closer earlier (as early as 3 pm). Advanced reservations are only needed for the first leg of the train trip. If you opt to rent a car in Italy, you’ll definitely save time and have more flexibility.

What’s your budget for a day trip?

Train tickets to Pompeii ran about $70 per adult and $30 for children in late 2015. Consider this cost in your considerations. Tickets to Ostia Antica are just a few euros, and the train line is included in the greater metro area of Rome. This means that if you have Roma Pass, you’ll travel there for free. Both locations charge entry fees, but they’re minimal. At both locations, it’s possible to either tour on your own or hire a local guide.

What type of preservation do you hope to see?

Pompeii is unique in that it’s literally a moment preserved in time. Ostia Antica was abandoned more slowly and naturally, as the port grew out of service (as the sea receded). Therefore, what you’ll see there is a more generalized ruin that represents many centuries. There’s more to physically see at Ostia Antica, because it’s all above ground and spread out in a city format. At Pompeii, much is still hidden under layers of ash and dirt, but what you can see is magnificent. So the question boils down to: do you want to show your children what a civilization looks like in mid-movement, when struck by a natural disaster, or what many centuries of commerce look like? There’s no wrong answer.

What we decided:

After much debate, we decided to take the plunge and go to Pompeii. Why? Several members of our traveling party were set on it, and when there’s that much enthusiasm for a site, that’s where we head. There’s something vey iconic about seeing Pompeii, and I didn’t want to damper this excitement. Would we have loved Ostia Antica? I have no doubt we would have. As I said before, there’s no wrong answer here.

pompeii

The above post was written in partnership with Alamo Europe. All opinions remain my own.