Summer travel gear pick: Trunki PaddlePak review

Now that’s summer’s underway, you’re getting a good feel for what travel gear is working for you…and what’s not. If you’ve been carting your pool and beach gear around in a standard backpack that A) your kids leave on the pool deck and B) allows wet swimsuits to leak through, leaving wet spots in your car, we have a solution.

puddlepak-review

We recently reviewed the PaddlePak backpack, the latest offering from Trunki, a travel company known for their innovative (and fun!) gear for kids. Trunki believes a good travel product appeals to both little ones and their parents. The PaddlePak is water resistant inside and out, so go ahead and spill a juice box or two, plus stash wet swimsuits and towels inside. Have a water bottle that religiously leaks when you pack it for day camp? Go ahead and put that in there, as well.

We tried out the PaddlePak Clown Fish pack, named Chuckles. Chuckles is a regular-sized PaddlePak (large is also available), and is big enough to fit a swimsuit (or change of clothes), a pair of shoes, and/or a snack and drink. It’s recommended for ages 2 and up, which we appreciate: my three-year-old loved that it fit her well. No more backpack shoulder straps slipping off! The top closes with a roll-top just like a grown-up dry bag, which is a fun (and practical) touch. See what I mean about Trunki products appealing to both parents and kids?

paddlepak

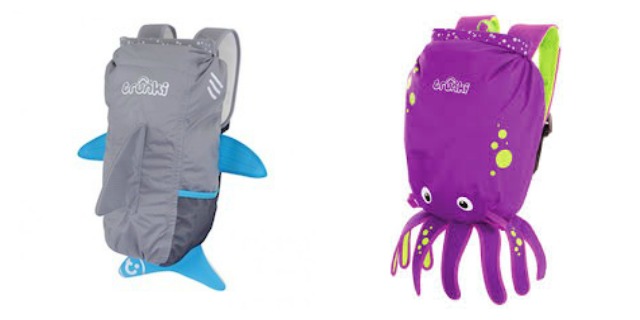
‘Chuckles’ is truly unisex: it appealed equally to my daughter and my five-year-old son. For older kids, I’d recommend one of the large packs, such as the gray shark or black killer whale. The straps are adjustable, and best of all, the regular size is only $25.

We’ve used the pack for short hikes in the woods, because it’s the bag my daughter is enthusiastic to wear, and for trips to the beach and pool. If your child is in swimming lessons or attends a day camp this summer, a PaddlePak would be ideal!

Disclosure: we were given one PaddlePak to try for the purpose of review. Without product review samples, Pit Stops for Kids would be unable to bring information on current travel products to our readers.

Sending your kid on a teen service trip

This July, my 15-year-old son, Nate, will take his first trip out of the country without me. He’ll be flying solo to San Jose, Costa Rica, where he’ll meet up with a small group of like-minded teens and adult leaders to embark upon a two week teen service trip with Adventures Cross Country.

During the trip, Nate will be reporting for Pit Stops for Kids, taking video and recording his experiences. His first-hand impressions of his trip will be published here for other teens and parents to read. In the meantime, I’m experiencing the Adventures Cross Country process for parents: including questions to ask, paper work to fill out, and what to expect from the trip leadership.

adventures-cross-country

All parents feel some trepidation before sending their child on a trip without them, and I’m no exception. Nate won’t know anyone before he goes, will need to make an airline connection and navigate customs on his own, and will be relying on two years of high school Spanish. But I’m not worried about him–just jealous, really!–because I trust in the program and people we’ve selected for this adventure. On the Costa Rica Classic trip, Nate will help build structures in a mountain village, teach Costa Rican school kids English, and explore the country by way of a river rafting expedition and surf camp.

Nate’s trip departs in two months, and I’ve learned the following about selecting a teen service trip and the pre-trip process at Adventures Cross Country:

1. Shop around before you select a program.

Teen service trips are expensive and require a serious investment of time, too. There are many companies offering trips these days, and Adventures Cross Country encourages parents to shop around. What we looked for:

  • Proven safety track record
  • Long history working with kids
  • Well trained staff
  • Meaningful service
  • Good communication with the home office

We absolutely found all of the above with Adventures Cross Country. Before we’d selected which trip to send Nate on, we were able to join a live webinar with the president of Adventures Cross Country, Scott von Eschen, during which each type of trip offered was described in detail. After we’d selected the Costa Rica Classic trip, we were immediately assigned a regional director. Ours is Bridget Reynolds, and we’ve experienced frequent, consistent communication from her. Bridget makes sure we understand (and turn in) all our paperwork, is on-hand for any destination-specific questions, and basically holds our hand. She also orchestrates an additional webinar just for the families of our particular trip. Thank you, Bridget! Adventures Cross Country has one of the best safety records in the business and their leaders are carefully selected and highly trained. Of course, we’ll have first-hand knowledge of the latter after Nate returns.

2. Budget time and money.

We recommend making a plan at least one year in advance of a teen service trip in order to save money and allow your teen to earn money for the experience. Kids are encouraged to fund raise locally; the upside of a program that brings kids together from all parts of the US is that there’s no local competition for fund raising. Kids can also write letters to friends and family members explaining the trip and asking for donations.

The paperwork involved in applying for a service trip isn’t terrifying, but it is extensive. The good news: Adventures Cross Country makes it easy by giving parents (and teens) their own portal, where all paperwork lives. In the portal, you can upload documents, print them, and see which are still due. Here’s what ours looks like:

teen-service-trip

Kids will need to plan ahead to get letters of recommendation and a physical from their doctor. Depending on the destination of the trip, immunizations may be required. What I love about Adventures Cross Country: kids are required to write a short essay (within a form) explaining why they want to go on the trip. This process, sometimes combined with a phone call from an Adventures Cross Country leader, eliminates kids who are only applying because their parents want them to attend.

3. Study up before your child goes!

The preparation process is part of the fun and excitement: Nate and I have had a good time purchasing the clothes he’ll need, selecting what backpack to take, and making sure he has a good camera to use. But just as important are the books on Costa Rica that have been recommended to him by Bridget. During the first few weeks of summer, Nate’s Kindle will be loaded with guides on Costa Rica to add to his excitement and knowledge base.

4. Secure airfare based on your location and your child’s comfort levels.

With Adventures Cross Country, the trip officially starts when kids arrive at the destination airport. However, a chaperoned flight is offered from the US for those who want it. While we would have rather Nate take this accompanied flight, it departs from Miami, and doesn’t make sense for us from the West Coast. Instead, he’ll be flying to San Jose unaccompanied. Nate is well-traveled, and feels comfortable flying solo. However, we downloaded a map of the airports he’ll be in to help orient him before he goes, and we’ll be checking gate information more than usual to help him from afar. He’s never navigated customs in a foreign country on his own, so that gives me pause, but I know it will be part of this great adventure, and will boost his confidence in later travel.

A basic timeline for preparing for an Adventures Cross Country trip:

To use as a general guide, here’s the timeline we’ve experienced from first signing up with Adventures Cross Country to putting Nate (in a few short weeks!) onto the plane:

7-9 months out:

  • Select a program
  • apply
  • ‘meet’ your regional director via email
  • fund raise if you haven’t already
  • first payment will be due

4-6 months out:

  • get all paperwork in
  • order your child’s passport if he or she doesn’t have one
  • remaining payments will be due
  • join a live webinar on your destination
  • secure your child’s airfare

No more than 1 month out:

  • final call for paperwork
  • shop for packing list items
  • read up on the destination

1-2 weeks out:

  • double-check airline connections, prepare teen for any layovers, gate changes, etc
  • pack
  • make sure the passport arrived!

Disclosure: Nate will be attending this trip as a guest of Adventures Cross Country, for the purpose of review. He’ll be writing about his experiences for other kids at Pit Stops for Kids and Trekaroo.com.

Visiting Santa Fe: Georgia O’Keeffe Museum with kids

No trip while visiting Santa Fe would be complete without a stop at the Georgia O’Keeffe Museum with kids. Located downtown, this most-visited museum in New Mexico showcases the work of one of the most influential modernist artists of all time, Georgia O’Keeffe. In the museum, families will see her quintessential works–the minimalist bone and colorful flower paintings associated most with the artist–but also learn about her life, see her early work and sketches, and view temporary exhibits.

okeeffe-museum-santa-fe

During my visit, I was lucky enough to experience a docent-led tour. These tours are available twice daily (at 10:30 am and 2:00 pm during the time of my visit) and are free to visitors. During the tour, which took about 1.5 hours, I gained an overview of O’Keeffe’s career, including her education, early work, and professional life. Details in her paintings were pointed out that I otherwise would have missed. I highly recommend the tour to adults.

The O’Keeffe Museum for kids:

The O’Keeffe is not a stuffy museum only for adults! The team here has taken great measures to make the museum kid-friendly, including activities to help kids engage with the exhibits, opportunities for kids to create their own artwork, and special family hours.

kids-programming-at-okeeffe-museum

  • Discovery Guides for kids: these guides help kids interact with the exhibits (use a packet to find prompts, answer questions, offer opinions).
  • Sketchbooks and pencils for kids: upon entering the museum (by the way, kids are free), children are offered their own sketchbook so they can nurture their own creative juices while exploring the the nine galleries.
  •  Ok to Go: this program is an opportunity for parents to create art with kids on Fridays, Saturdays, and Mondays from 10:30-12:30.
  • Saturday morning Family Program: the gallery opens an hour early for families (9:30-11:30 June 28, July 19, and Aug 2). This allows for kids to enjoy the galleries without having to be too quiet.

When you enter the museum, be sure to stop and watch the short (just over 10 minutes) film on O’Keeffe’s life to give you a good overview and prepare you for the exhibits. Kids will especially be interested in the photographs of O’Keeffe’s New Mexico homes and home life, and an exhibit depicting her studio. Until fall, the current temporary exhibit features side-by-side works from O’Keeffe and Ansel Adams, from their commissioned work in the Hawaiian Islands. It’s fascinating to see their different takes on the same region, given their love of ‘place’ as inspiration. Plan to spend at least one hour in the museum, or more if you plan to catch a docent talk.

Date last visited:

April 2014

Distance from the interstate:

Several minutes from I-25 in Sante Fe.

Admission:

$12 for adults ($6 for New Mexican residents) and FREE for kids 18 and under.

Hours of operation:

Open 10 am to 5 pm daily (and until 7 pm on Fridays).

Directions:

Take exit 282, St. Francis Drive, heading north toward Santa Fe. Follow St. Francis Drive for approximately five miles. Turn right onto Paseo de Peralta, then left at the next light, onto Guadalupe Street. After a few blocks turn right onto Johnson Street. The Museum will be on your left, at 217 Johnson Street.

A day with Santa Fe Walkabouts: tour of Santa Fe

Families looking for an active way to see the New Mexico desert outside of Santa Fe will definitely want to book a tour with popular local tour company Santa Fe Walkabouts. These guys offer more than a tour of Santa Fe: they take you outside the city limits either on foot (for a hiking tour), on bike, or in their unique Pinzauer off-road vehicle.

santa-fe-walkabouts

We decided to try their half-day (3 hour) Pinzauer Tour to La Bajada Mesa, which takes families from downtown Santa Fe to the historic (original) Route 66 in the high desert. This 4×4 adventure starts out calmly enough along dirt roads to the national forest boundary, where the Swiss military vehicle gets the challenge the rocky, steep, and sometimes daunting descent down the La Bajada hill road. Guests ride in the back of the Pinzauer, on cushioned benches with lap seat belts. There are roll bars to hang onto. We were in great hands with our driver (and owner of the tour company) Georges. During the tour, it was clear to me that Georges and his partner Sue love their jobs: they were able to point out many natural and historical sights along the way, while keeping us safe in the vehicle.

Santa-Fe-Walkabouts

The ride in the Pinzauer was certainly windy, but not uncomfortable. I recommend the tour for families with older kids, as there are long periods of sitting and riding. My tweens and teens would get a big kick out of the many steeps grades and rugged terrain navigated. At times, the vehicle listed (safely) over 20-40% in either direction, and took at least 30% grades.

Along the way, we were lucky enough to have a Route 66 expert with us, who was able to point out remains of the original Camino Real trading route and road. We also stopped to see petroglyphs and even spotted a rattlesnake (and then gave it a wide berth).

Keep in mind that bathrooms are not available during the tour, and you’ll want to bring layers to wear during the windy ride. Sunscreen and sunglasses are a must!

camino-real-santa-fe

Tip: for parents who want to dig deeper into area history and culture (and have a sitter at the hotel), we recommend attending a lecture by Southwest Seminars . The team here has rich knowledge of the region, and incredible insight. Lectures are held almost every Monday evening at 6 pm at the Hotel Santa Fe.

Tour cost:

The 3-hour Pinz ride and hike we experienced costs $83/person, very standard for this quality of tour. We were offered bottled water as needed, but bring your own snacks if you’ll want them. You’ll be back in time for lunch.

Contact information:

Santa Fe Walkabouts picked us up at our hotel. Call the company to book a tour and find out where to meet them: 505-216-9161.

As I disclose whenever applicable, Santa Fe Walkabouts hosted me during my tour, for the purpose of review. Without their hospitality, I would not be able to share this experience with my readers.


Reuben H. Fleet Science Center

Located in scenic Balboa park San Diego, the Reuben H. Fleet Science Center offers hands-on science fun in a open-layout, easy-to-navigate facility. The museum is actually smaller than it looks on the outside, and for our family, that was just fine by us. With four kids in tow from age 4-14, we were thankful for the manageable size and open layout of the space. There are two floors: downstairs houses exhibits with live demonstrations, such as the popular drone exhibit, hands-on mind games and machine-based science, plus a great exhibit on the human body. There’s a great ‘Tinkering Lab’ where older kids can create projects of their own as well.

reuben-h-fleet-science-center

Upstairs is the ‘Play City’ for kids five and under, which is a full room of imaginative play pieces such as a grocery store, fire truck, and the like. Older kids can enter if playing and interacting with younger siblings or friends (in our experience). The upstairs section also features an interesting exhibit on the history and physics of the guitar, which older kids especially will enjoy. For an admission add-on, there’s an IMAX theater on-site.

Tip: Combine a visit with a stop at the Natural History Museum, located directly adjacent. Start your day at either museum, and eat a picnic lunch at the fountain between the two as a break. Each museum can be toured in about two hours.

balboa-park

Date last visited:

April 2, 2014

Distance from the interstate:

Balboa Park is an easy drive from I-5 or I-805.

Hours and admission:

The museum is generally open 10 am to 5 pm (but hours alter slightly during school holidays, etc). Admission is only $13 for adults and $11 for children (3-12).

Directions:

The museum is located at 1875 El Prado in Balboa Park, San Diego.

Photo credit: Pit Stops for Kids and Port of San Diego

Luv Surf: Best San Diego vacation home rental

Pay attention, family travelers. I’ve recently discovered a gem of a San Diego vacation home rental option. If you’re not in the San Diego area, you probably haven’t heard of Luv Surf, but this local company should absolutely be on your radar before your next visit to Southern California.

san-diego-vacation-home-rental

Luv Surf is a boutique rental company with half a dozen beach home rentals in the Mission Beach and Mission Bay area of San Diego. Each home is beautiful, in an ideal beach location, and pet and baby friendly. While in a Luv Surf rental, families can enjoy both beach living and city living. Since I hadn’t heard of them before our stay, I admit to being skeptical. As soon as I opened the door to our vacation home rental at 812 San Rafael in Mission Beach, however, I was blown away. Check out our video:

How Luv Surf differs from standard home rental options:

  1. Service and hospitality: Before I’d even arrived at our home rental, I called my rental contact Sheila (as instructed by Luv Surf). I thought I was calling just to get the key code for the front door, but instead, I got so much more: cheerful instruction for how to find the house, where to park, how to make my way to the rooftop deck (more on that later), where to find the SUPs and beach toys (yep!), and what I’d find complimentary in the fridge. In Luv Surf’s words: wine should always be waiting!
  2. Amenities and extras: Many vacation homes are luxurious and beautiful (and 812 San Rafael is both of those things), but rarely do they have everything you need with turn-key readiness. We were advised to poke through our home’s kitchen cupboards before grocery shopping for our stay, which turned out to be great advice: already on-hand were all the small items we thought we’d need to buy, such as ziplock baggies, spices and oils, laundry detergent, soaps and sponges, and even standard over-the-counter medications such as cold medicine. The bathrooms were stocked with shampoos and lotions, and wine and beer were in the fridge.
  3. Recreation items: We were so excited to see two SUPs (paddle boards) waiting for us, as well as boogie boards, a skim board, kids’ life vests, sand toys, beach towels, and cruiser bikes. This is such a savings in recreation rentals! Right away, we were riding bikes along the many bike paths and paddling around Mission Bay!

san-diego-vacation-rental

The 812 San Rafael location:

We stayed at the San Rafael home, which is located just three homes from the water of Mission Bay. On the other side, it’s only one short block from Mission Beach. The location absolutely couldn’t be beat for our family: we were in the area to explore San Diego (all within easy driving or public transit distance) and play on the water. Our school-aged kids could absolutely walk by themselves to the bay or the beach, and we could all ride bikes straight from the front door. There’s ample dining and shopping within walking distance—Mission Beach is a lively, vibrant, and fun community—and the beach is lifeguard-manned. Stop by the Luv Surf retail store just a few blocks away!

mission-beach-san-diego

The home itself is three stories (in addition to a rooftop deck). The first floor houses one bedroom and bathroom plus the garage (with full laundry facilities). The second floor has two bedrooms (one of which is a children’s bedroom with bunk beds) and two bathrooms (one of which has a jacuzzi tub). Each of these bedrooms have their own private deck. On the third floor is the kitchen and living area (with yet another deck), and upstairs from the kitchen is a fabulous rooftop deck with fire pit, outdoor table, and seating.

san-rafael-luv-surf-rental

A few extra ‘extras’ you can expect:

  • BBQ
  • granite counters
  • gourmet kitchen
  • espresso maker
  • flat-screen TVs
  • complimentary WiFi
  • pet amenities such as dog beds and toys
  • high chair and baby-proofing items

Get more tips on what to do in San Diego during your stay!

A word on parking:
The home is located in bustling Mission Beach, which is notorious for having little street parking. The property features two spaces to park: in the single car garage or in the parking space adjacent. The garage and space are located at the back of the house, in a narrow alley. We have a standard-sized minivan, and had a hard time fitting into the garage space (it involves careful navigation). We opted to park in the space instead, which meant that when we had a friend stop by for dinner, she had to find street parking, which was very difficult. This solitary inconvenience would in no way prevent us from renting a Mission Beach home, but it helps to go in aware.

luv-surf-rental

Rates:

All Luv Surf rentals have rates that change seasonally. The San Rafael house ranges from $325-$620 nightly. It is absolutely a luxury home property. Once there, you’ll save on parking, entertainment, dining, and recreation.

Directions:

Mission Beach is only minutes from all points in San Diego. It’s also less than 30 minutes from Legoland and Carlsbad beaches.

As I disclose whenever applicable, we stayed with Luv Surf as guests of the company. Hosted visits make up-to-date reviews on Pit Stops for Kids possible.

An ideal day itinerary using Old Town Trolley Tours

San Diego’s Old Town Trolley Tour is an excellent way to get an overview of the city for first-time or infrequent visitors. The trolley drivers are entertaining and most stops are well-worth your time. However, admission is not cheap, so to make the cost of an Old Town Trolley Tour worth your while, plan to spend the whole day utilizing it.

old-town-trolley

After a day on the trolley as visitors already familiar with San Diego, we designed what we consider the perfect all-day San Diego Old Town Trolley Tour itinerary for families:

The trolley begins running at 9 am (in most seasons) and makes stops every 30 minutes at 11 points of interest (two of which are hotels). The tour takes two hours to complete if you remain on the trolley, but the real beauty of this tour is the hop-on, hop-off feature, so you’ll want to utilize that. However, you certainly don’t need to get off at every stop.

old-town-trolley-tour

Step 1: Unless you’re staying at one of the two hotels on the tour route (Marriott Marquis or Hilton Bayfront), you’ll want to start at Old Town.

Arrive at 9 am at Old Town (the trolley station is located at the edge of Old Town Market on Twiggs). You’ll want to tour Old Town, but wait: the market is much more lively later in the day. Instead, board the trolley and start the tour.

Step 2: Get off at Stop B: San Diego Harbor.

Most families will want to either tour the USS Midway LINK or the Maritime Museum. Either will take about two hours to visit. If you don’t want to spend that much time, it’s still worth hopping off to walk along the harbor front to see the various ships docked: the historic Star of India, the Midway aircraft carrier, an historic submarine, and the odd cruise ship or two.

USS Midway

Step 3: Enjoy the trolley through stops C-H.

Get back on the trolley when you’re done with the harbor, and ride it through the next six stops (this will take approximately 30 minutes). The trolley will take you through the downtown area and give you the history of the founding of the city, plus point out Petco Park, the Gaslamp Quarter, and Horton Plaza. You’ll then head over the Coronado Bridge (with great city views) to Coronado Island.

Step 4: Hop off at Coronado-Orange Avenue.

Don’t get off at the first Coronado stop (on the bay side) but rather wait until the second stop near the ocean side. This is a great place for a causal lunch at any number of sandwich shops, plus a walk on the beach by the famous Hotel Del Coronado. Plan to spend an hour, then re-board the trolley.

old-town-trolley-tour

Step 5: Hop off again at Balboa Park.

The very next stop is Balboa Park, home of San Diego’s many kid-friendly museums and the San Diego Zoo. We recommend saving the zoo for a separate visit (as it deserves a full day) but definitely get off the trolley to walk the grounds of the park. The botanical garden is free, as are several smaller museums. If you want to spend a few hours (which we recommend), our top picks are the Museum of Man, San Diego Natural History Museum, or Reuben H. Fleet Science Museum.

Step 6: Stay on through Little Italy.

Unless you need a meal (the dining in Little Italy is stellar), stay on the trolley through Little Italy after Balboa Park and take it to Old Town. The nice thing about hopping on and off: each driver has different tidbits to share, making the tour entertaining no matter how many drivers you get.

Step 7: Disembark at Old Town.

You’ll want to visit Old Town Marketplace and the Old Town State Historic Park for at least two hours, after which Old Town is a great place to get an authentic Mexican meal for dinner. Our favorite sites in Old Town include the visitor center and historic exhibits in the Old Town State Historic Park square, the marketplace with lively colors and (mostly) cheap souvenirs, and the many snacks and old fashioned candle, soap, and candy shops. Look for the lady making tortillas!

This tour itinerary should take you from 9 am to past 6 pm. Of course, adjust according to your interests, but we found this to be a great use of the trolley (plus you skip the hassle of parking at all these locations).

old-town-san-diego

Trolley tickets:

Trolley tickets are $39 for adults and $18 for kids, making it a serious investment for your day. All the more reason to plan the perfect day’s itinerary to utilize it! Get trolley tickets online or at the Old Town or harbor kiosks.

As I disclose whenever applicable, we experienced the trolley as guests of the company, for the purpose of review. Without hosted activities, we wouldn’t be able to bring reviews to Pit Stops for Kids.

Wet ’n Wild Palm Springs with kids

In our experience Wet ’n Wild operations are largely the same wherever you go, but certainly, Palm Springs is an ideal location for one. Open in spring and summer, Wet ’n Wild Palm Springs includes all you could ask for in an outdoor water park and a sure-fire activity when in Palm Springs with kids: plenty of slides and tube rides, daredevil slides with sharp drops, small slides for the younger set, a large water clubhouse/play area, and most importantly for my kids: a lazy river and wave pool.

wet-n-wild-palm-springs

Note: Coming soon, Wet ’n Wild is adding a Wave Runner surf simulator. We saw construction ongoing during our visit, and wished very much it was already in operation!

Given Palm Springs hot, dry climate, it came as no surprise to me that this Wet ’n Wild location offered more than the usual cabanas with shade and misters (available for an extra rental charge) and ample shaded seating and lounger areas (free of charge). Still, I’d arrive early in the day to snag a good spot. We found the park to be generally clean, and the staff to be friendly and attentive to water safety.

wet-n-wild-palm-springs

Distance from the interstate:

An easy drive from I-10.

Admission and hours of operation:

General admission at the time of our visit was $36.99 for adults and $26.99 for kids 3-11. Hours vary significantly by season and day, so be sure to check the website for update information. Parking is $14 per day.

Dining:

Plenty of snack and quick-dining options abound in the park, including my kids’ favorite: Dippin’ Dots. Outside food is allowed at designated picnic areas just outside the main gate (get your hand stamped before exiting). We brought water bottles and small snacks into the park (our bags were checked and these items permitted).

wet-n-wild-palm-springs

Tip: Bring your own towels and sunglasses, or you’ll pay dearly for these items in the park.

Directions:

From Palm Drive, take Gene Autry Trail. Continue south for approximately 5 miles.
Wet ‘n’ Wild is on left just past Mesquite Ave.
As I disclose whenever applicable, we experienced Wet ’n Wild as guests of the park, for the purpose of review. Without compensated admission, many pit stop reviews would not be possible.

Day trip from Dublin: Driving through the Wicklow Mountains Ireland

Dublin, Ireland is a great city to explore by foot and public transit, but there’s so much beauty and history in the Irish countryside, families will definitely want to head out of the city limits at some point. We took the following day trip from Dublin a few years ago without kids, but due to the relatively short driving distances between stops (at least by Western US standards), this itinerary is ideal with kids, too.

wicklow-mountains

It’s easy to rent a car for one day from Dublin. In fact, you can book with a company you already know and trust from the US, like Enterprise. We chose to rent (or hire) our car from Dublin Airport for as low as 32 Euros; the key to low fare is to always hire and return the car to and from the same location. We took the express bus from our lodging in Dublin to the airport (always a quick and direct route), rented our car around 7 am from the kiosk in the main arrivals terminal, and returned it around 7 pm. We were back ‘home’ at our Dublin hotel by 9 pm. Here’s where to head:

1. Wicklow Mountains to Enniskerry

Leave Dublin and head south into the Wicklow Mountains towards the village of Enniskerry (about 3o minutes from the city). This will be your first glimpse of Irish country life. Stop for a snack or coffee, or head through to nearby Powerscourt Estate and Gardens, with a waterfall and gardens to walk through.

wicklow-mountains-sally-gap

2. Sally Gap to Glendalough

From Enniskerry, drive into Wicklow Mountains National Park to Sally Gap, stopping en route for plenty of photos and a short walk or two. The Wicklow Mountains are stark, windswept, and stunning in their simple beauty, and walking through them, it’s very easy to imagine ancient life in Ireland. Stop in Glendalough, one of the most picturesque glens of County Wicklow and home to sixth-century St Kevin’s Monastery. The national park has a visitor center in Glendalough, and families can find nine well-marked walking trails. The walks vary from short half hour hikes to ‘hill walks’ of half a day. Maps of the walks are displayed at the visitor center; all the walks start at the National Park Information Office near the Upper Lake.

3. Glendalough to Kilkenny

From Glenalough, head down to Kilkenny, one of the longer stretches of drive, but still very scenic. Kilkenny is worth the drive: Kilkenny is home to numerous historical buildings and landmarks, including stunning Kilkenny Castle. Take the tour inside, walk the grounds, and then grab food in any of the village pubs. If time allows, a visit to medieval St. Canice’s Cathedral and Round Tower is fascinating, and another great example of period architecture for kids. Consider eating a meal at Blaa Blaa Blaa sandwiches before departing.

kilkenny-castle

4. Return to Dublin via N7

The entire driving loop will take visitors under four hours, but with stops and meals, plan for at least 12 (a full day).  Take your time: we made several road-side stops on the route back, including to an ancient cemetery, a local pub, and another short hike to a vista. By all means, if time allows, make this a two day trip with a stop overnight in Kilkenny.

Point-by-point Google map to plan your trip:

wicklow-mountains-day-trip

This post was done in partnership with Enterprise Rent-a-Car but they had no input on the content. All opinions are my own.

Photo credit: Sean MacEntee / Ivan Walsh

Yosemite lodging pick: Yosemite Lodge at the Falls

If your family vacation will center around the valley floor area of Yosemite National Park, you can’t beat the location and convenience of Yosemite Lodge at the Falls. Located steps from Yosemite Village in the heart of the park, Yosemite Lodge is directly adjacent to Yosemite Falls (yes, you can see them out your door) and a shuttle stop away from everything else on the valley floor. Read Yosemite National Park touring tips and advice.

yosemite-lodge-at-the-falls

Yosemite National Park has plenty of lodging options, obviously, including Curry Village tent cabins, campsites, and upscale accommodations at historic Ahwahnee. Just outside the park, Tenaya Lodge is a good pick. All have their pros and cons, but for location and convenience, Yosemite Lodge can’t be beat. This is no secret, which makes reservations at Yosemite Lodge hard to come by. Here’s what you need to know:

  • the lodge takes reservations a year in advance
  • the 4 family rooms are hardest to come by (try for one of 27 family bunk rooms instead)
  • packages including breakfast or select tours are available seasonally
  • the site availability calendar is kept up-to-date: keep dates flexible to ensure a reservation

yosemite-lodge-building

Yosemite Lodge is run by the park’s main concessionaire, Delaware North, who does a fantastic job offering park programming such as nature walks, ranger-led talks, and naturalist-run activities. I recommend the Night Prowl with a Delaware North naturalist for school-aged kids and teens (which departs directly from the lodge). Yosemite Lodge also offers valley floor tours.

Rooms:

yosemite-lodge-room

Yosemite Lodge’s standard rooms feature two queen beds or one king, a separate bathroom area and private patio or balcony. There’s a small fridge in each room, and complementary wifi, but for coffee and other food preparation, you’ll have to venture out. Family rooms feature bunk beds, living space, and kitchen tables, which helps with space, but I definitely wish they also included kitchenettes for simple meal preparation.

Dining:

yosemite-lodge-food-court

Everything families need in the dining department is right there at Yosemite Lodge: the Food Court is open for all meals, and serves counter-service style items a la carte or by platter or meal. I recommend a B&B package to save some cash on breakfasts. At the time of my visit, a standard adult breakfast cost approximately $10 and up.

In addition to the Food Court, the Mountain Room is open daily for dinner (even in the off-season) and offers upscale dining against a backdrop of mountain scenery thanks to the floor-to-ceiling windows. I recommend budgeting for at least one relaxed dinner in Mountain House (and definitely get the pastry-wrapped salmon entree!).

yosemite-lodge-at-the-falls

Activities on-site:

In addition to ranger and naturalist-led programming held on-site, Yosemite Lodge offers an outdoor swimming pool in summer, bike rentals seasonally as weather permits, and ice-skating at nearby Curry Village. The Tours and Activities desk can help you with anything else you might want to do in the area.

yosemite-village

A five-minute walk takes you to Little Yosemite Falls, and the trail head for Upper Yosemite Falls. A ten-minute walk takes you to Yosemite Village and the visitors center and museum. The park-wide shuttle services stops right at your door.

Rates:

Rates vary widely by season. Check rates here for up-to-date information.

yosemite-falls

As I disclose whenever applicable, my stay at Yosemite Lodge was hosted, for the purpose of review. I hope my knowledge of the property can help other families plan a perfect Yosemite vacation!